2 Layer Face Mask with Filter Pocket

I am constantly trying the think of new ways to improve face masks. I am going to be wearing these every day to work like many of you and I hope to create masks that are both comfortable and functional.

After making the 3 layer mask with a filter pocket I thought I would give this one a try. I was very pleased with the results.

3img_1925

This mask uses my regular contoured face mask pattern, but cut at the pocket line, so it is a bit more narrow. This actually is nice because it’s not as hot since it doesn’t extend as far toward the ears.

1img_1931

The channel for the nose bridge wire is optional, but is simply a row of stitches attaching the lining to the exterior fabric.

1img_1952

I didn’t use any interfacing on mine, and I really like how lightweight it is, even with the filter.

1img_1947

I also tried strap adjusters with this mask. They are handy and are quite easy to use. I like that they are small and not bulky.

Supplies:

8 x 10 inches Main Cotton Fabric (Dimensions work for all sizes. You may need less fabric for smaller sizes)

8 x 10 inches Lining Cotton Fabric

Straps (I used 1/8 inch elastic)

Filter (Optional)

Nose Bridge Wire (Optional)

Strap Adjusters (Optional)

Free Pattern:

Contour Face Mask Pattern with Filter Pocket by learncreatesew

DETAILED INSTRUCTIONS:

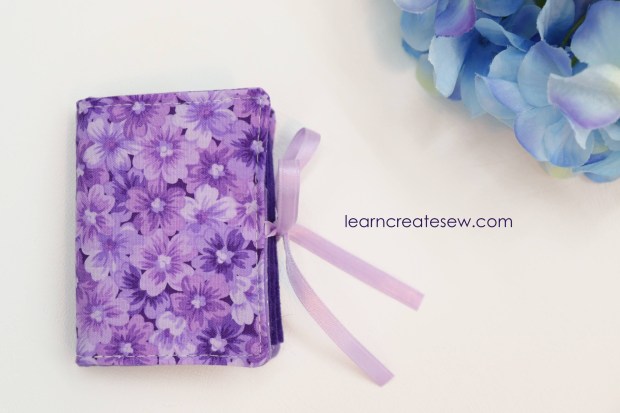
FACE MASK KEY CHAIN CASE:

The face mask key chain case is always a fun project 🙂 It’s a little tight fitting the nose bridge wire, and you have to fold the filter, but I like to store my mask in the case when it’s not in use, without the filter and wire. I find it keeps my masks nice and organized.

Learn to Sew Lesson 2: Rice Bags

The second Learn to Sew lesson continues to focus on hand-sewing. Most of the time when we are hand sewing we are not working with felt or yarn. As a result, it is very helpful to practice your stitch size and placement, as well as working with regular all-purpose thread.

3img_1443

Recommended prep before this lesson:

Lesson Category:

  • Hand Stitching

Lesson Topics:

  • Careful Cutting
  • Identifying the Right Side of the Fabric
  • Using a Seam Allowance
  • Double Threading a Needle
  • Tying a knot
  • Sewing a Back Stitch
  • Blanket Stitch Applique
  • Stitch Size & Placement
  • Slip Stitch

Whether you have been sewing for a while or are picking up a needle and thread for the first time, rice bags are always a fun project 🙂

1img_1469

For this project, you get to add decoration of your choice to really personalize your project! Decorative stitching can add dimension to any project and is a great skill to have even when sewing complex projects. These also make great gifts when you are finished.

4img_1462

Supplies:

5.5 x 11 inches of Cotton Fabric

Scrap Felt

1 Cup of Rice

Coordinating All-Purpose Thread

Here is the free pattern:

Owl and Sloth Rice Bag Patterns by learncreatesew

LESSON:

Flat Zipper Pouch

This is a classic zipper pouch! It is a great project to start sewing zippers if you want to learn. These make great pencil bags. They are also fun to fill and give as gifts.

1img_0415

This is also a fun project to use decorative stitching on. I love adding a cute stitch to the contrasting bottom panel.

2img_0355

This is a flat pouch, kind of like a pencil pouch. So, it does not stand up on its own.

1img_0386

That said, it still holds quite a bit!

1img_0387

You can easily adjust the size of the rectangles to make the bag as bid or small as you would like.

The bag I made has final dimensions of approximately 6 x 9 inches.

Supplies

Two 7 x 10 inch rectangles for the lining fabric

Two 7 x 10 inch rectangles of lightweight fusible interfacing (optional)

Two 4.5 x 10 inch rectangles for the outside TOP fabric

Two 3.5 x 10 inch rectangles for the outside BOTTOM fabric

One 11 inch Zipper

Here is the free pattern if you would like it.

Flat Zipper Pouch Pattern by learncreatesew

DETAILED INSTRUCTIONS:

QUICK OVERVIEW:

Needle Book

This is a cute fun little project. It is super fast to make, and handy to have around the sewing room, especially if you do a lot of hand sewing. These also make really cute gifts.

1img_0209

It doesn’t take much fabric, so it is a good way to use up your scrap fabric!

1img_0286

I love the little pockets. You can store thread, needle threaders, needle grips, and even tiny travel scissors.

This book measures approximately 3.5 x 2.625 inches when finished.

Supplies:

Scrap Cotton Fabric (or 1/4 yard)

Felt

12 – 14 inches of narrow ribbon (I used 1/4 inch wide)

Featherweight Fusible Interfacing (optional)

Cotton Batting (optional)

Here is the free pattern:

Needle Book Pattern by learncreatesew

DETAILED INSTRUCTIONS:

QUICK OVERVIEW:

Fun Size Backpack

I absolutely LOVE this backpack! This is my favorite size backpack to take to amusement parks. At 9 x 11 inches it is smaller than regular sized backpacks, but large enough to hold a lot. I’ve stuffed this thing with water bottle, snacks, extra sweatshirt, wallet, keys, notebook, first aid kit, and more. However, it’s not so big that it gets too heavy, as regular sized backpacks can.

It even fits in a lot of the ride compartments at Disneyland. That is it’s best feature in my book!

3img_0172

It is constructed with a layer of cotton overlaying duck canvas. I used bias tape to bind the seams.

1img_0090

I’ve made six or seven of these bags using a variety of fabrics and interfacing. I’ve used vinyl, suede, plain canvas, fusible fleece, and even satin. The cotton covered canvas, with woven interfacing is my favorite combination! It is nice to work with, strong without being bulky, and holds its shape very well.

3img_0056

I love the pocket in front. While it takes patience to construct it’s not too difficult once you know the method.

1img_0039

This bag also has adjustable straps depending on how you like to wear your backpack.

Supplies Needed:

1/2 yd 41” wide Main Cotton Fabric
42 inches 19” wide Interfacing (I used Pellon SF101)
3/8 yd 58” wide Canvas (I used duck canvas from JoAnn)
One 20 inch zipper
One 13 inch zipper

1 pkg Extra Wide Double Fold Bias Tape
75 inches 1” wide Strapping
Two 1” wide Rectangle Rings
Two 1” wide Tri-glide adjusters
One “Handmade” Metal Tag (Optional)

This project takes a bit of time and patience when working with multiple pieces, zippers, curves, and interfacings. Difficulty 7/10.

Approximate Finished Dimensions (inches):

Main Compartment 9 x 3.75 x 11, Pocket 7 x 1.5 x 5.75

DETAILED INSTRUCTIONS: PART 1: Fabric, Zippers, Pocket

DETAILED INSTRUCTIONS: Part 2: COMING SOON!

Free Pattern:

Please note, this pattern has been updated. There was an error in the first version of the pattern, the bottom pocket gusset piece should measure 12.75 inches in length. Sorry for the inconvenience!

Super Simple Tote Bag

This project is quick and easy, a simple tote bag that is a great project for new sewers. It is also really nice for gifts!

This bag is back to basics with a simple lining and fabric handle.

1img_9431

This project doesn’t take long to make and can be easily adjusted for other sizes.

1img_9450

The corners of the bag are boxed to provide space at the bottom, but it can also be made flat.

1img_9380

This project is super simple and is a 1/10 in difficulty.

DETAILED INSTRUCTIONS:

QUICK OVERVIEW:

Scrunchies with Removable Ties

One of the projects that my students request to make most frequently is scrunchies! They are quick, easy, and don’t take a lot of fabric.

1img_873

You can use a variety of fabrics to make scrunchies, so it’s a great way to use the fabric in your scrap bin. Scrunchies are great in cotton, flannel, velvet, satin, and more.

1mvi_8725

You can mix and match removable ties to add a bit of flare to your scrunchies.

1img_8846

Scrunchies only take a few minutes to make and even beginning sewers can be successful with this project.

1img_8870

You can make the scrunchies without the ties if you prefer.

Here is the pattern for the removable ties!

Scrunchie Tie Pattern by learncreatesew

DETAILED INSTRUCTIONS:

QUICK OVERVIEW:

Rag Doll Part 2 – Adding the Hair

Here is the second installment of my rag doll tutorial. This was by far one of the most difficult videos I have made. Not because the process is hard, but because there are so many different styles of hair that can be selected and so many methods with which it can be applied.

I spent a lot of time deciding what I would share because I didn’t want anyone to feel limited in the approach they had to use. Not to mention, there was a whole lot of yarn that did not want to cooperate and stay in place while filming! Apparently it does not take direction well.

1img_7279

I really enjoyed using multi-colored hair on this doll. Mixing and matching colors strand by strand was a lot of fun, and I really like the look it created.

On the above doll the majority if her hair is the dark purple color. The wefts added at the bottom were all the same color, however at the top, I added just a bit of contrast.

I hope that you can take the methods used in this video and expand upon them to make something all your own 🙂

1img_7489

I love the drastically different looks you can create by altering hair styles and color.

Here is my rag doll pattern in case you missed it in the last post. The doll is just over 14 inches tall when completed.

Rag Doll Pattern by learncreatesew

ADDING THE HAIR DETAILED INSTRUCTIONS: