
I’m so excited to share this project with you today! It has been quite a while since my last post and I am happy to finally share with you a fun holiday project.
Life and work caught up with me the last few weeks and it took the excitement of Christmas projects to motivate me to get back to sewing!
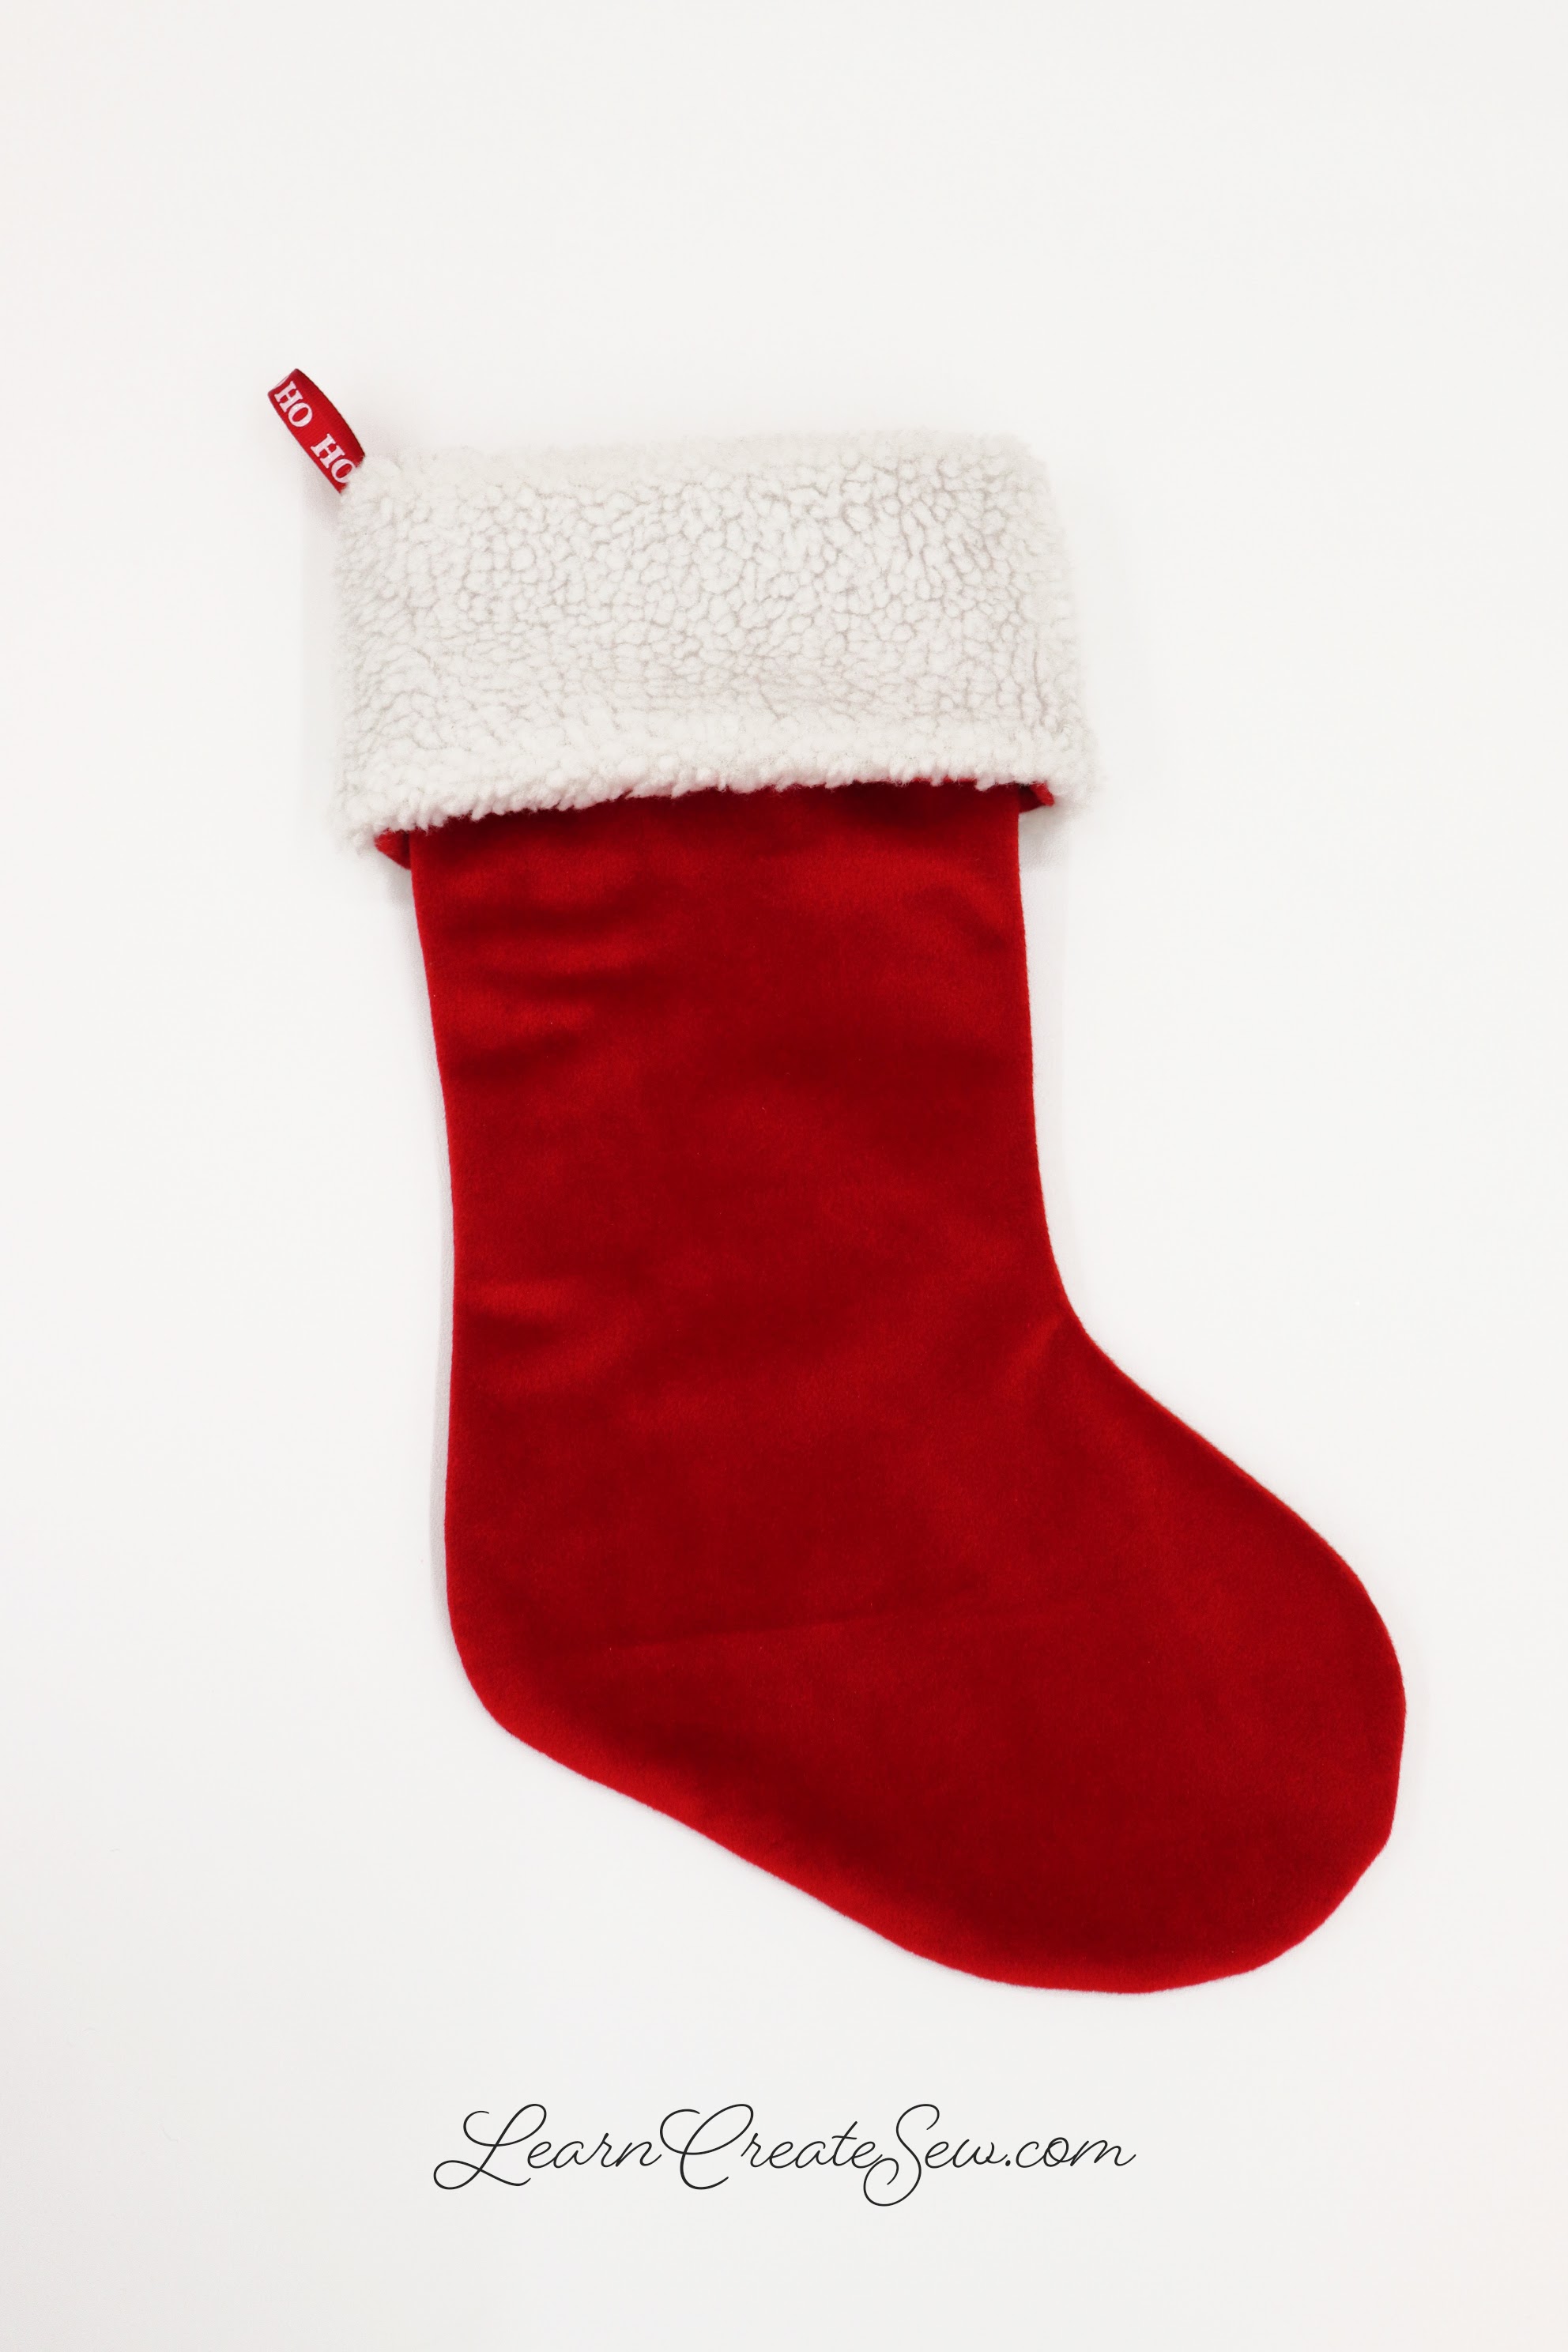
This is a quick easy Christmas Stocking.

It is fully lined and has a fold over cuff!

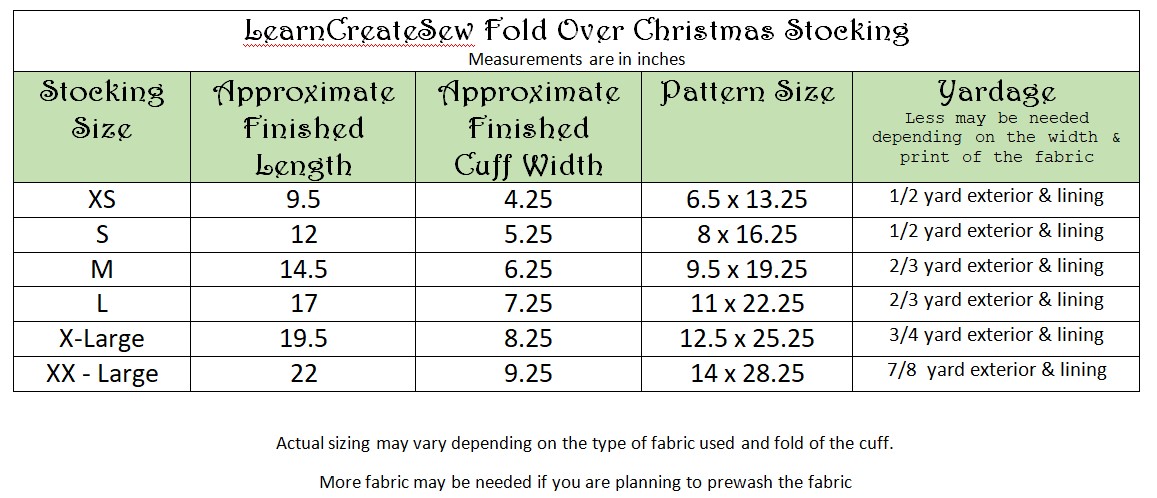
The free pattern is available in several sizes.

The pattern works great with flannel, fleece, and cotton fabrics.

If you enjoy this tutorial keep an eye out for future posts in which I’ll show you a few quick alterations to the same pattern.

SUPPLIES:
- Coordinating Thread
- Ribbon (4 – 8 inches)
- 7/8 yard (or less) Fabric for the Outside of the Stocking (Cotton, Flannel, or Fleece)
- 7/8 yard (or less) Fabric for the Lining and Cuff (Cotton, Flannel, or Fleece)
- The project works best when the lining and outside fabrics are the same type of fabric.
- The amount of fabric needed varies a lot depending on the size of the stocking you make and the direction you need to cut your fabric.
- I recommend reviewing the pattern sizes in the table below if you would like more specific measurements.
- Remember you will need two lining pieces and two outside pieces.
A bit more on yardage:
For instance, if I want to make a size small I know I need two pieces of outside fabric that will fit the pattern (which is 8 by 16.25 inches). If the direction of my fabric doesn’t matter 1/4 yard would work…but if I have to follow the selvage, for example on fabrics with words or a specific direction, I may need 1/2 yard.
Enjoy!
FREE PATTERNS:
Some viewers have had a difficult time downloading piece E from the 2XL pattern. If so, here is another version of just that piece.
Here are updated versions of the larger size patterns:
QUICK OVERVIEW:
DETAILED VIDEO INSTRUCTION:
ADDING EMBELLISHMENTS – The Burlap Stocking
ALTERING THE PATTERN – Contrasting Cuff

Great pattern, instructions and tutorial.
Thank you! 🙂
Am I supposed to print two of each pattern pieces? I see the dotted line Is for the lining fabric measurements but it goes inside and outside the solid line for main fabric.. not sure how to cut both sizes from one paper🙃
Hello! Yes, you print the pattern out twice. On one of the patterns cut on the solid line, this will be your pattern for the main fabric. On the other cut on the dotted line, this will be your pattern for the lining. Thanks for your question!
Thanks for the tutorial and free pattern. I’m looking forward to making the stocking. I have subscribed to your channel and notification bell.. looking forward to more tutorials
Brenda
You are very welcome! Thank you for sharing 🙂
How do you do a seam on the “bottom” of your cuff when doing a contrasting cuff? I’m guessing that isn’t needed on the sherpa you used, but I’m looking at doing this with several different types of fabric and need to make sure it’s as clean as absolutely possible. I’m thinking maybe inverted at the bottom of the cuff before attaching to the lining?
Hi! Thank you for your question. Just to clarify, do you need the “inside” or hidden section of the cuff (attached to the main fabric) to be the same fabric as well as the “outside” visible part of the cuff (attached to the lining)? If so, yes, I would split the main and lining pieces as shown in the video and then redraft the cuff pattern and do an inverted section at the bottom of the lining (eliminating the seam allowance in the middle). I would make the side that attaches to the main fabric just a smidge shorter than the outside, to accommodate for turning. After making quite a few I have noticed that different fabrics can act very differently. I found it a bit difficult to predict. I might try testing different types of fabric out on a small size sock to see how it goes 🙂 Hope you enjoy making the stockings!
Do you have a file with the 2xl stocking that has a rounded toe (part E)? When I download this file it has a strange angled point instead of a round toe.
Thank you for letting me know! I have uploaded a different version of just that piece. I hope it works for you! It is at the bottom of the stocking pattern list on the Christmas Stocking page.
Thanks for this tutorial and patterns!
You are very welcome!
Thank you so much for this fabulous Christmas stocking pattern and tutorial. I’ve just made 25 of them for my class and they look great!
I made them slightly smaller than your smallest pattern and they’re perfect to pop a little gift inside for my kiddos 😀
What a great idea 🙂
I am so glad they worked well for you! That sounds adorable!
Good morning. Thank you for the tutorial. I’m very excited to make 12 stockings for my Bunco group! Unfortunately, I, too, am finding a problem with the bottom two pattern pieces printing out angular rather than round (for the toe and heel). I’m using a large size pattern. I’ve tried to download and print a couple of different ways but with the same angular result. Any suggestions?
Thank you for letting me know! I can’t seem to identify the problem, but I tried uploading updated versions of the pdf files. Hopefully, that will help! The new patterns are posted in the pattern list on the Christmas Stocking page. Thanks!
You are so thoughtful! Thank you so much for such a gracious and prompt reply! I look forward to making stockings!!!
Would you please do a video showing using different material from the liner for the cuff.
Thank you for your request! I will be sure to add it to my to-do list as time permits 🙂
This is a great pattern, with easy to follow instructions. I made three large stockings out of minky, and appliquéd names on the contrasting cuffs. Due to my imperfect cutting and sewing, they’re not all exactly the same size, but I’m very happy with how they turned out. Thanks so much for the free patterns and instructions!
You are very welcome! I am so glad they worked for you!
Thanks so much for sharing these tutorials and patterns! I printed off a Large pattern a month ago, but forgot to print the second one for the lining. I tried last night but the Large is now a different size! And is much smaller than I wanted. Maybe it’s my end here. Anyway, I will try again to see if it was just a glitch. Thanks again for these lovely festive sock patterns!
Oh dear! I apologize! It was my print settings! Soooo sorry!! All is good now!
I’m so glad you were able to get it to print correctly 🙂 Happy Sewing!
Kind of a silly question. I’m a quilter and so used to 1/4in seams. Can I get away with a 1/4in seam or will it distort the project?
Thanks for your question! I’ve never tried it, but I don’t think it would be a problem. As long as the same seam allowance is used throughout I think it would work just fine 🙂
Thank you. I’ll give it a whirl. Great instructions and patterns, by the way.
I love this pattern! Thank you so much!
You are very welcome 🙂
I’m very new to sewing and wanted to make stockings for me, my husband, and my son. I was looking at the medium pattern, however I’m not sure how much fabric I need to get of both the lining and the outside. I need to make 3 total. Can you help me out? Thank you so much for the informative tutorial!
Thank you for your question! If I was making 3 medium stockings I would purchase 1 1/4 yards (45 inches) of fabric for the exterior of the stockings and 1 1/4 yards of fabric for the lining of the stockings. I hope it works well for you! I apologize I didn’t see this sooner 🙂
Hello,
I really like your pattern and video! So helpful. I made a medium stocking and turned out great. I have read through the comment and I noticed some others have had issues with the bigger patterns. I know you updated them but I printed out the large and the “C” piece is off and maybe the “E” piece too. Just letting you know. Thank you for putting together the patterns and videos!
Thank you for letting me know! I will be sure to look into it 🙂
I’m new at sewing. I’ve made S size stocking on up to 2x. They all come together well except the L pattern. The liner material seems to be too wide, as theres a part where theatrical folds over on itself after I sew the two pieces together. Also, there’s excess material in the toe area. I did use picking shears around the foot part. I don’t k ow what else to do. Can you help me?
Thank you for your question! I am sorry to hear that the Large did not turn out. It sounds as if the lining piece may be too big all around. One solution could be to sew the lining section again using a larger seam allowance. If the top of the lining matches the main fabric well, start sewing where they meet and then gradually increase the size of the seam allowance. For example, you could try using a 5/8 instead of a 3/8 all of the way around. If the toe area is still too large you could make it even larger there. Then, once the new seam is in place, trim off the excess seam allowance. The only other solution I can think of would be to unpick the stocking and cut the lining pieces smaller, and that is quite a bit of work. I hope this helps! I wish you the best!
Will the XXL allow a newborn or preemie to fit into the stocking? Thinking of making these for the NICU ..
Thank you for your question! What a sweet idea 🙂 The XXL stocking is approximately 22 inches in length and 18.5 inches in circumference. I would check with the NICU to see what they allow and recommend for their precious little ones as they often have specific requirements and special needs.
I love this pattern making them for our Christmas boxes for Christmas at church.
Mabel Alexander
Thank you for sharing! I am so glad you enjoy the pattern 🙂
For cotton fabric, would you recommend a light iron on batting to make the stockings a bit fuller? I am new to sewing and appreciate your fantastic, instructional video and patterns.
Thank you for your question! If you are looking for a little bit of a fuller look and are planning to use regular cotton fabric. I would try fusible fleece on the back of your exterior pieces. I haven’t tried it myself, but have used it frequently on bags and such. I expect it would create a very nice finish and fullness, especially for larger stockings.
thank you!
Thank you for your tutorials they are extremely well made, thought out and presented! I am excited to make my first ever stocking!
I do have a question, how would I incorporate wadding to the stocking with a quilted appearance?
My plan is to make a large stocking based off of your template with a fur contrasting cuff.
I look forward to hearing from you. Thank you 🙂
Thank you for your question! That will be so cute! What I would do is quilt a piece of batting/wadding to your exterior cotton fabric prior to cutting out the pattern pieces. First, cut a rectangle of cotton fabric and a rectangle of cotton batting the same size, large enough to accommodate two of the stocking pattern pieces, plus a little extra space just in case. Then I would sew those two pieces together in whatever quilting pattern you prefer. Then, use the new quilted fabric to cut out the stocking pieces. The lining would not be quilted, but it would allow you to have that great quilted look on the outside. I would test it out on scrap fabric first just in case. Not all machines appreciate batting on the bottom, so you may have to play with the best way to quilt the two layers together. Hope this helps! Happy Sewing!
Hello. Thank you for your stocking with contrasting cuff pattern and video. After completing all the steps, I turned over the contrasting cuff and the lining piece pulled up and no longer sat at the bottom of the stocking. I am having difficulty in understanding where I went wrong. Is it correct that only the lining piece should be cut on the “cuff line fold with the addition of 3/8″? I understand that the cuff piece gets an addition of 3/8” also.
I hope you can help. I would like to make four stockings with contrasting cuffs. Thank you very much.
Rosie
Thank you for your question! It sounds like you have it right. The main exterior fabric is cut using the full pattern and then only the lining is split at the cuff line to separate the cuff from the lining. The lining is cut slightly smaller than the exterior stocking to prevent bunching at the toe and heel but depending on the fabric choice and thickness as well as the size of the stocking, that difference could be more noticeable than with others. If this seems to be causing a problem with the way your stocking is sitting, I might try increasing the pattern extension for the lining or cuff a bit. Keep the seam allowance 3/8, but add a bit more length to account for the fabric lifted at the fold. For example, if you add 5/8 to the lining at the split, instead of 3/8, it should drop down1/4 inch more inside. Hope this helps! Wish you the best and Happy Sewing!
I love your YouTube videos and this website! Thank you so much for all of these resources, I will soon search to see if you have a web shop or other ways that I can offer reciprocal support, but for now this nice comment will have to do.
I am a middle-aged man that inherited a fancy tabletop Singer sewing machine from my grandmother and I am attempting to learn how to sew. My immediate goal is to sew my wife a Christmas Stocking that is similar to the one my other grandmother knitted for me.
I was very lucky to find Learn Create Sew’s SewEverMore-Christmas Stocking project patterns and videos and I cannot wait to try to sew together a complimentary reproduction of my knitted stocking.
Thank you again for all that you continue to do 🙂 If I am successful with learning how to work this machine and correctly create and produce products, that I’ve sewn together myself…it will likely be a direct result of the guidance while studying at YouTube University’s Learn Create Sew videos produced by SewEverMore.
😉
Whether I end up successful or not, I am truly grateful for these resources to am attempting to develop a solid foundation for how to sew using my new-to-me fancy tabletop sewing machine.
Thanks so much @SewEverMore &
CHEERS! With much love,
-Matthew (aka DuffBrew)
Brew Bloggers Dot Net
https://brewbloggers.net/
Thank you for your comment! I hope you will find my videos and patterns helpful as you learn to sew. I wish you the best in your endeavors and hope you enjoy working on the stocking 🙂 Happy Sewing!
If my cuff fabric is directional, I would want to trace the pattern on the cuff fabric upside down, correct? That way when it’s folded out for the cuff, the pattern on the cuff would be upright? Just want to make sure I’m thinking through this correctly before starting. 🙂
Thanks for your question! Sounds like you have it right. The shorter edge of the cuff will be the top, and the longer edge will be the bottom. After it is attached to the lining, it will appear upside down until it is folded.
Hello,
I believe that I am following your video instructions exactly; but I am not getting a good result, so I am doing something wrong. I would greatly appreciate it if you could help me.
I printed out your large Contrasting Cuff Christmas Stocking pattern and I’m using premium felt for the stocking, premium felt for the cuff and 100% cotton for the lining.
When I got to the last step of pushing the lining down into the finished stocking, the lining was short over 3″. I made another stocking with the addition of 5/8″ to the lining at the split and it is still too short over 3″.
After sewing all pieces together, the main stocking measures 20″ long including my 3/8″ seams, the lining measures 18″ long including seams and the cuff measures 4 1/4″ including seams. I did add the 3/8″ to the bottom of the cuff as instructed. Can you see a problem with these measurements?
Also, the second time I printed out the large pattern for a friend a few days later it was smaller than the large pattern I printed out for myself. Both patterns were marked to be large. If you are aware of two large pattern sizes being different in size, I would like to find your pattern for the “larger” large size to print out again.
Please help. Thank you very much.
Rosie
Oh goodness, yes it definitely sounds like something is going wrong. I was imagining the lining being a ¼ or ½ inch too small. Thank you for clarifying.
I would double-check the sizing of the printed pattern pieces. It is possible that the printer is scaling the pattern. When you print the pdf check that it is printed at actual size, default, or 100%. Some programs will automatically scale to fit the paper or automatically use whatever the last print setting was, which can unfortunately alter the sizing.
The large pattern in its entirety measured from top to bottom when printed and taped together should measure approximately 22 ⅛ inches.
Since the lining and main patterns use the same base pattern their sizes should be very similar. Here are the details if it helps.
When cut, the Lining pattern (prior to the cuff adjustment) should measure approximately 21 ⅞ inches in height. This is also the height the lining and the cuff should be after they are joined together (measured inside out including seam allowance). The cuff pattern piece should be roughly 4 ¾ inches tall and the lining roughly 17 ¾ inches tall.
The Main pattern when printed and taped together should measure approximately 21 ⅜ inches in height. The fabric should measure the same when cut and sewn (measured inside out including seam allowance.)
I would measure the paper pattern pieces before cutting out the fabric, and then I would also measure the main fabric and lining (including the attached cuff) prior to joining the two together at the top.
Wish I could be there to help you! I wish you the best!
Is the black stocking in the pictures the Large, XL or XXL size? The YouTube tutorial was very easy to follow. I will be making these for my family this year!
Thank you for your question! The black stocking is an XL.
Why are comments turned off on your video? I’m sorry if people were mean… I liked your video and your pattern! Thank you!
Thank you so much for your question! I appreciate your support 🙂 The comments are turned off because my time is quite limited, and I wouldn’t be able to respond to a large volume in a timely manner. I hope to be able to open up comments in the future. I am so glad you enjoyed the video and pattern. Thank you!
Wondering about your thoughts on this idea for securing the cuffs. Rather than seeing around the stocking at the fold line, I was thinking of doing “stitch in the ditch” on both side seams just the length of the cuff.
By the way zi have watched loads of tutorials on a wide variety of projects and just wanted to commend you on the clear and precise directions you provide. I am very excited to make these stockings for the entire family. I plans to use stiff interfacing on quilting cotton, just to provide a bit more structure without the padding of fusible fleece.
Thanks again!
Thank you for sharing! I am so glad the directions are clear and I hope you enjoy the pattern! In regards to stitching in the ditch to secure the cuff, I think that would work well for most fabrics, especially in the smaller sizes. I think that would work great for quilting cotton. However, there may be some fabrics, such as velvets, that may be too soft to stay upright without horizontal stitches to keep them in place. In those cases it may be necessary to stitch on the fold line. I hope this is helpful! Happy Sewing 🙂
My thoughts exactly. Great for quilting cottons but for other fabrics, stitching at the fold would be best. Thanks again for your pattern and tutorial!
Thank you so much for this easy pattern and tutorial!! I searched and searched for a stocking pattern and yours was by far the easiest to understand!! I completed 8 stockings yesterday!
You are very welcome! Thank you for sharing! I am so glad you enjoyed the pattern and tutorial 🙂
LOVE the size of patterns! If you can figure out how to get it to work with layers on adobe acrobat you definitely have your self a winner. We wouldn’t have to reprint everything just the part we need.
Thank you for your suggestion! I have used layers with Illustrator, but never acrobat. I will look into that 🙂
I made my first stocking today, it turned out pretty nice. I’m curious though, why is the liner slightly longer on the top then the outer piece? I tried to sew it with the seam being even on top, but then it puckered .
Thank you for your question! It has been a while since I made the pattern, but if I recall I believe I made the lining longer to accommodate the fold at the top. Since the lining is on the outside and the main fabric is on the inside when the cuff is turned, making the main fabric bit shorter prevents the excess fabric from bunching up underneath the fold. Hope this helps 🙂
Thank you souch for this pattern. I made them for my class, personalised them using my cricut and filled them for their Christmas gifts. I enjoyed making them so much, I made lots more for all my friends children. Your tutorial is brilliant and easy to follow. Thanks again and Merry Christmas 🎅
Thank you so much for sharing! I am glad you enjoyed the pattern!
Hello!
I watched your video on how to make a Christmas stocking. I’d like to know where’d you got the red “Ho Ho Ho” ribbon that you used for the hanging loop. Thank you!
Hello! I purchased that ribbon at JoAnn fabrics a few years ago. It was clearanced at the end of the holiday season. I’m not sure if they still carry it.
Just saw your site for the Christmas Stocking. I just finished a medium one for my great nephew just born. I was looking for an easy pattern to follow and yours was it. Thank you so much.
You are very welcome! Thank you for sharing!
Hello!
I’m a newbie and I’m wanting to make this in a size XXL. How much fabric total do I need to make one?
Hello! 7/8 of a yard of two different colors, would be enough to make the XXL stocking. Hope this helps! Have fun sewing 🙂
do you have printed directions that I can download?
Hello! Unfortunately, no. I do not have printable directions for the Christmas Stocking. Sorry about that.
Hi!
I was just wondering if we can sell any of the stockings we make using your pattern? Thank you.
Thank you for your question! Yes, you are welcome to sell any stockings you make from the pattern as long as they are not mass produced. If you could list learncreatesew.com as your source it would be very appreciated. Thank you!
Thank you!
Evening!
I’m excited to try these out in a cotton flannel! In your opinion how much fabric would be required for two medium and two large stockings? I’m in a really rural area and will need to travel to purchase fabric. Thanks so much for your advice and wonderful instructions for these stockings!
Hello! I am glad you are looking forward to this project 🙂 The amount of fabric needed can vary greatly depending on the direction of the print and width of the fabric. Assuming the fabric is 40″ wide, I would estimate you could need up to 1.5 – 2 yards for the lining/cuff fabric and 1.5 – 2 yards for the exterior fabric. The 1.5 yards, depending on the width, may require some creative or staggered placement of the pattern for cutting the large stockings, but 2 yards should give you plenty of room and you may even have enough extra fabric to make an additional medium stocking. I tend to estimate high as there is always something I can make with the scraps. However, if you want a more precise yardage to avoid waste and unnecessary cost, I would recommend printing out the pattern and bringing it with you to the store so you can lay it on top the chosen fabric to find the exact amount needed prior to having them cutting it for you. Hope this is helpful!
hi, I love the patterns tho I just realised I have already made a mistake I put the fabric together with the inside on the inside and the right side away from each other. Does it matter?
Hello! If you placed it with the right sides out when sewing, your seam allowances may be visible on the outside of the stocking. Sometimes this is done on purpose to create a more rustic look, especially if you fray the seams. So, it may be okay if you like the look, although I haven’t tried it. Also, depending on which seam is flipped your ribbon loop could be facing the wrong way. If you want to start over, but don’t want to unpick your stitching, you can try trimming the stocking using a smaller size pattern so you can start fresh. Good luck and happy sewing!
Hi There! I am planning on making these over the weekend. Is there instruction to make this without the cuff?
Hello! I don’t have instructions for making the stocking without the cuff, but it would be very similar. What I would do is trim off the top of the pattern pieces about 1/2 inch above the Cuff Fold Line, lower the Tab Placement for the ribbon about 1/2 an inch or so, so it is below the Cuff Fold Line. Then construct the stocking as indicated in the video. When finished, if the top of the stocking looks puffy or the lining isn’t staying inside as it should, I may also stitch around the top edge (and maybe press depending on the fabric). I hope this helps! Happy Sewing 🙂
when cutting out the lining, to you place the right sides together? when I pulled my stocking through for the last step, the toe was on the opposite side
Yes, you will cut and sew with right sides together. When you sew the lining initially, it will be right sides together, then you will flip it right sides out so that the right side of the lining is touching the right side of the exterior fabric when you place it inside the stocking to sew the top. Hope this helps! Happy Sewing 🙂
Wish I could leave a photo! Thanks for the video and pattern. I quilted 3 inch strips together and sherpa for the fold over. The stockings are beautiful!
Thank you for sharing! Your stockings sound lovely 🙂
I cannot find the detail instructions. Are they still available?
Hello!
Thank you for your question. If you go to the main site menu and select Free Patterns – Holiday & Seasonal- Christmas Stocking and scroll down to the video section at the bottom the Detailed Instruction tutorial is the second video. Unfortunately, written instructions are not available at this time. Hope the project works for you! Happy Holidays 🙂
Thanks for sharing your patterns and expertise. The stocking is a lovely shape (not just a straight-sided “boot” as some patterns are. Your videos are all great, and I love your adaptations for fur cuff, etc. I admire your patience in answering all the questions people have.
Thank you! I hope you enjoy making the stockings 🙂
hi! Love this pattern! I got adventurous and tried to add embroidered names to the cuff… When I put my pieces together the name turned out backwards and upside down. Can you give me a pointer of how to piece together the lining once I have the name embroidered and where I should embroider the name?
thank you so much!
Hello! I have never tried embroidery, but that would be super cute! I would following the instructional video located on the stocking page for altering the pattern and adding a contrasting cuff. Then you could embroider the cuff piece. When embroidering, I would turn the cuff piece upside down so that the longest straight edge (the one that was the top of the pattern) is on the bottom. That will be your baseline for the embroider and the line that the bottom of your words should follow. When you attach the cuff piece to the rest of the lining it will look like the word is upside down, but once you attach it to the main fabric and flip it it should be in the correct position. ( The words you embroider would be upside down from those you see printed on the paper pattern.) To double check to make sure you have it going the right way sometimes what I will do is write the word on a piece of paper or scrap fabric and pin it to a stocking I already have and then fold it so I can see where it should go and what it will do when folded over. You could also do this with the full lining piece if you don’t want to have a separate piece for the cuff. Hope this helps! Happy Holidays 🙂
So, grabbed this pattern when Mom suggested we make our own stockings. I got my fabric, old jeans, and cut out the front pieces. Then Mom popped her head in and reminded me of seam allowance.
Having not seen the video since I thought it was pretty straightforward, and having not seen on the template anything about seam allowance, I assumed that the border given was the lines for sewing. So I decided to make a patchwork version out of two different pairs of pants…and used the cuts I made.
Now, here I am, looking at the video to find out how you’re supposed to put it all together, and I see that the pattern IS considering seam allowance. I have made many squares, and have put together one half of the front pieces, and here I am, seeing I didn’t need to. At least now we’ll have bigger stockings.
PLEASE edit the patterns to point out that the outlines are not the final size. Also, PLEASE consider having TEXT instructions and not just video–many people, such as my mother (whose WordPress account I’m using for this), find that easier to follow than video.
Thank you for the feedback.
Thank you for sharing your stocking patterns and YouTube tutorials with us. The tutorials are easy to follow and make the process flow easily.
You are very welcome!
Hi,
I’m not sure if you’re still monitoring this page, but I have a question about adding batting to the stocking. I don’t want to quilt it, I think the stocking hangs better with batting. How would you suggest I do this?
Thank You,
BB
Hello,
Thanks for your question. I have never used batting on this project, so I am not sure the best technique. I would try placing the main fabric on top of the batting and treating them together as one piece, kind of like how you would use interfacing. However, depending on the batting, the seams could be too bulky. The seams may need to be graded, trimming the seam allowance of the batting down after sewing. I’m not sure if it will work, but that would be what I would attempt. I wish you the best! I hope it all turns out for you 🙂