
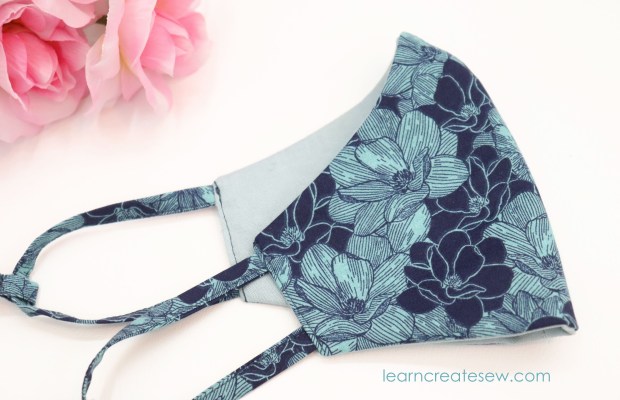
I really like the look of contoured face masks! Making a pattern has been on my to-do list for several weeks, and I am happy to share it with you today!

With many of the patterns I tried, I found that the mask would move around a lot when I spoke. This drove me crazy, and as I result this project sat at the bottom of my stack for a while. But this week I found new motivation and tested it out again.

Lo and behold I made a pattern that works! This mask has a great shape, but allows me to talk without worrying about having to adjust my mask every two seconds. Since you are supposed to touch your mask as little as possible, I think this is a big plus!


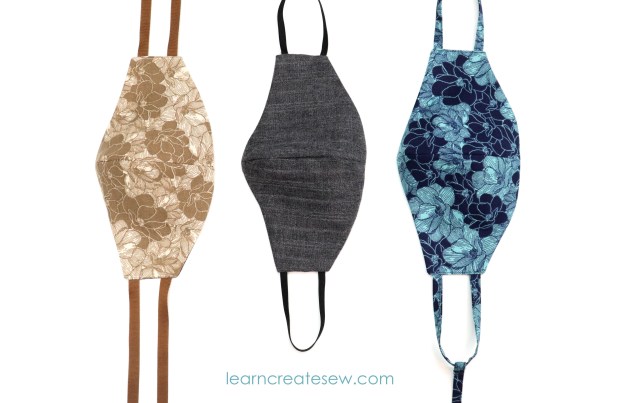
This pattern makes two different styles of mask. Masks with either fixed ties or masks with adjustable ties.
FIXED TIES & ELASTIC
I have to say, I definitely prefer fixed ties. Maybe it’s because I have made so many masks that I know exactly what size works for me, and since the ties don’t move I feel like I always get a really good fit.

Even with fixed ties you still have plenty of options for the ties that work best for you. There is the single tie back mask, elastic, or the basic two tie option. Also, with fixed ties you use less elastic, so if you have a limit supply, that is something to consider.
ADJUSTABLE TIES & ELASTIC
While fixed ties are my favorite, there is no question that there are definite advantages to using adjustable ties. If you are planning to use elastic, and you want to donate the mask to a charity, friend, or relative, adjustable elastic is great as the wearer can adapt it to their preference and size.

You can also make a single fabric tie that is adjustable.

While this option looks great, I found this to be one of my least favorite options, as I had a hard time tying the mask to fit just right, but I know a lot of people prefer this design.


You can also use two basic ties on the side to tie behind your head or ears. If you are planning to tie behind your ears, I would definitely choose a thin ribbon.
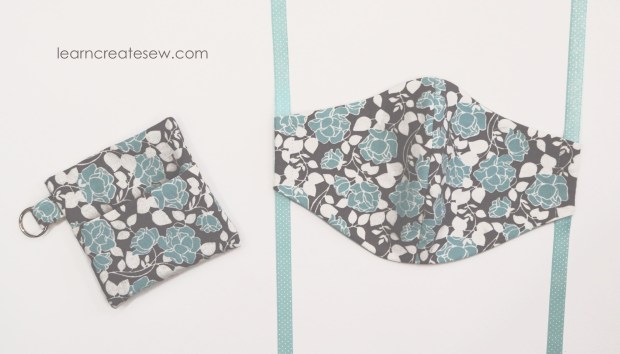
All of the masks fit in my key chain carrying cases, which I always love 🙂
MY FAVORITES
My overall winner for comfort and fit was the single tie back mask. I don’t know what it is, but it is just comfortable! I never have to worry if it is going to fit right.
For convenience you can’t beat the either of the elastic masks. They are still really comfortable if you make the elastic the appropriate size, and so easy to use. There is nothing better if you need something that is a quick on and off. Plus you don’t have to worry about the long ties when storing or washing.


Supplies:
These dimensions will work for all sizes. Actual size needed may be smaller if you make a smaller size.
About 8 x 15 inches Main Cotton Fabric
About 8 x 15 inches Lining Fabric (I used cotton)
About 8 x 15 inches Interfacing (Optional – I used Pellon SF101 for some of the masks. The black and gray mask has no interfacing.)
Elastic, Ribbon, or Fabric for Ties.
Here is the free pattern:
Contoured Face Mask Pattern by learncreatesew
FIXED TIES – DETAILED INSTRUCTIONS:
ADJUSTABLE TIES – DETAILED INSTRUCTIONS:
FACE MASK CASE:

What are the measurements for face mask key chain?
The face mask key chain measures approximately 3.5 inches wide and 3.75 inches tall. Thanks! 🙂
What is the length of the elastic, please?
Thanks for your question! I used 6.5 inches of elastic for my size Medium mask, but that could vary depending on size.
Thank you
How do you determine the correct size for best fit?
Thank you for your question! Determining the best size can be tricky. What worked best for me was to start with the most common size and then test both straps and fit before completing the mask. For women/teens I would probably start with a size medium, for men a size large, and for preteens a size small. After that, I would cut out just two pieces from scrap fabric and sew the center seam. I would then hold it up to my face to see how it fits. Keep in mind, there will be a 1/4 inch seam allowance all of the way around. If the fit looks good, I would continue to complete sewing the mask. If not, I would switch to a different size and repeat. Once the mask size has been chosen I would also test the fit of the ties or elastic. I would clip them in place and try the mask on again before sewing and adjust the length as needed.
I wish there was an easier way, but each individual is so unique it is hard to predict the perfect size for everyone.
I wish you the best. Happy sewing!
You’ve done a terrific job on your website! I discovered you on YouTube … I’m teaching myself to sew. Thanks for your instructions and it’s wonderful that you’ve provided the patterns for people to use. Blessings!
You are very welcome!
Very nice tutorial. I have one question…., ..was I supposed to print the pattern to scale, or enlarge it? Your completed masks seem larger than the “large” I printed and sewed?
Thank you.
Thank you for your question! I print the pattern at actual or original size. I do not enlarge the pattern and I do not scale to fit. Unfortunately, some browsers default to scale to fit, and this can shrink the pattern. The Large size contoured face mask pattern should measure approximately 5.75 inches from left to right (ear to center front) and 6.5 inches from top to bottom when printed. Hope this helps!