I mentioned in a previous post that I recently started crocheting again, and it has been a blast! I am loving it. One of the things I really wanted to start crocheting was amigurumi (crocheted stuffed animals).
If you’ve ever seen any amigurumi patterns you know that the foundation for most of them is the Magic Circle.
I was determined. I thought to myself…I’ve crocheted before. I’ve got some skills. It won’t be that hard. HA! I had more confidence than I should have. I tried, tried, and tried again with no luck. Either my magic circle wasn’t right, or I didn’t end up with the right amount of stitches, after dozens of tries it was driving me CRAZY! I watched video after video until finally I figured it out. But it took what felt like FOREVER to figure out why my magic circle didn’t look like all of the perfect ones I saw in the videos and what to do about it.
As a result, I decided to take a short break from my usual sewing videos (which I will get back to shortly, don’t worry!) to help all of those poor struggling souls who are having just as hard of a time with the magic circle as I did.
I hope as I share what I have learned it will make conquering the magic circle just a little easier for you.
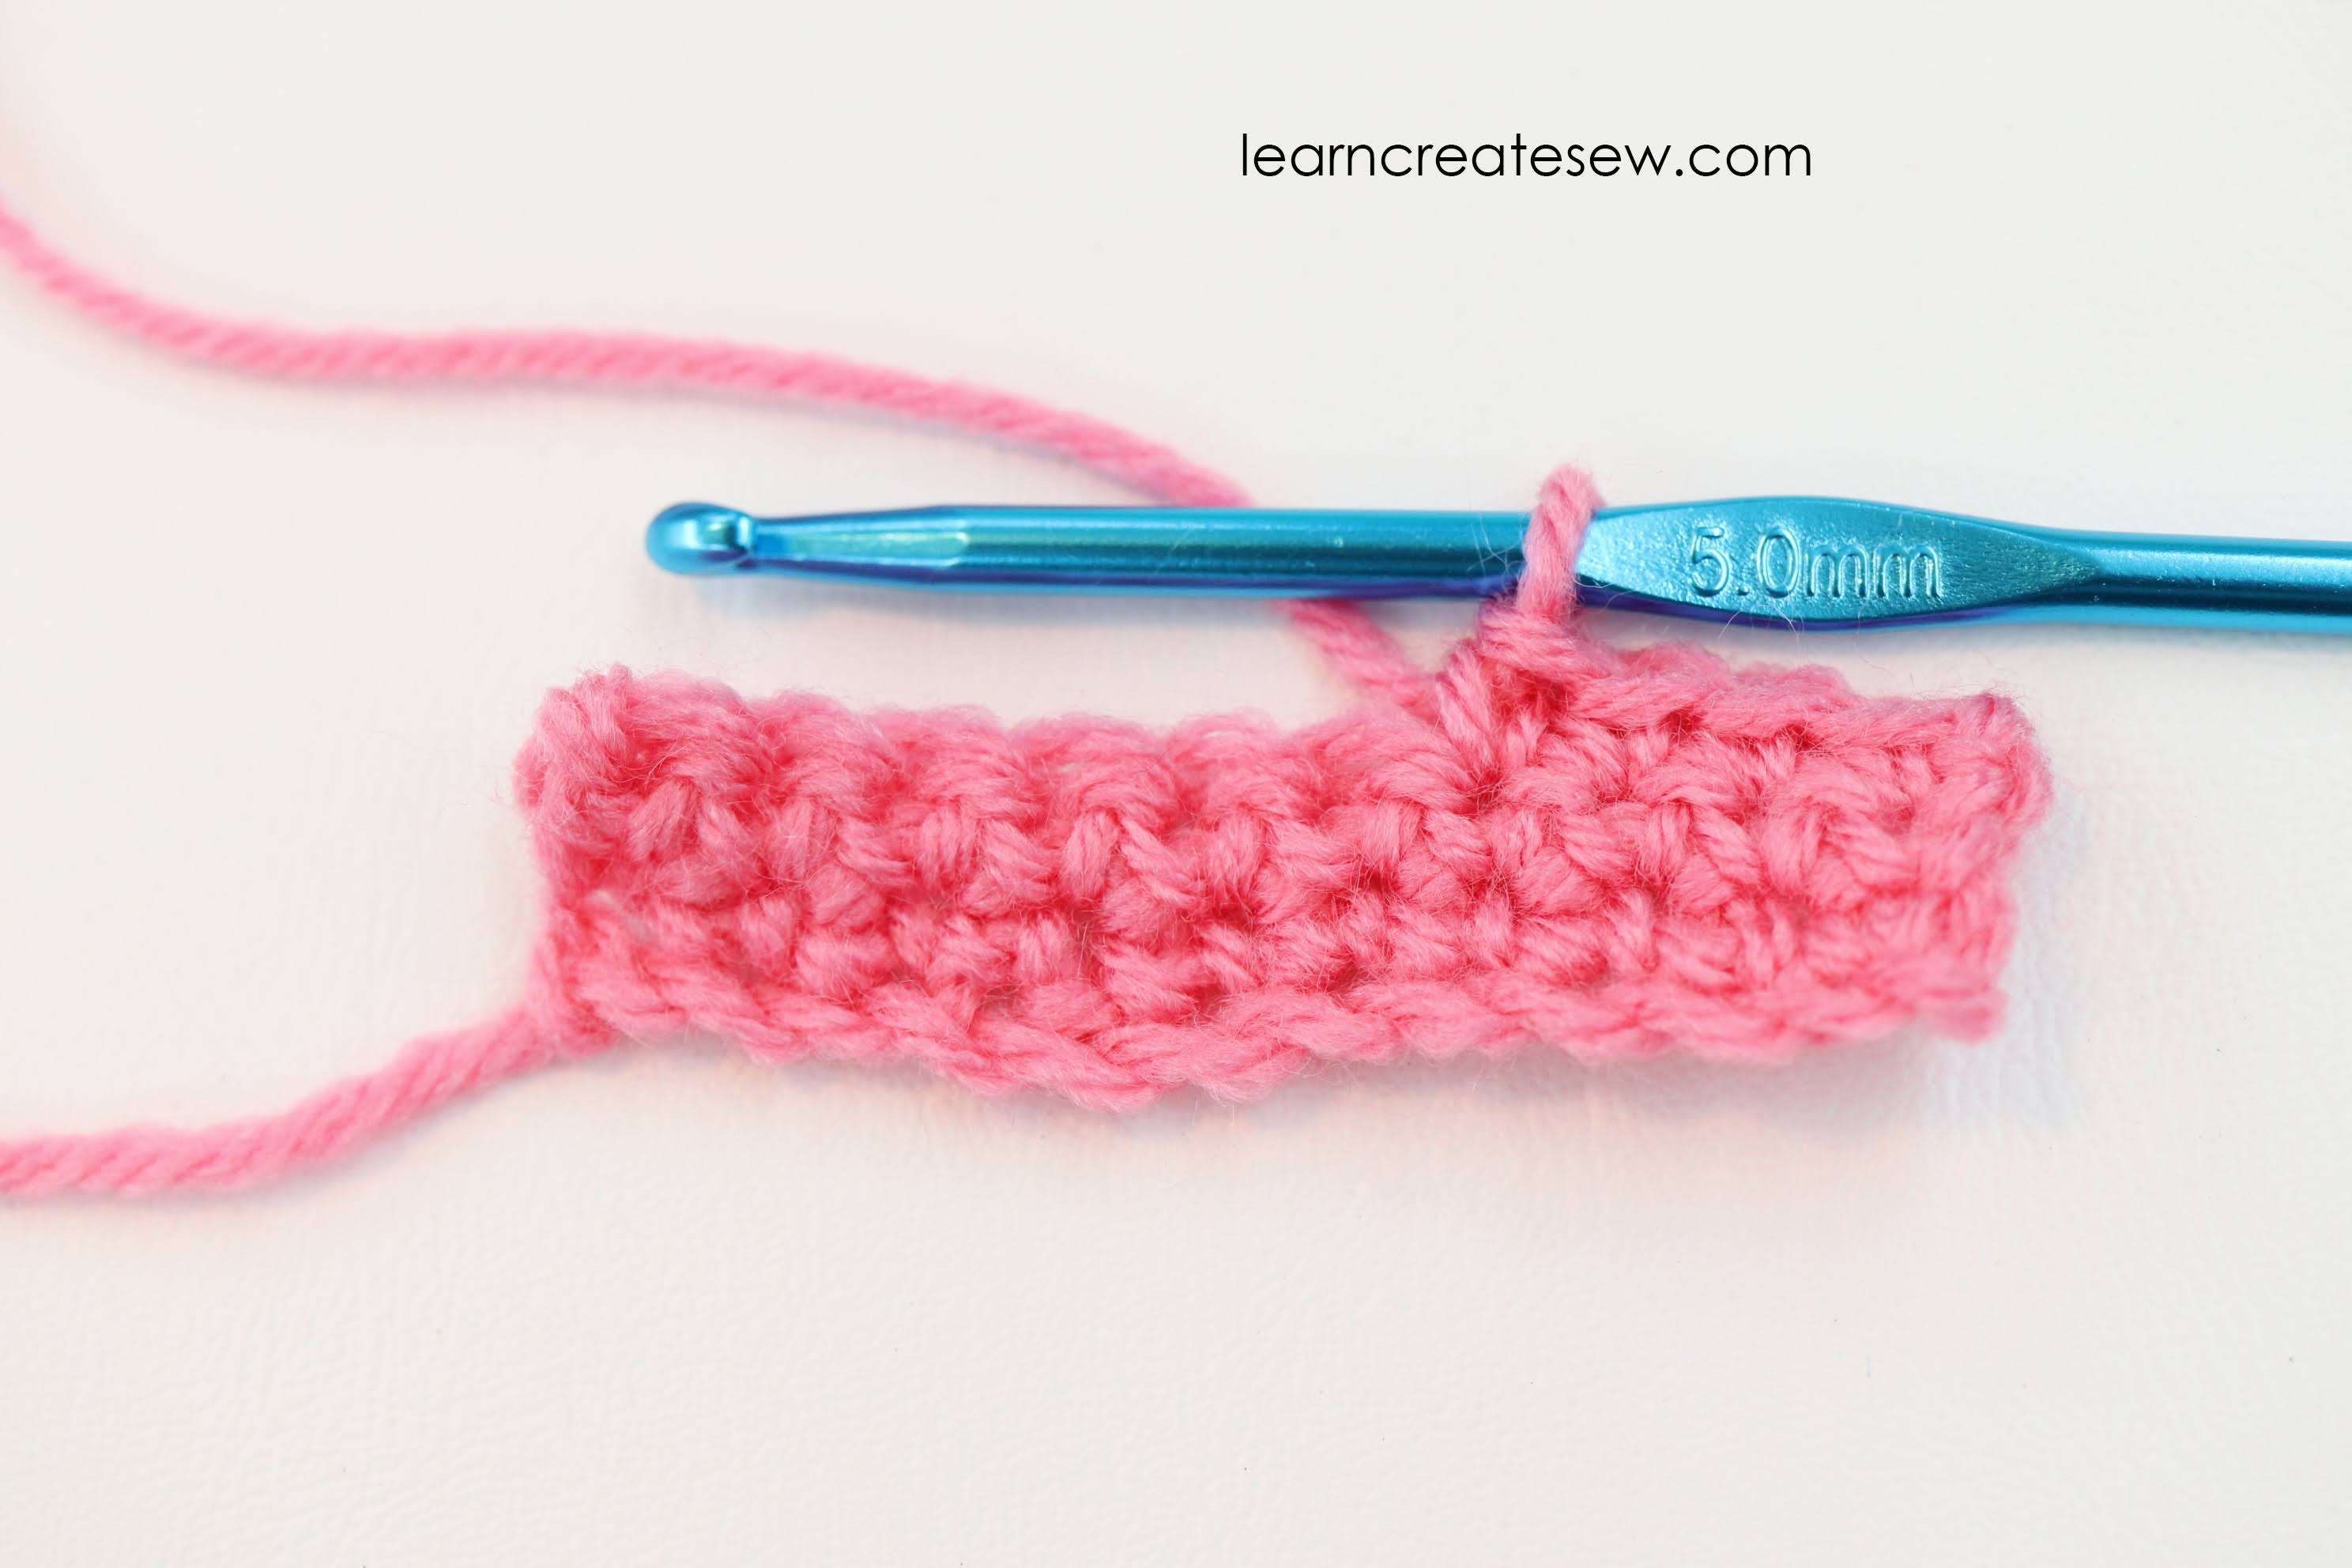
To help I am going to break it down. We are going to start with the single crochet, reviewing the steps. Then, we’ll single crochet around the ring, and finally around our magic ring.
From beginning to end I was baffled by the magic circle. Some videos started with the single crochet, some used half double, some double….I just wanted to know how to make the magic circle! All the different types of examples really through me off until I was able to connect the stitch they were showing me with the basic stitches and from there identify what was the magic circle and what was the stitch. So we will look at how a single crochet is made.
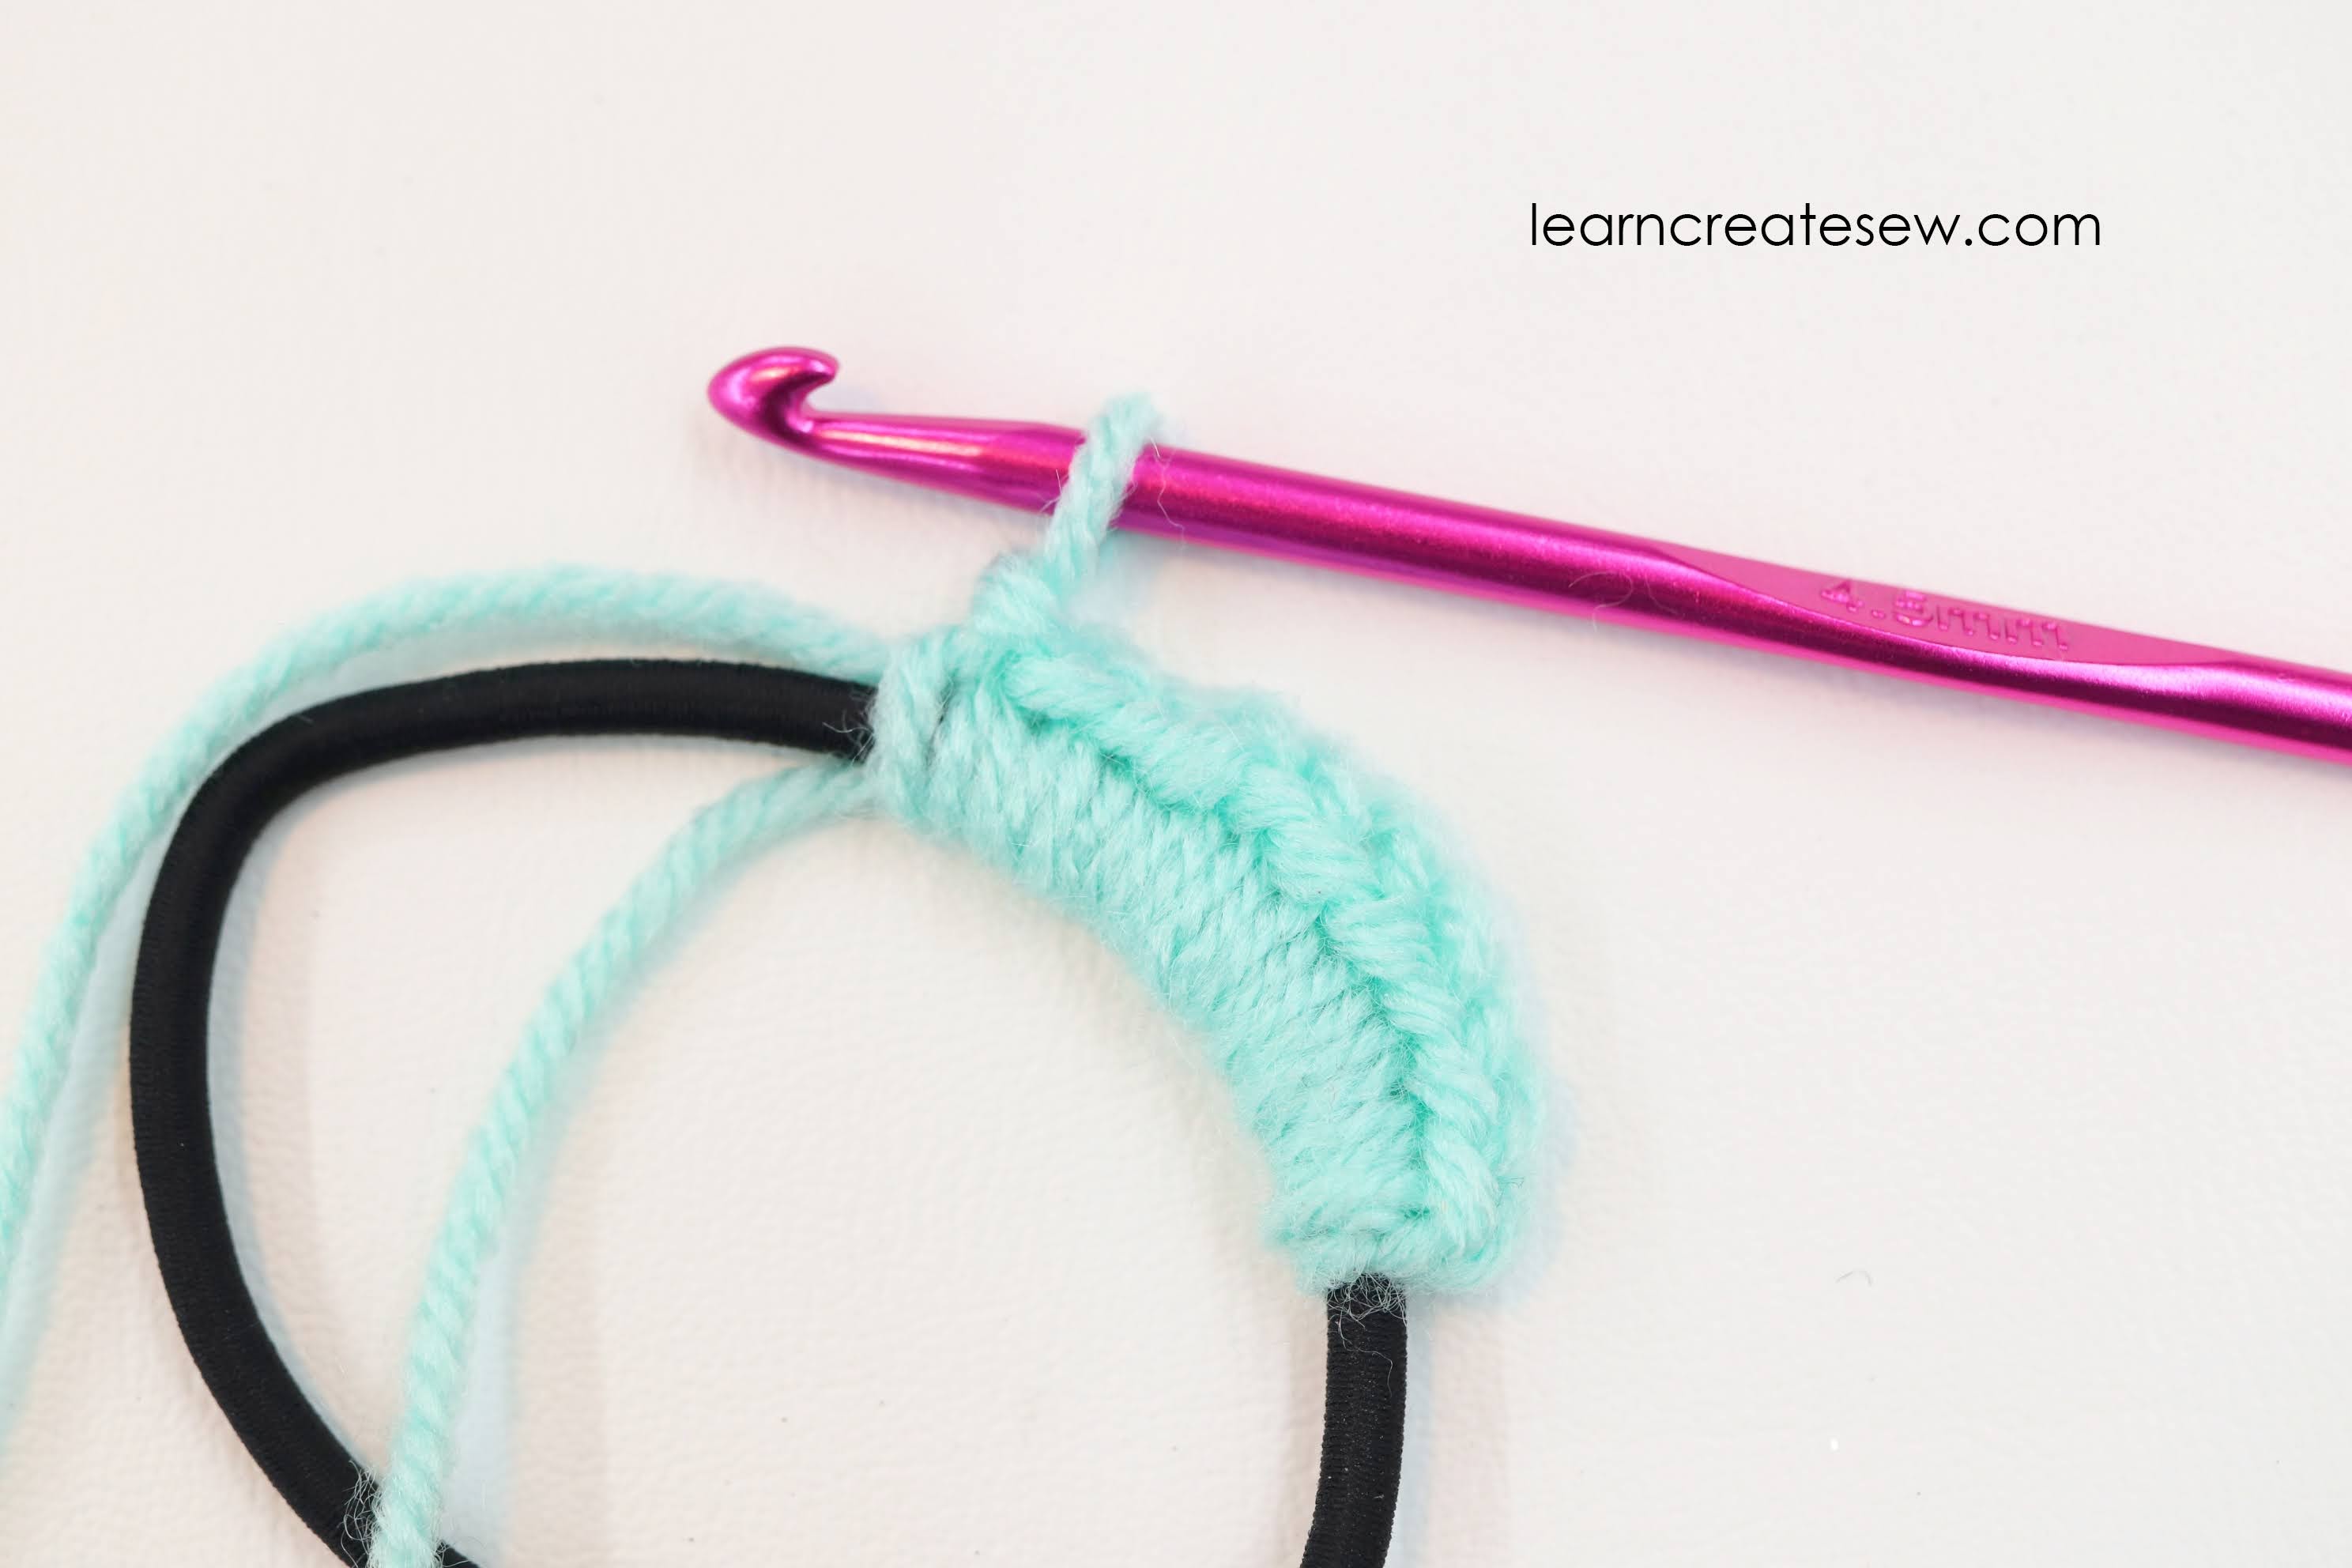
Then we will look at single crochet around a ring or a loop. This feels and looks a lot different then simply crocheting in rows, so it is helpful to be familiar with this before you attempt the magic circle. So, if you are just starting, grab a hair tie, milk carton ring, or key chain and practice crocheting around the circle.
After that we will actually make the magic circle. I’ll show you how I hold the yarn, what I had a hard time with, and what helped me finally make it work.
I hope this helps you!
RIGHT HANDED:
LEFT HANDED:
Here is the video flipped, which I hope will be useful to all of those left-handed crafters out there!
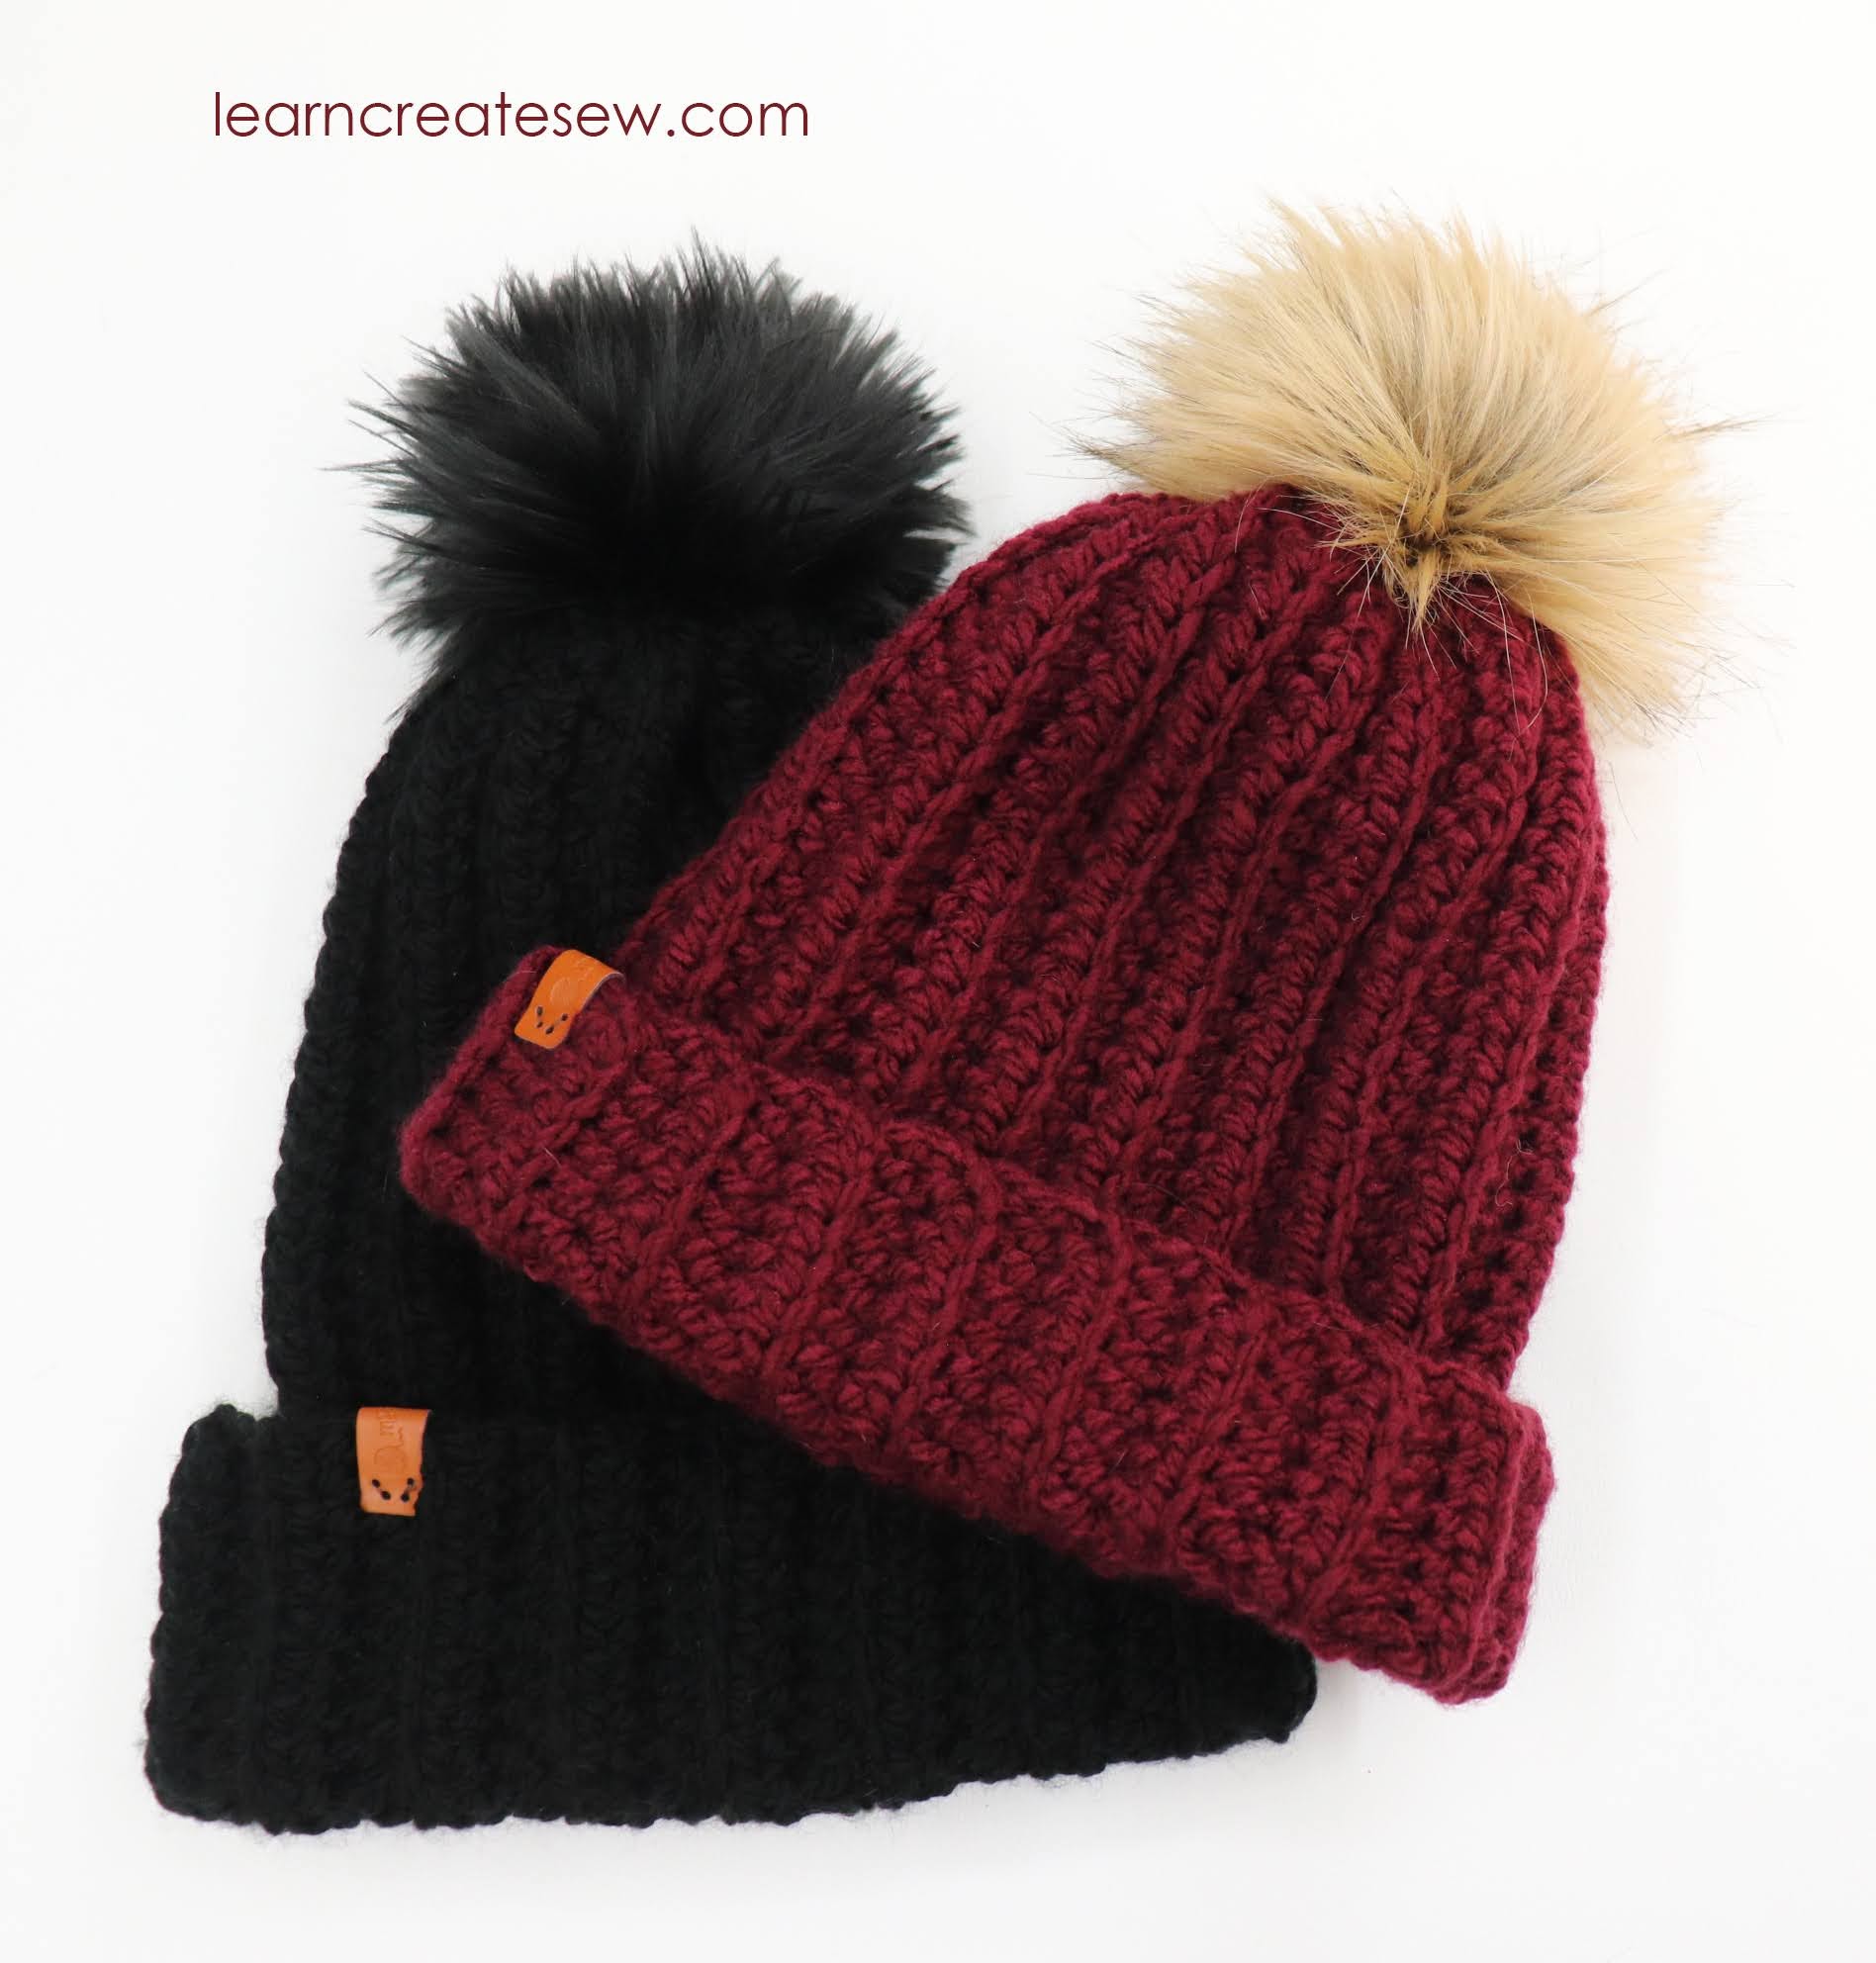
With all of the stress of this year weighing heavy, I decided to take up a new hobby to help myself relax. I decided to learn how to crochet! I had crocheted before, but it had been several years. My mom came to visit with her assortment of crochet projects and I just couldn’t stop myself from exploring the craft again.
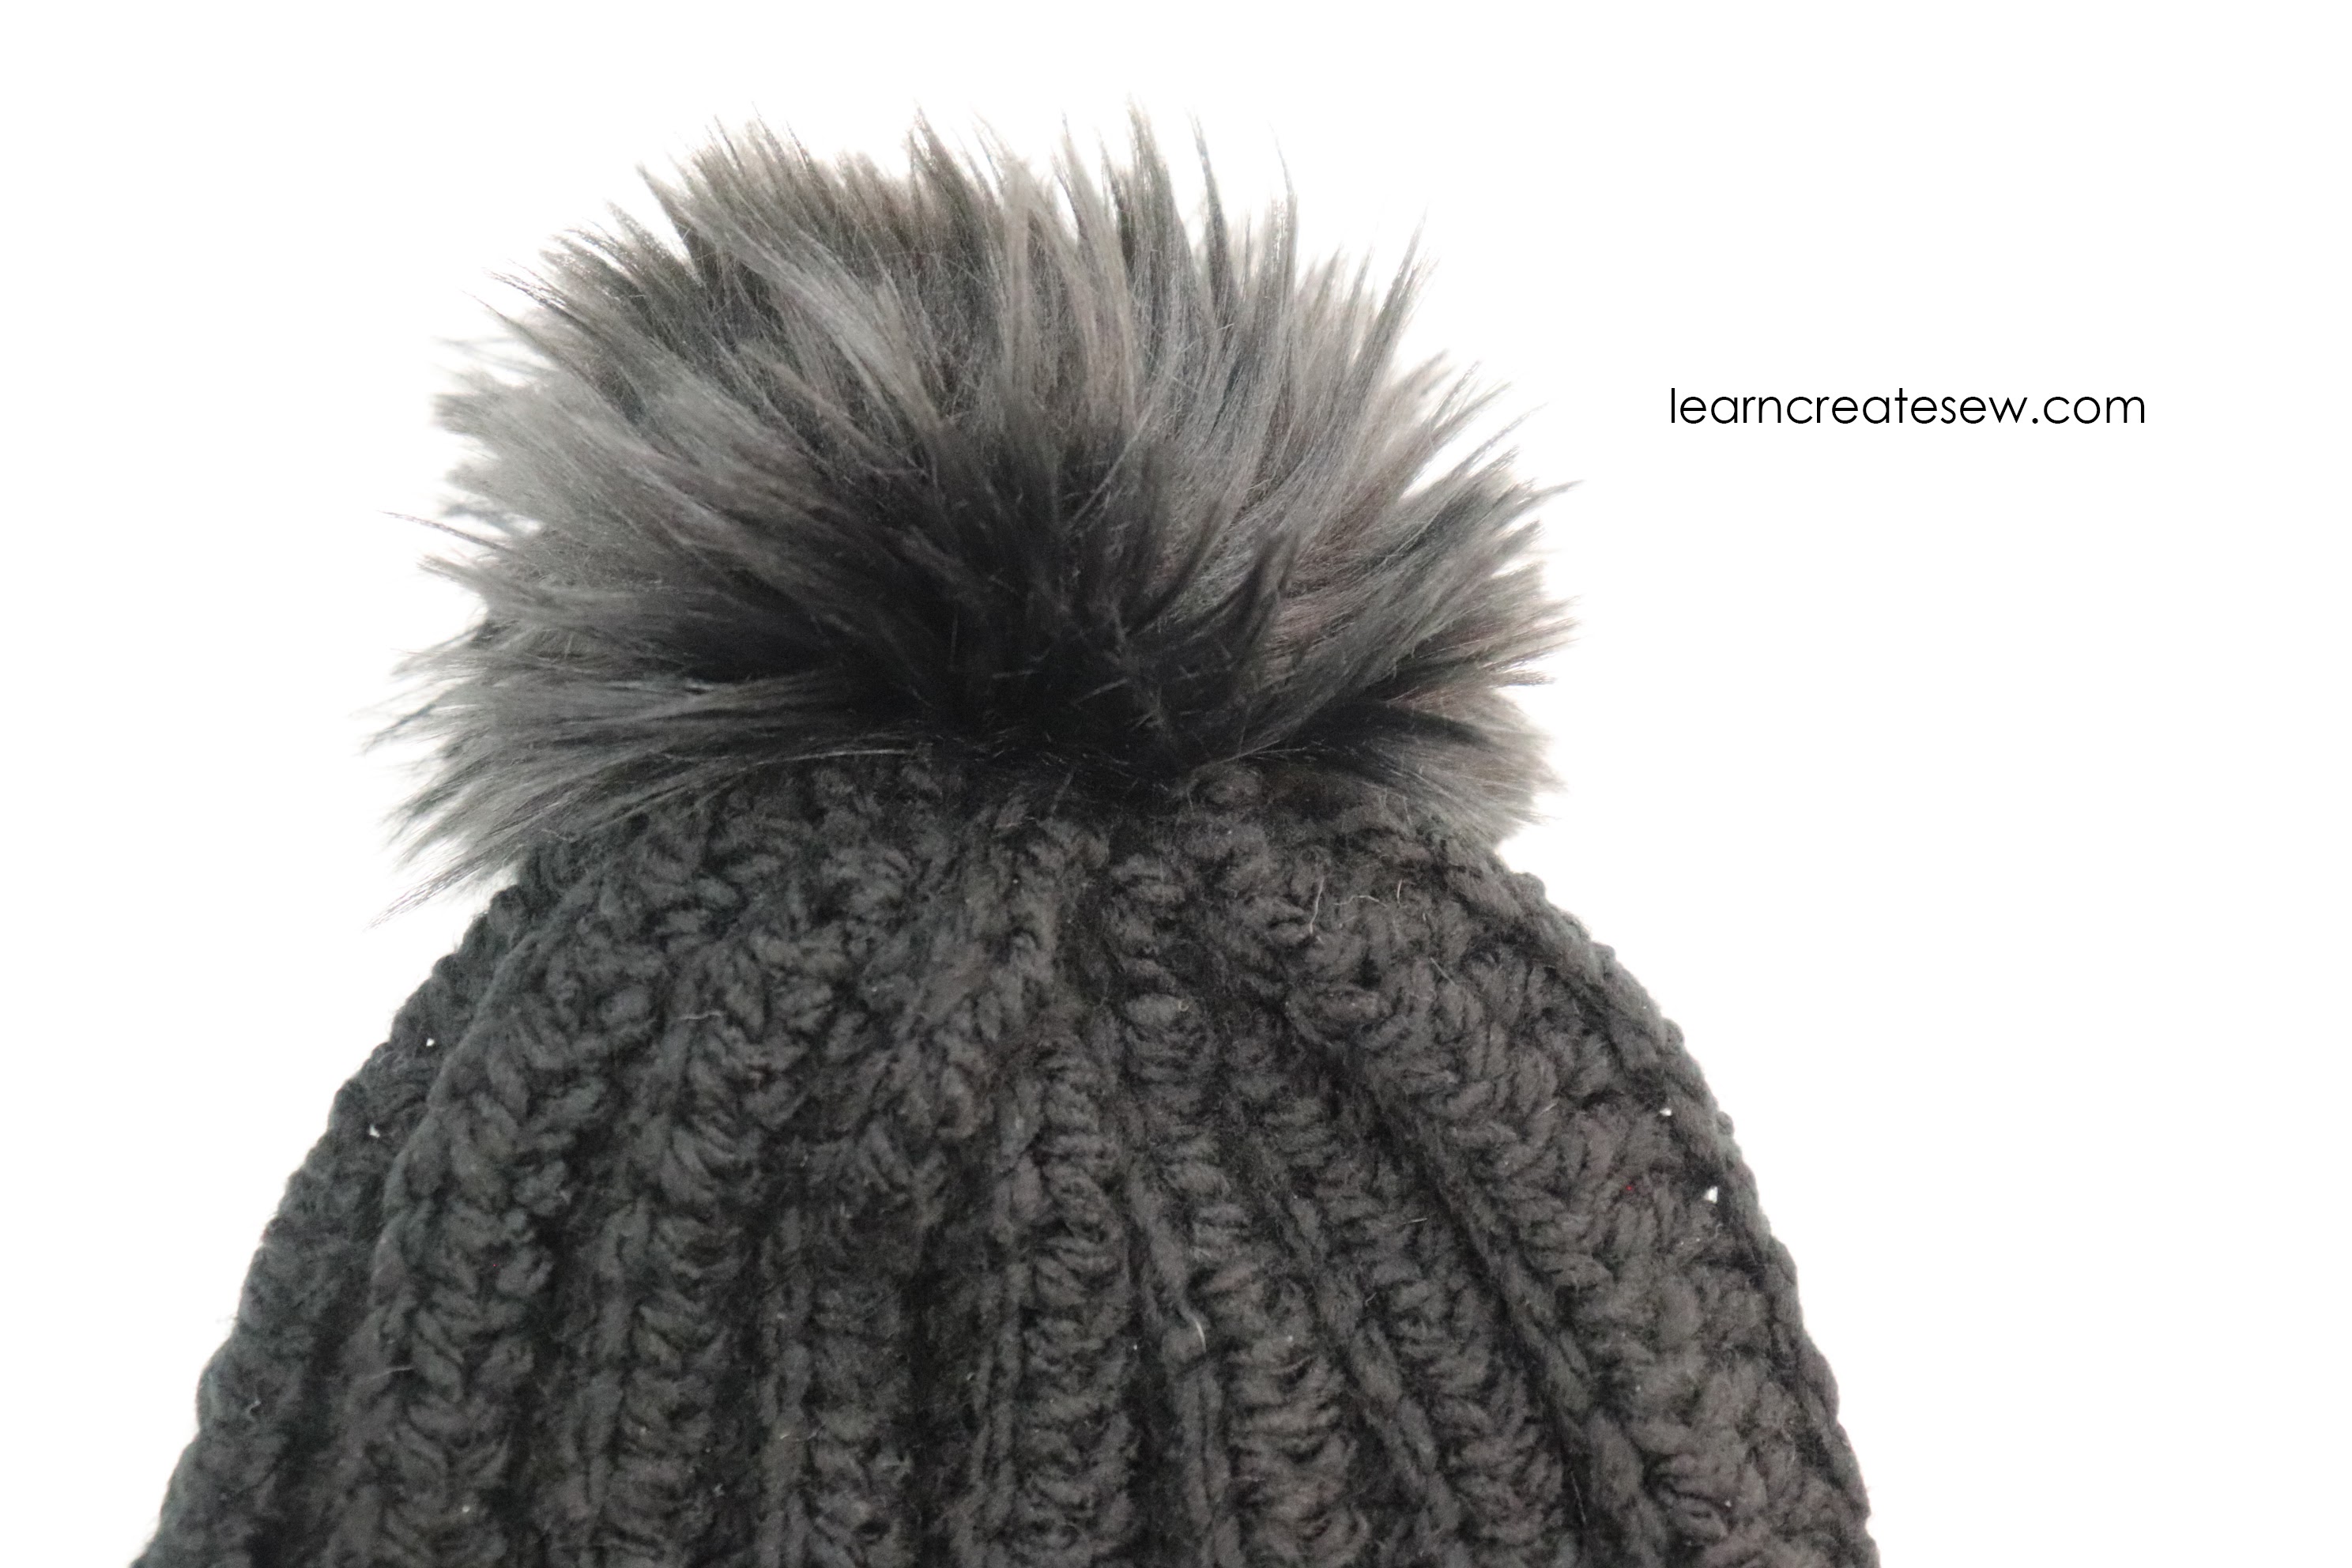
One of the first projects I made were these Half Double Crochet Beanies. These were simple and quick and a lot of fun. But they were definitely missing something…the fur pom pom! Hence this tutorial.
I thought I would share with you how I made the pom poms for the top of the beanies.
All it takes is faux fur fabric, poly-fil, needle and thread.
I think it adds a lot of character to the beanies! These pom poms have long ties that can be used to attach the pom poms to any project you like.
A larger hook will require fewer stitches, but they will be more spaced out.
I used hook 7.0 for the burgundy beanie and 9.0 for the black beanie.
Size: Teen/Adult
Terms: Ch – Chain
BLO – Back Loop Only
Hdc – Half Double Crochet
Chain 34 – 42
The number of chain stitches you need will vary depending on the size of the hook you selected.
You want your chain to be 11 – 14 inches long, not including the chain 2 at the end.
Mine (the burgundy beanie) was 12 inches long. I chained 36 stitches and measured stitches 1 – 34.
Leave the thread tail long.
Row 1 – Beginning in the 3rd chain from the hook Hdc in each stitch. Hdc in back loop only. [Total Stitches: 32-40]
The total number of stitches should be 2 less than your chain.
Check the length again after completing row 1. You want your row 1 to be 11 – 14 inches long.
Mine was 12 inches long and I had 34 total stitches.
You should have the SAME number of stitches in every row from now on.
Row 2: Ch 2, turn, Hdc BLO in each stitch [32 – 40]
Don’t forget to skip the turning chain when you begin your stitches.
Row 3+: Repeat Row 2 until your work is 17 – 20 inches wide.
You can test the width by wrapping the beanie around your head. It should be about two inches or so shorter than the circumference of your head.
Mine ended up being 12 x 19 inches. (The circumference of my head is 21 inches). Since this is a large yarn and a big hook it will stretch.
A smaller width will give a more snug fit.
STOP ON AN EVEN NUMBER OF ROWS.
Your working yarn should be on the opposite end from your starting tail. Cut the working yarn to be about 1 yard long.
Fold the beanie in half with wrong sides together. Sew the edge together. You should end with the working yarn next to your original thread tail. This will be the top of the beanie. Tie the thread tails in a knot.
Stitch through all the raised stitches around the top edge and pull closed. Tie in a secure knot. Weave in the thread tails.
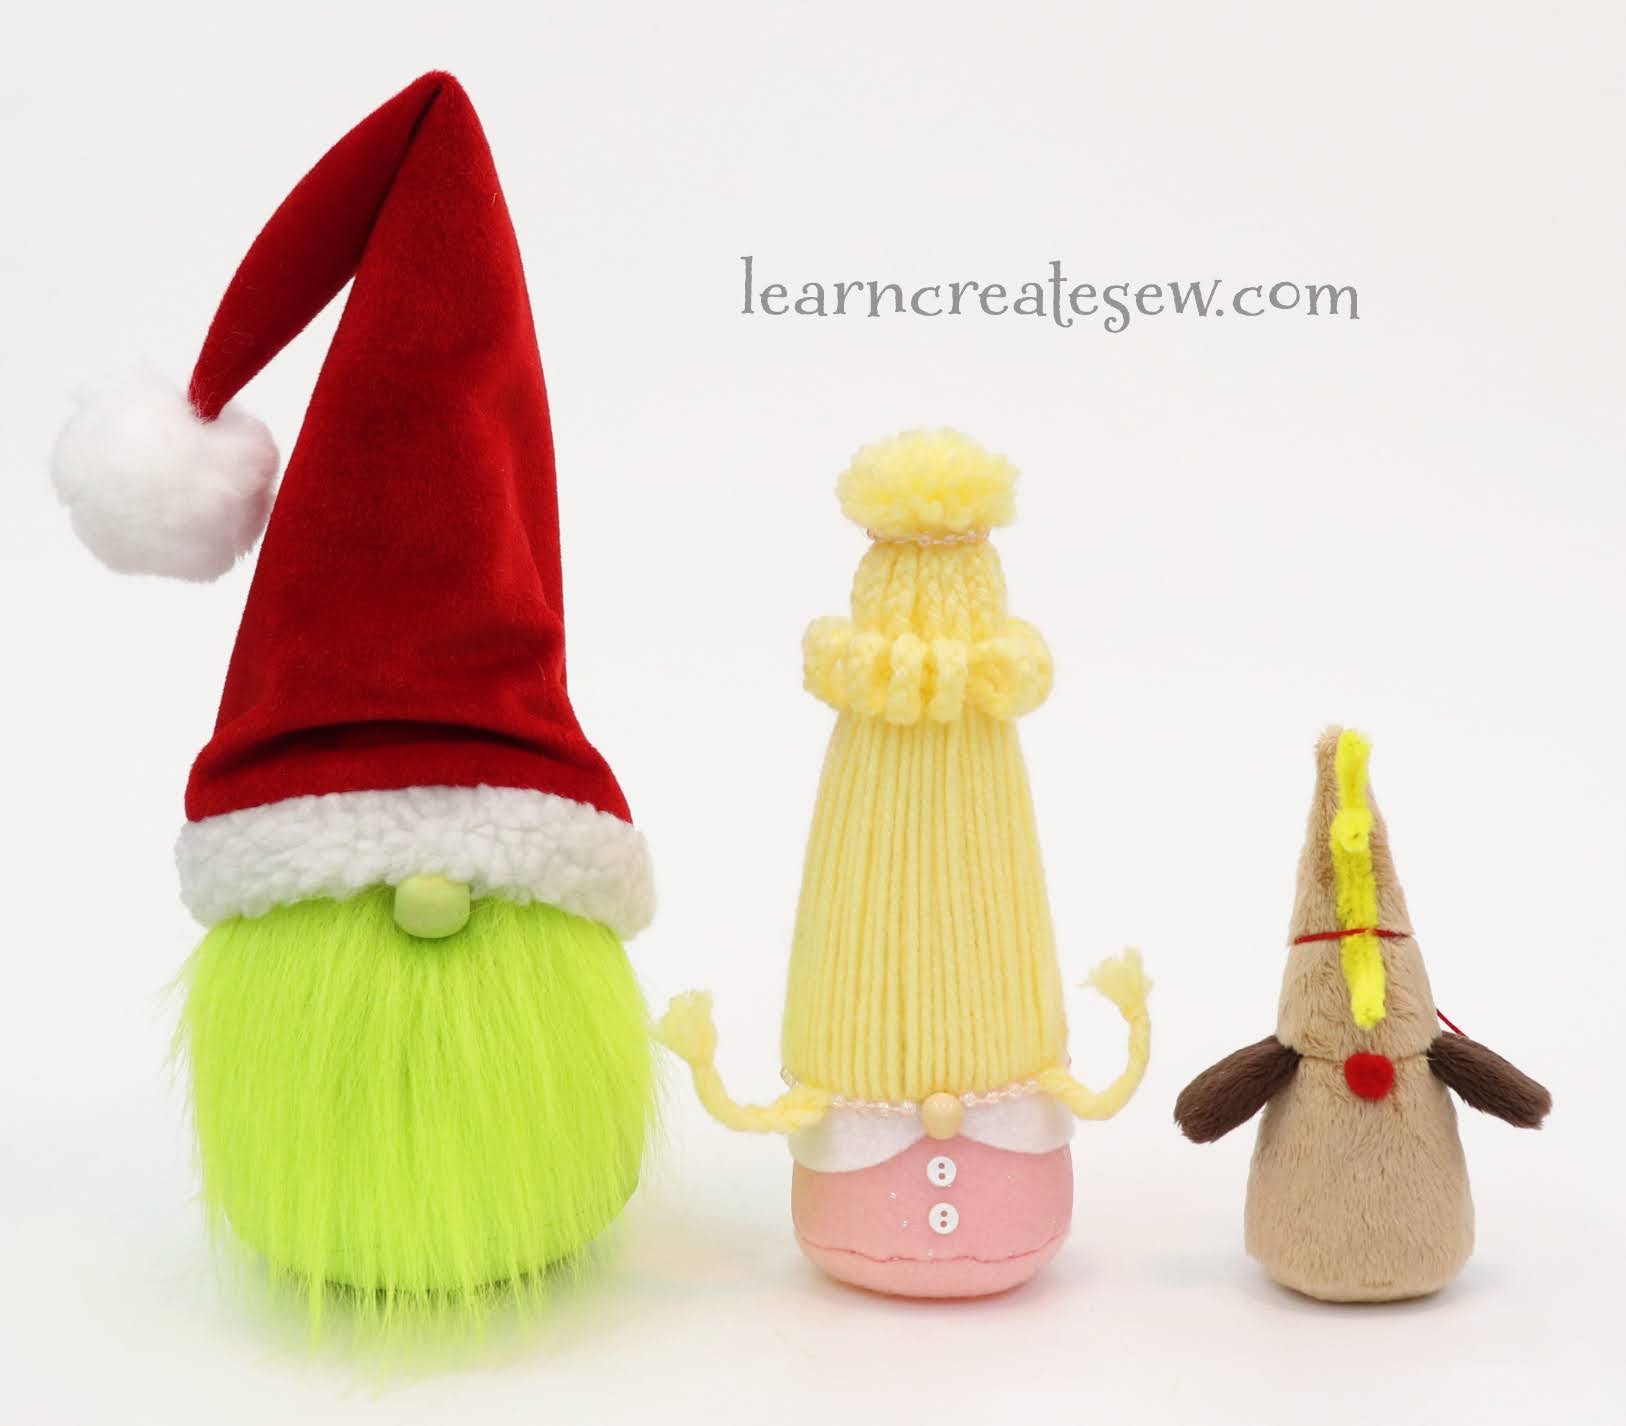
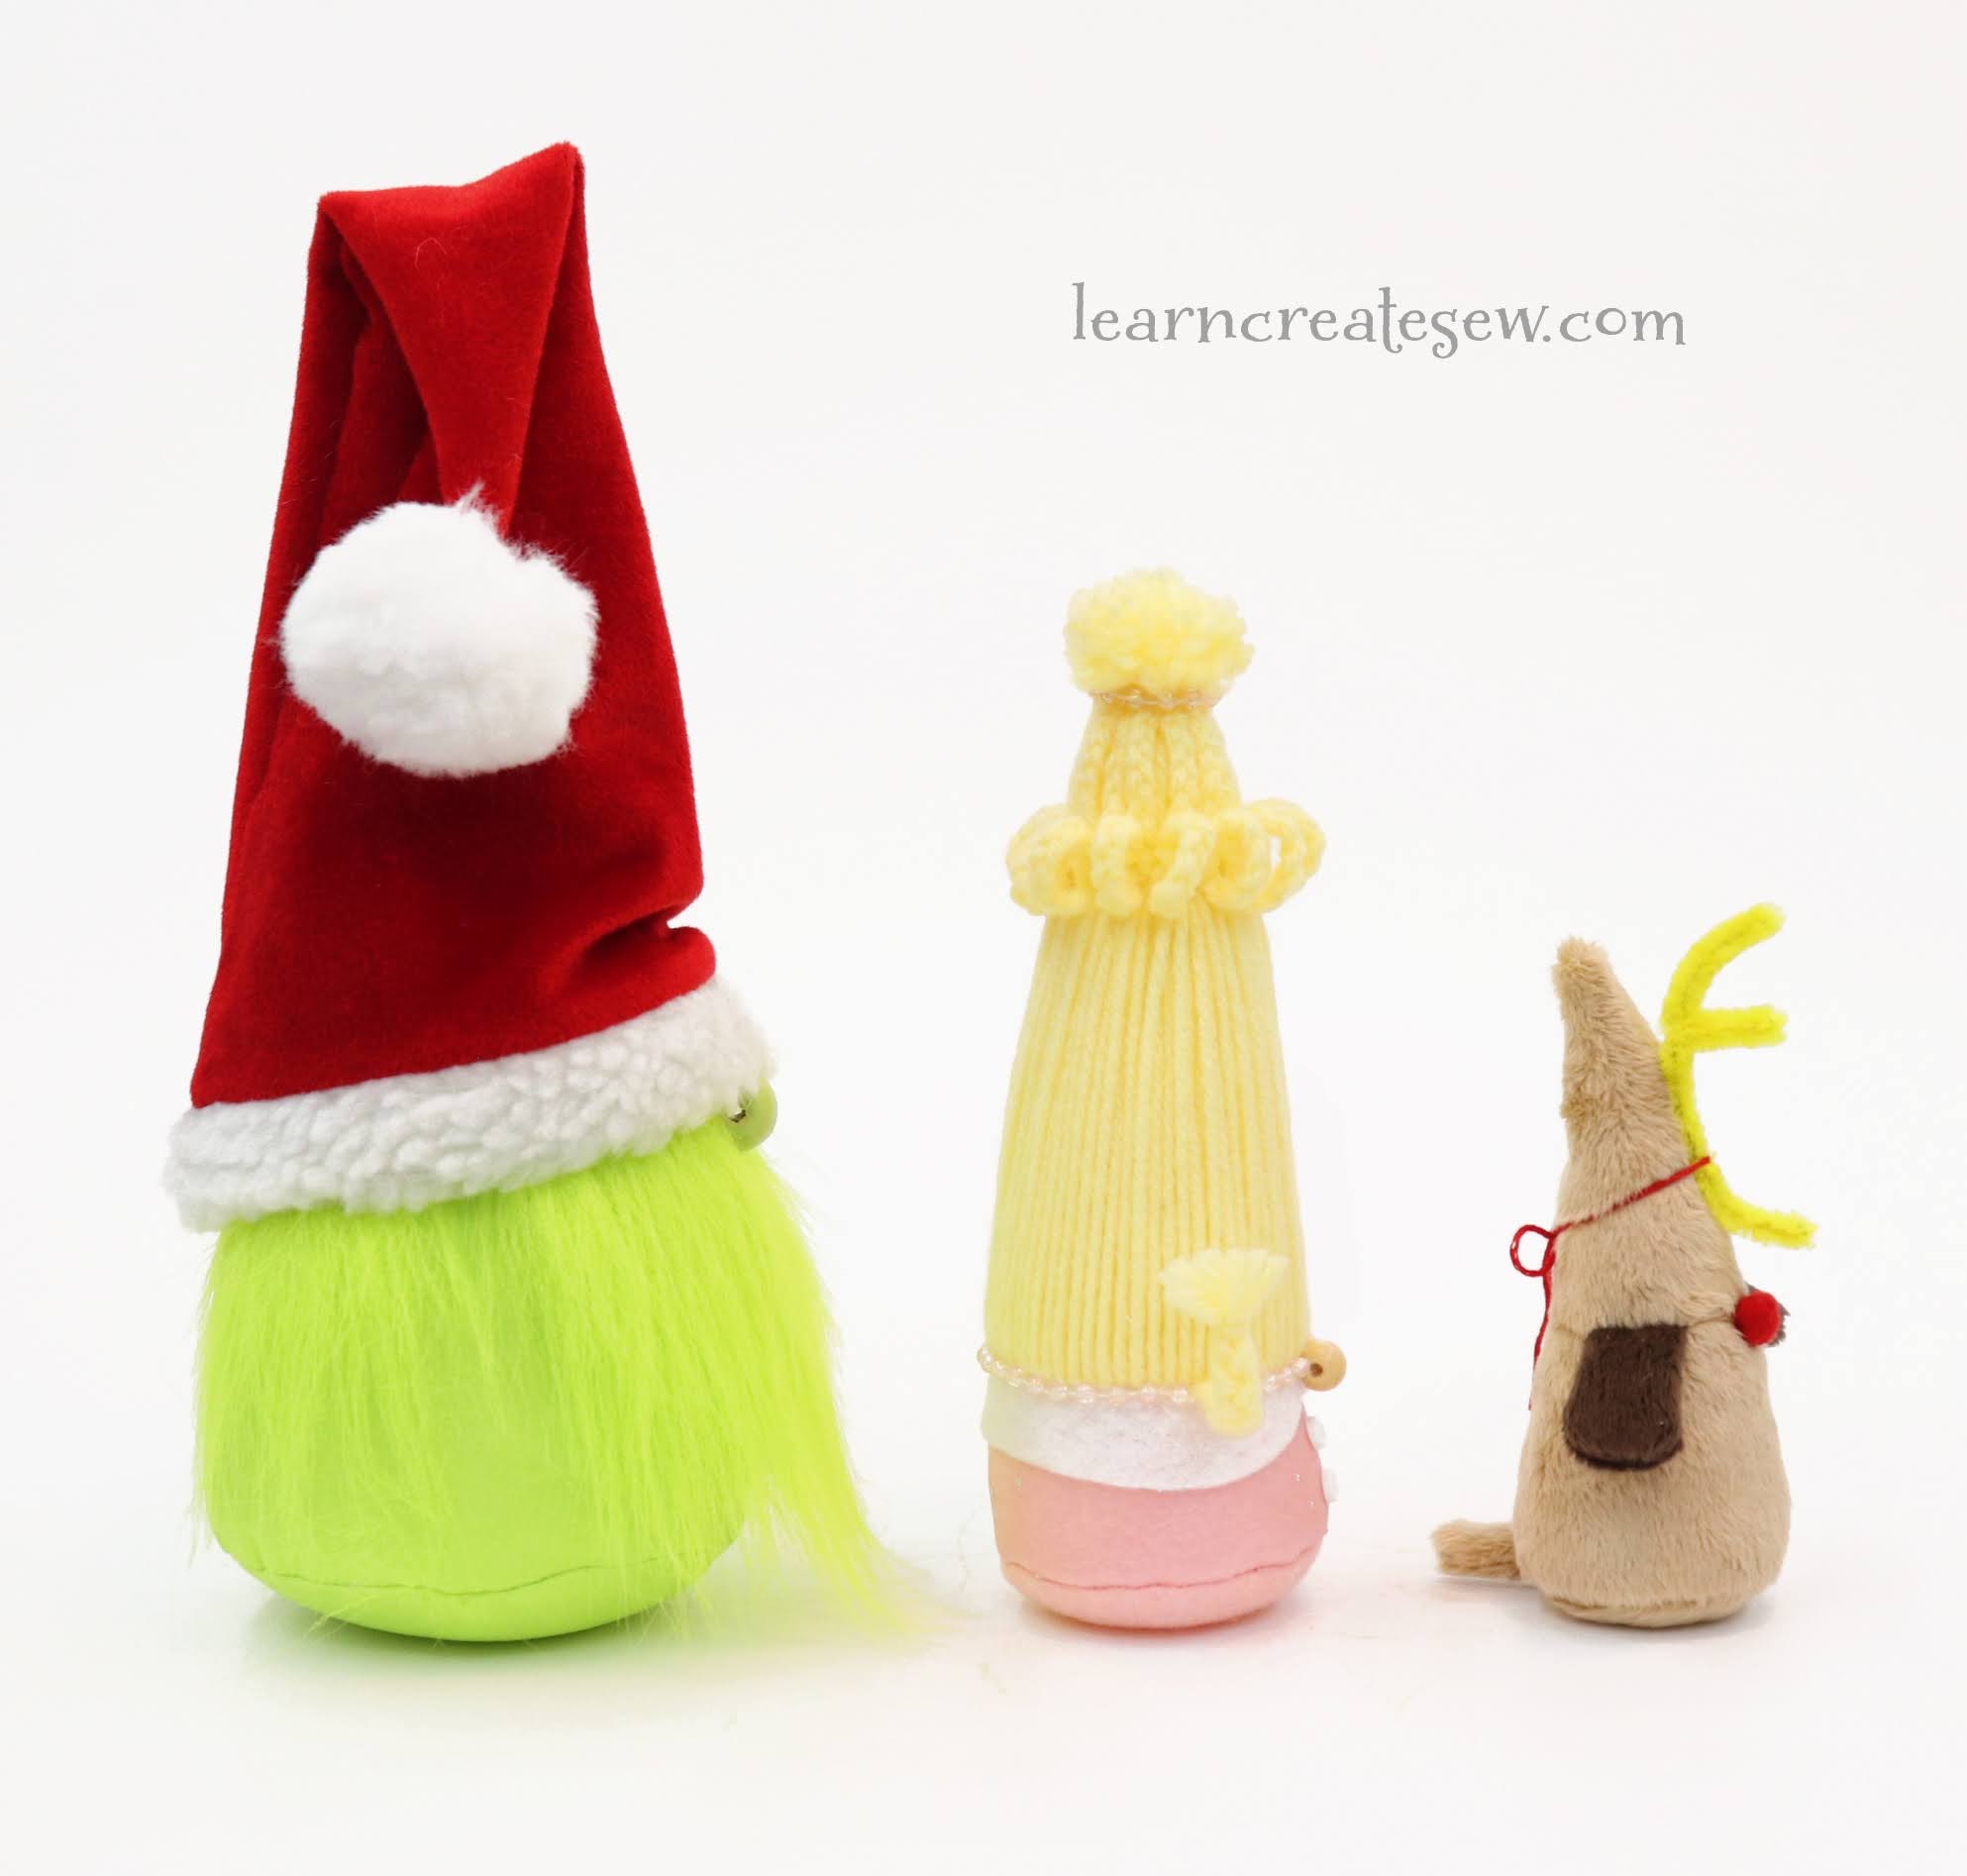
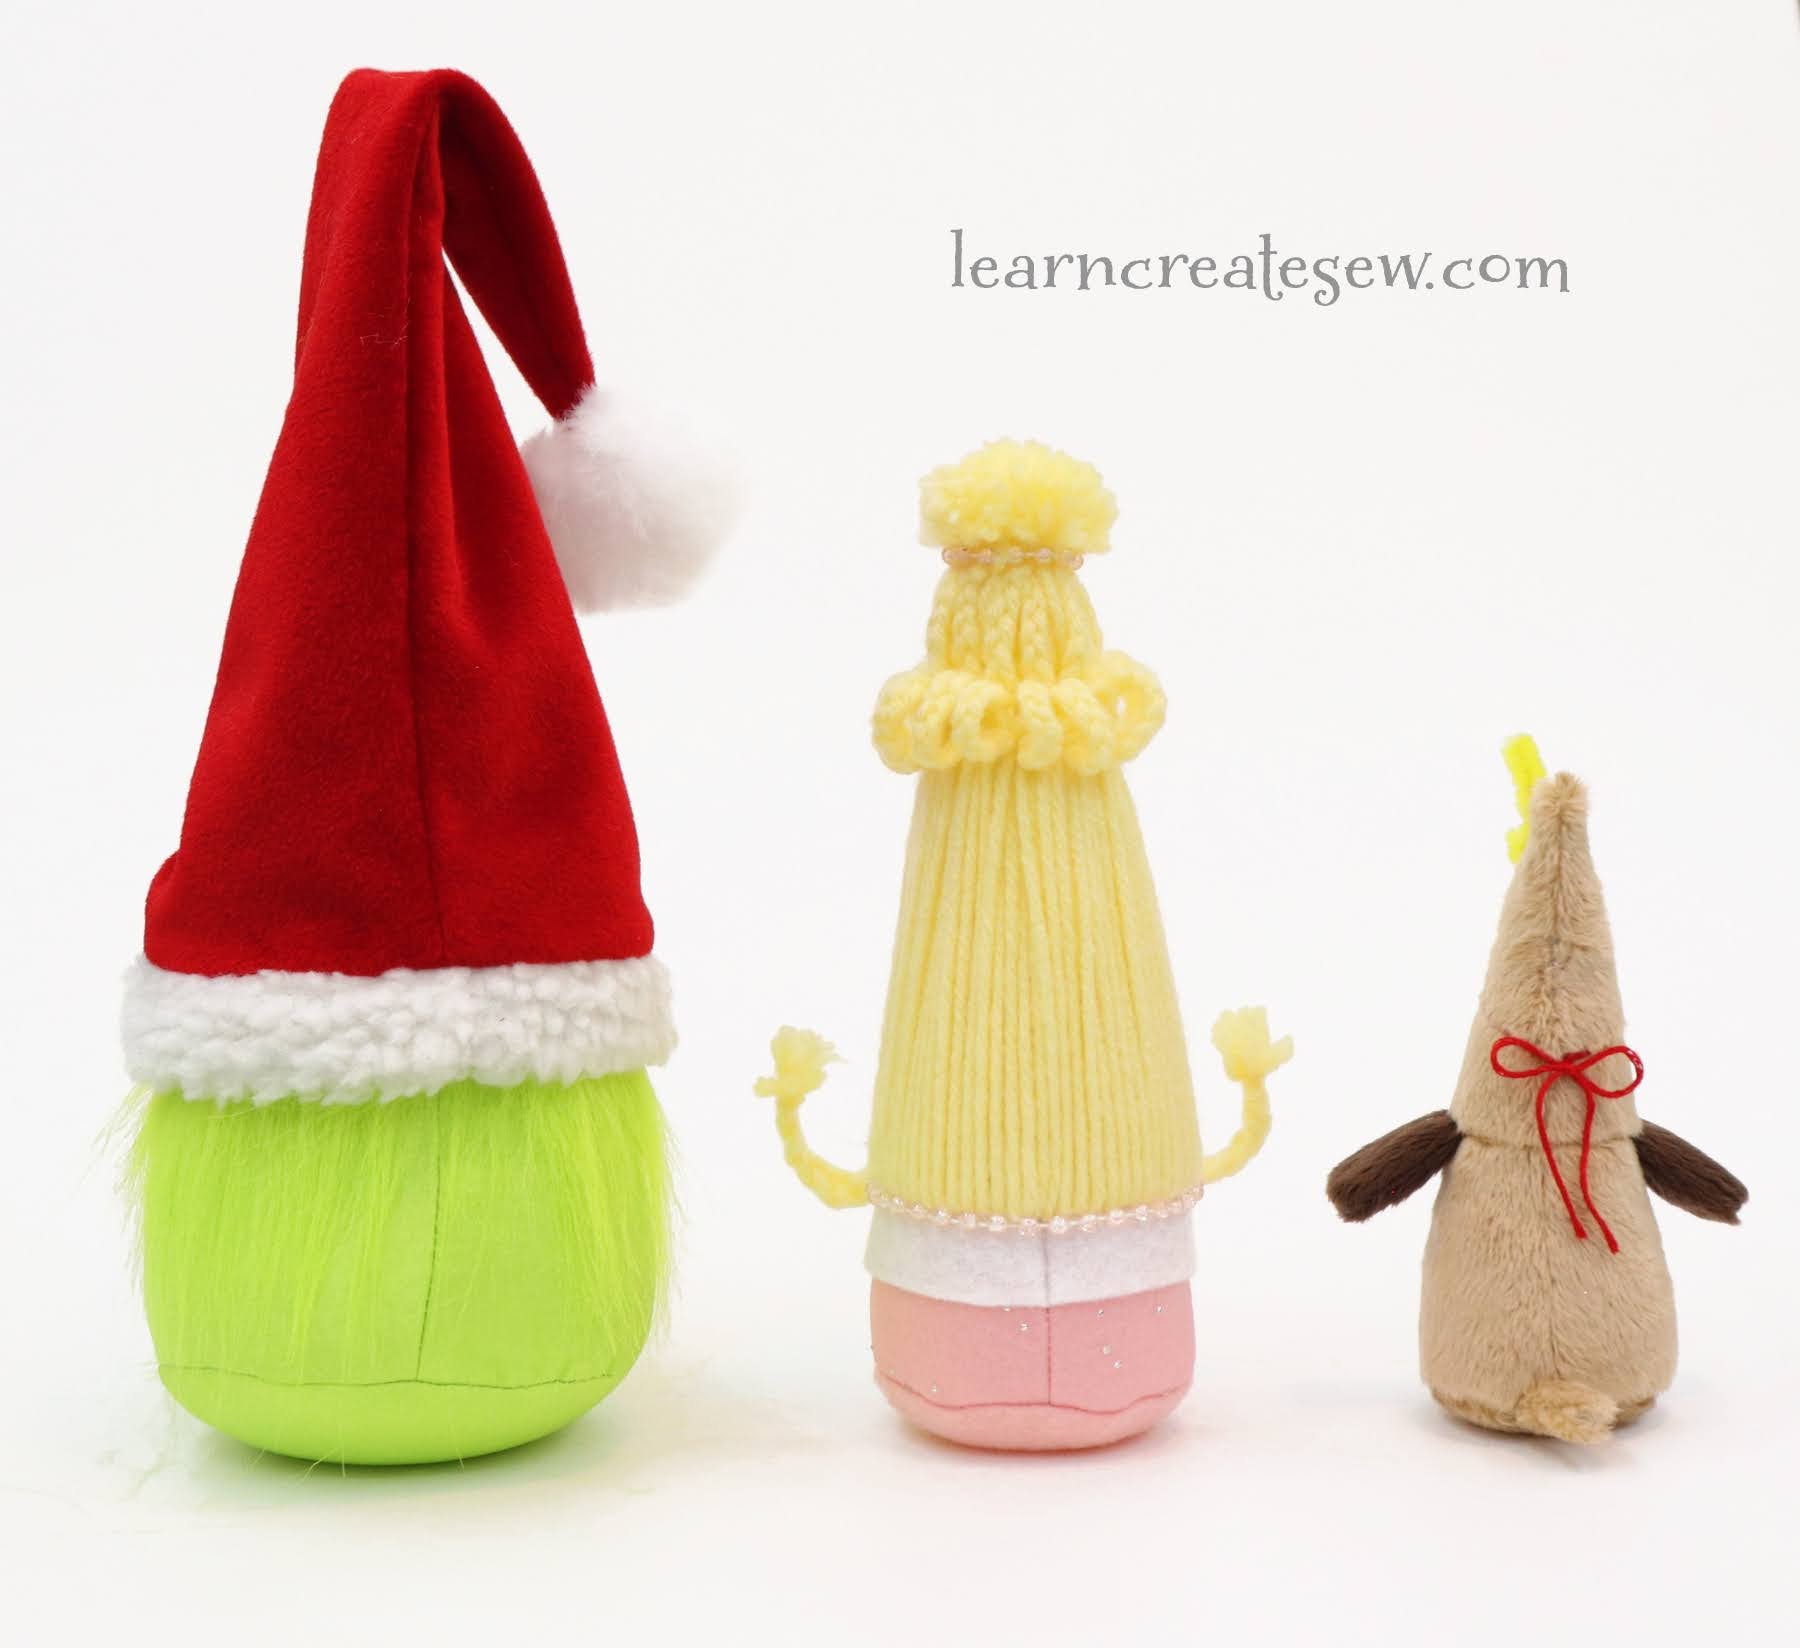
Whenever I think of Christmas, all of those iconic characters from Christmas classics come to mind!
I was crafting with my mom and we started brainstorming all of the possibilities available when making gnomes. There are just SO many cute cute gnomes out there.
I took up the challenge and decided to make some themed gnomes of my own. I hope you enjoy!
I just simply couldn’t resist making these guys!
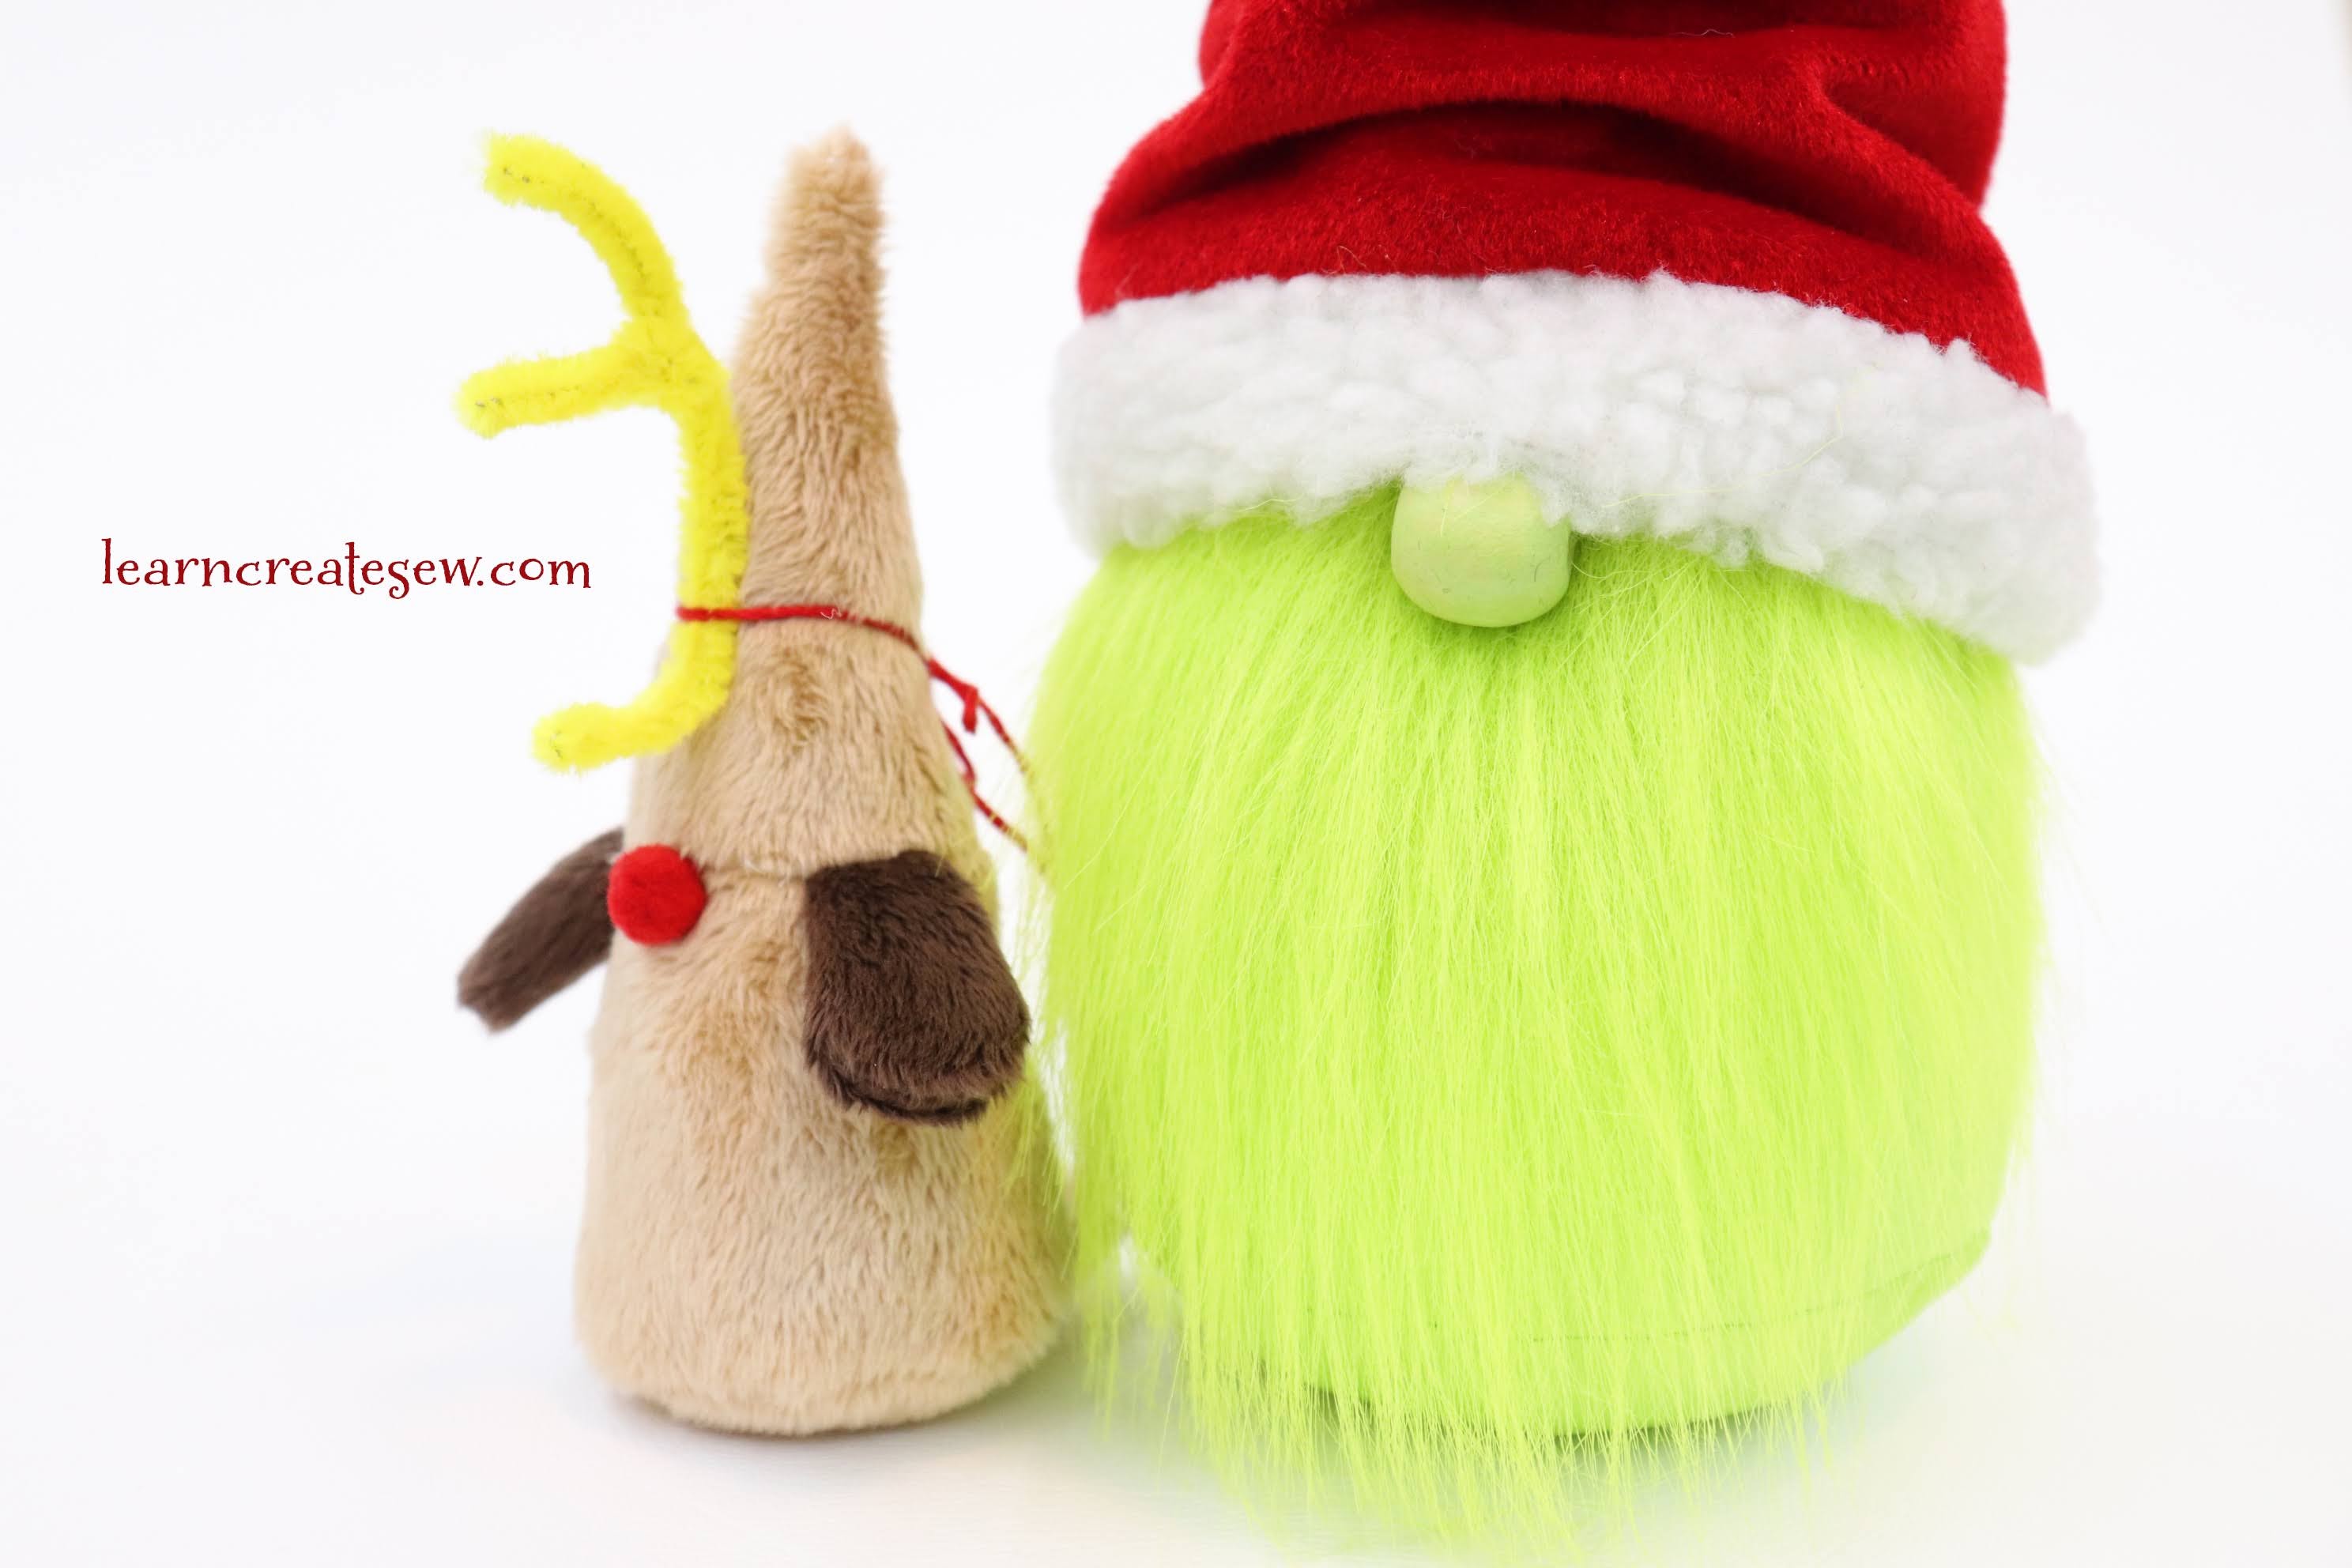
This big green guy can be made using the basic Christmas Gnome Pattern and tutorial. He is a size X-Large and stands about 10.5 inches tall without his hat. I added a sherpa binding to the edge of the hat and a bit of fur around the entire body, rather than just the beard.
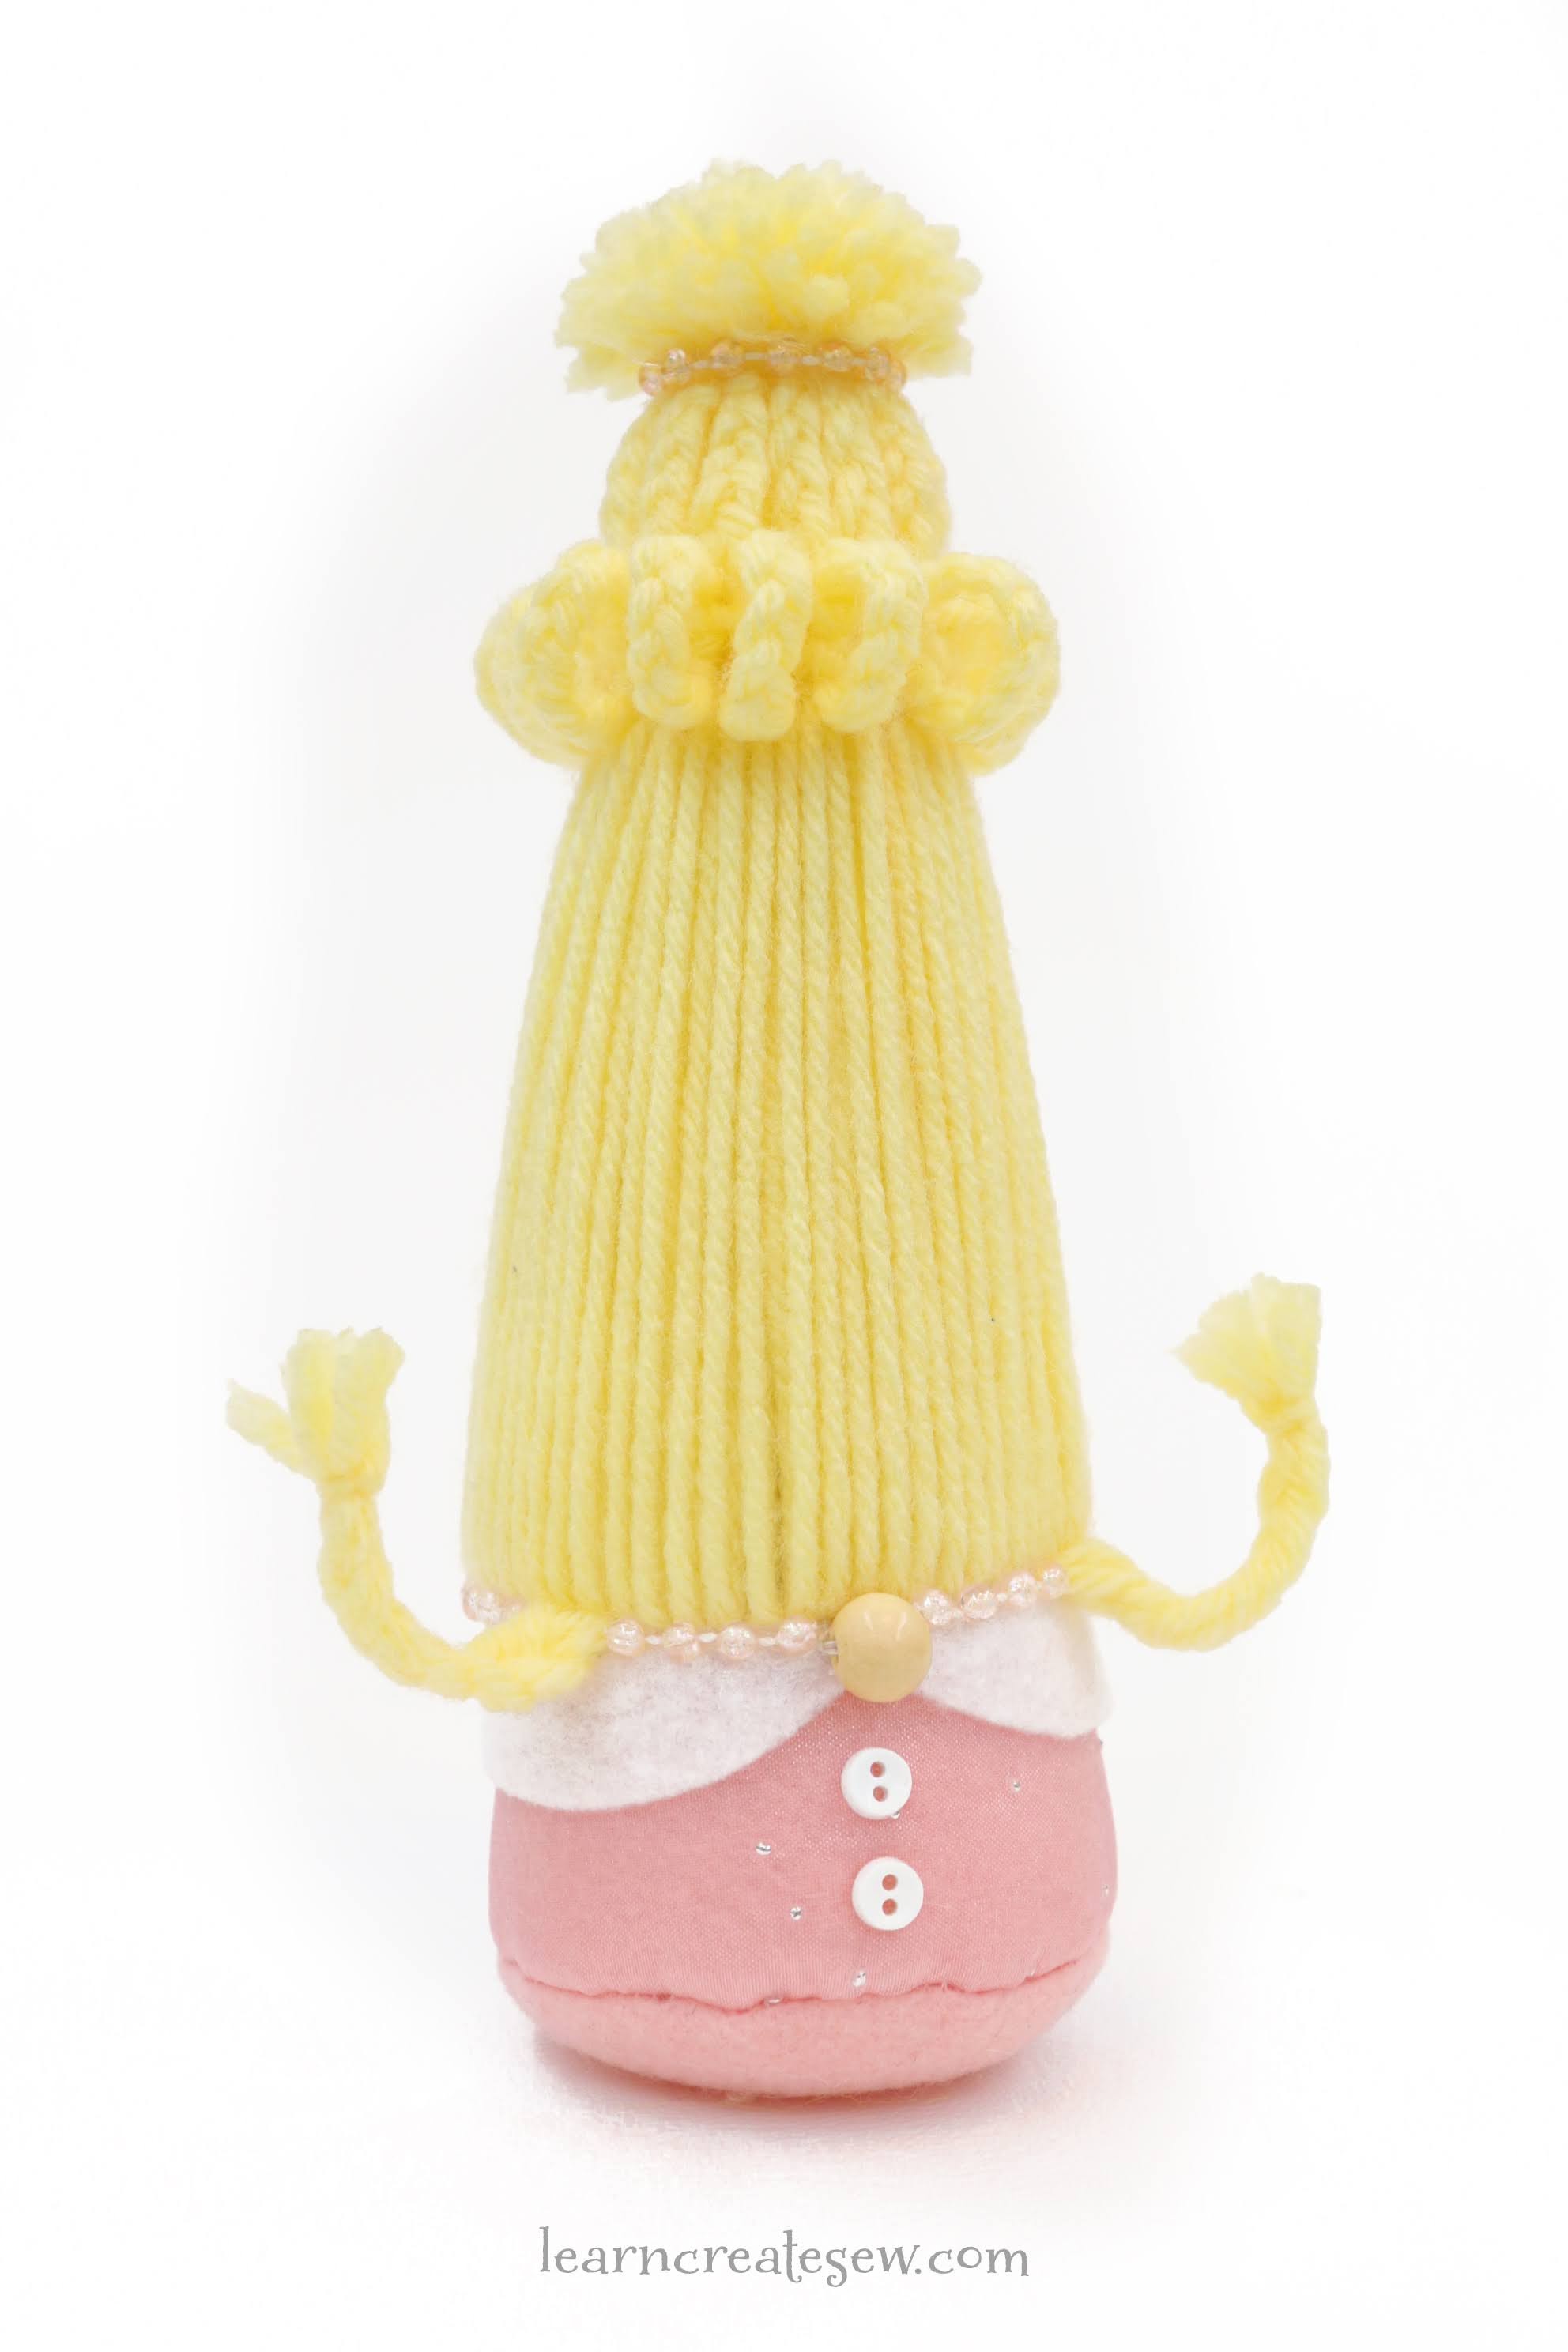
This little lady was super fun! I made the small size.
I really enjoyed decorating this one as well as making the hair. It took four tries to figure it out, but I was really happy with the results!
I really enjoyed styling the hair. All the little braids were time consuming, but I love the end result!
I also really liked adding decorations, such as buttons and pearls.
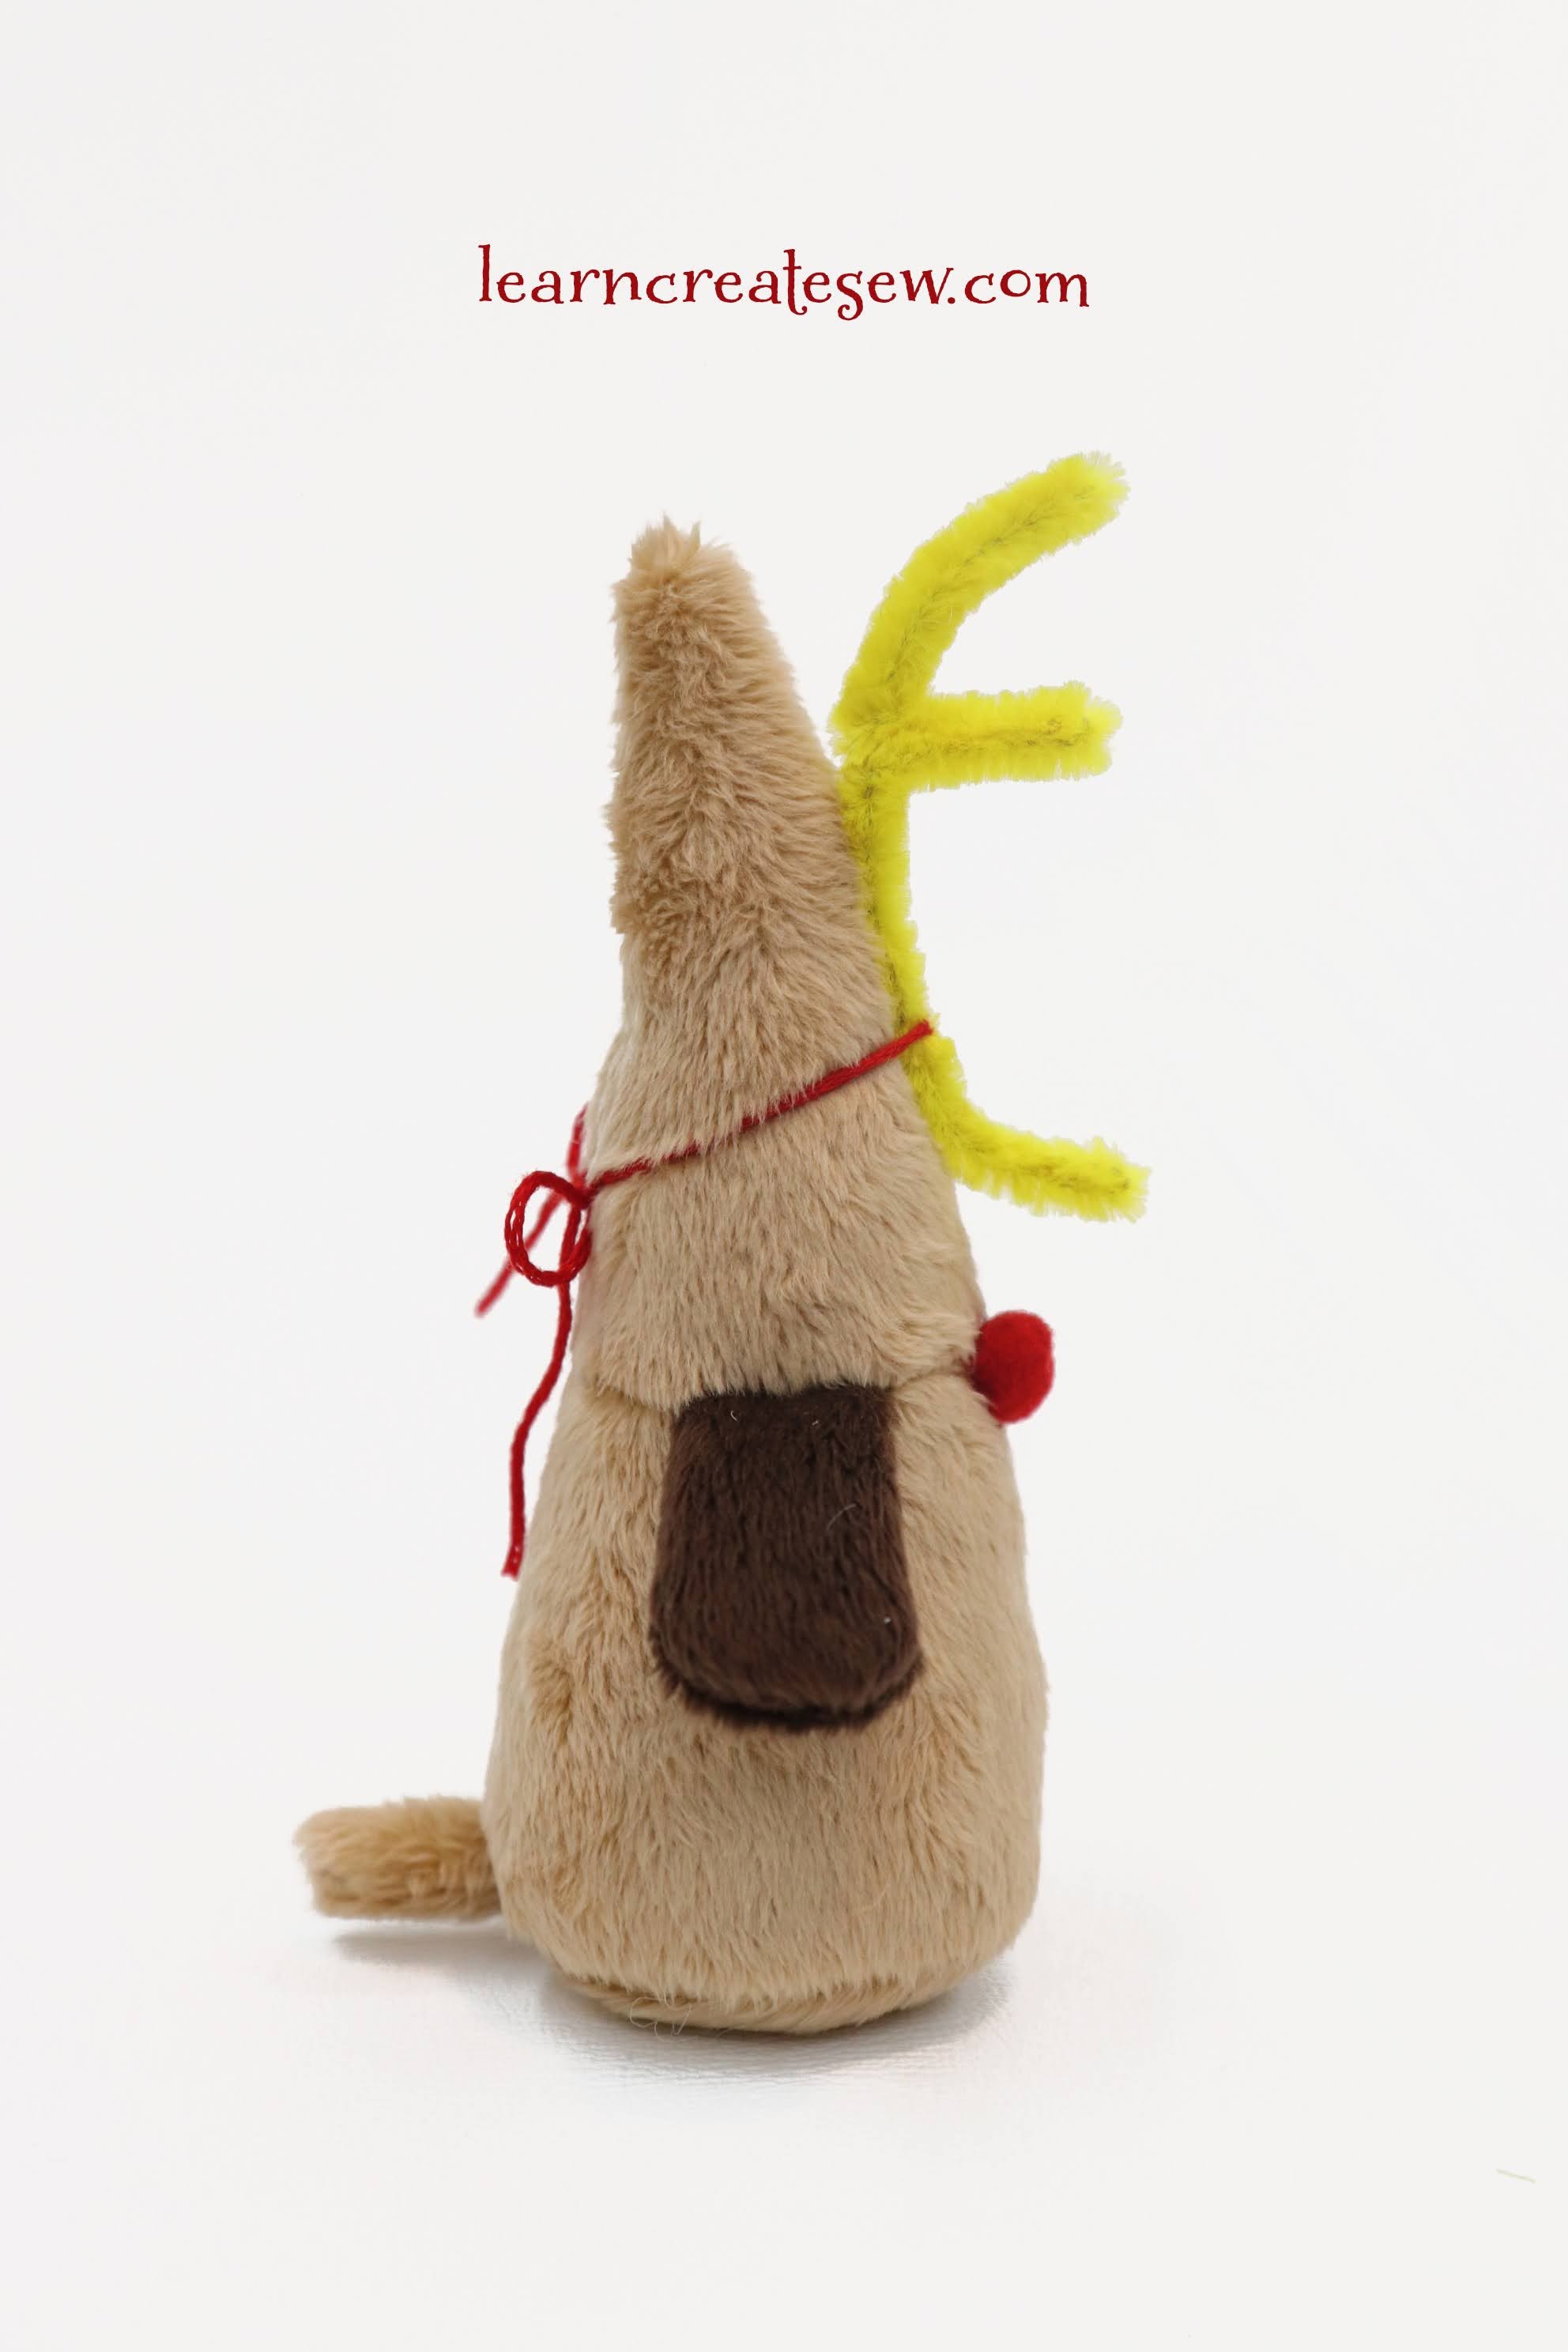
Of course, these two would not be complete without their furry friend!
This little pup was actually super quick to make and I absolutely adore how he turned out. I used minky to give him that furry look 🙂 And a pipe cleaner is the antler. A special thanks to my sister for that idea!
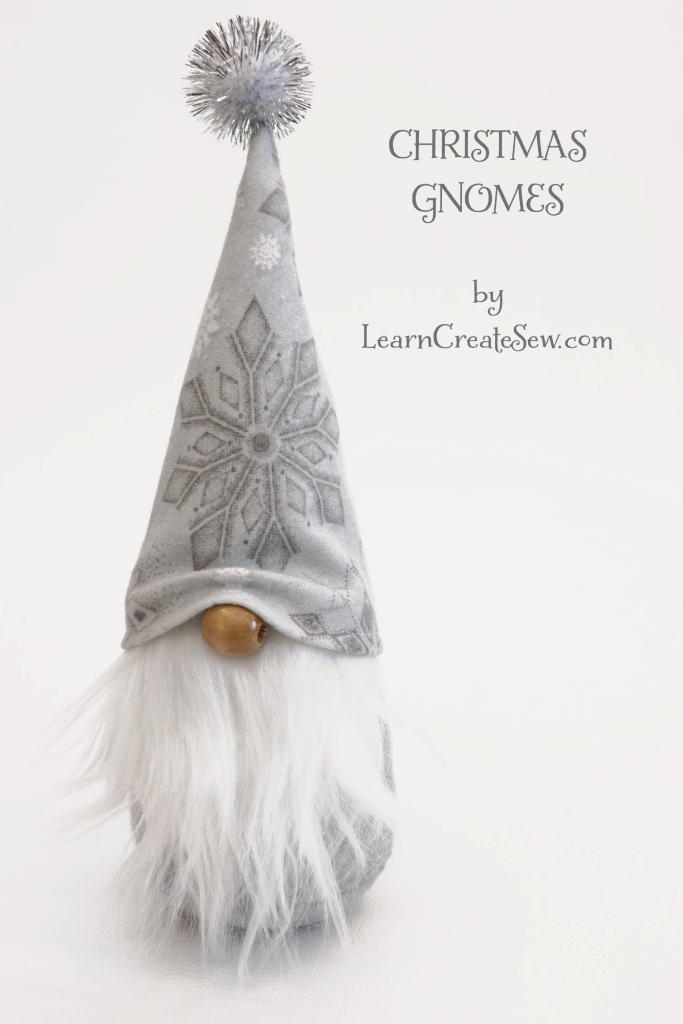
Happy Holidays! These little Christmas Gnomes are a great addition to your holiday decorations.
They are quick and easy to make and super cute!
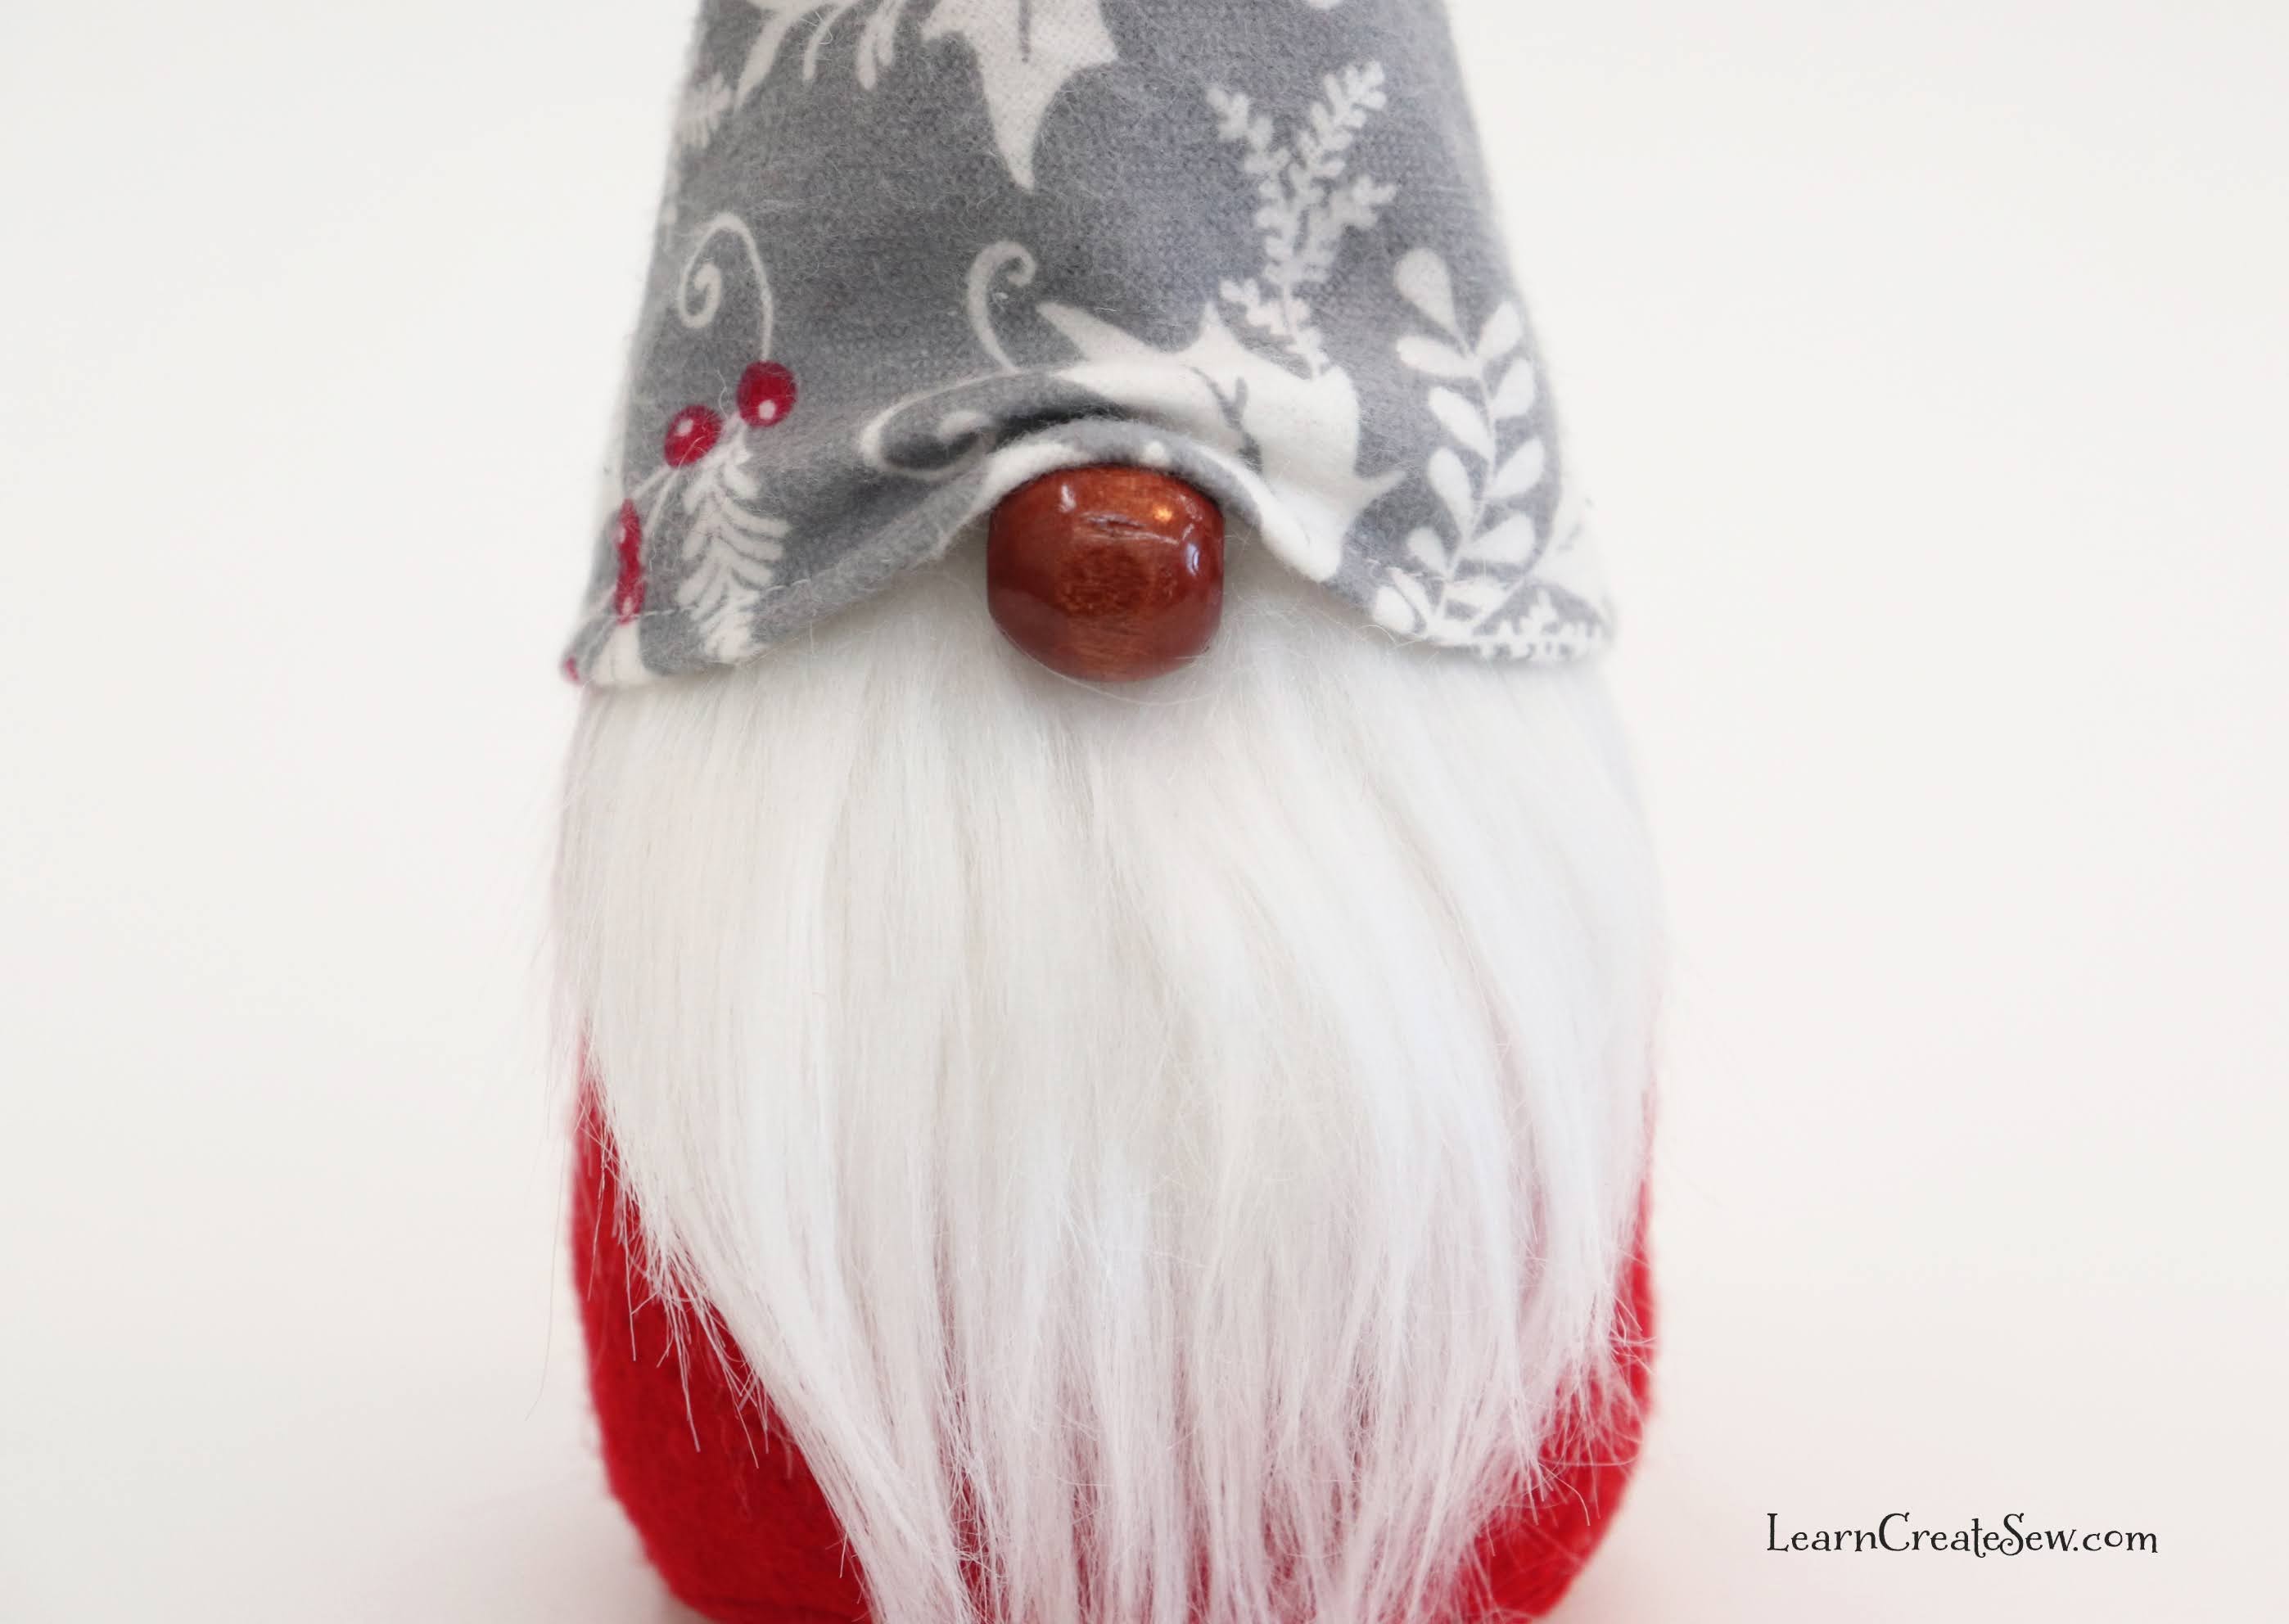
I used flannel fabric for the hat and felt for the body. My favorite part is the sparkly pom poms I found for the tops!
The beard is faux fur and gives the little gnomes a lot of character. I also picked up a mixed set of wooden beads at Walmart that work great as noses!
Each gnome is filled with polyfil and poly pellets to weigh them down.
At this holiday season, I want to express my gratitude to all of my followers. Thank you! Thank you for supporting learncreatesew.com and subscribing to my YouTube Channel. Having the opportunity to share my love of sewing with so many is a great privilege and an opportunity I never thought I would have.
Thank you for making all of this possible and encouraging me to keep creating.
And for you, here are my next videos!
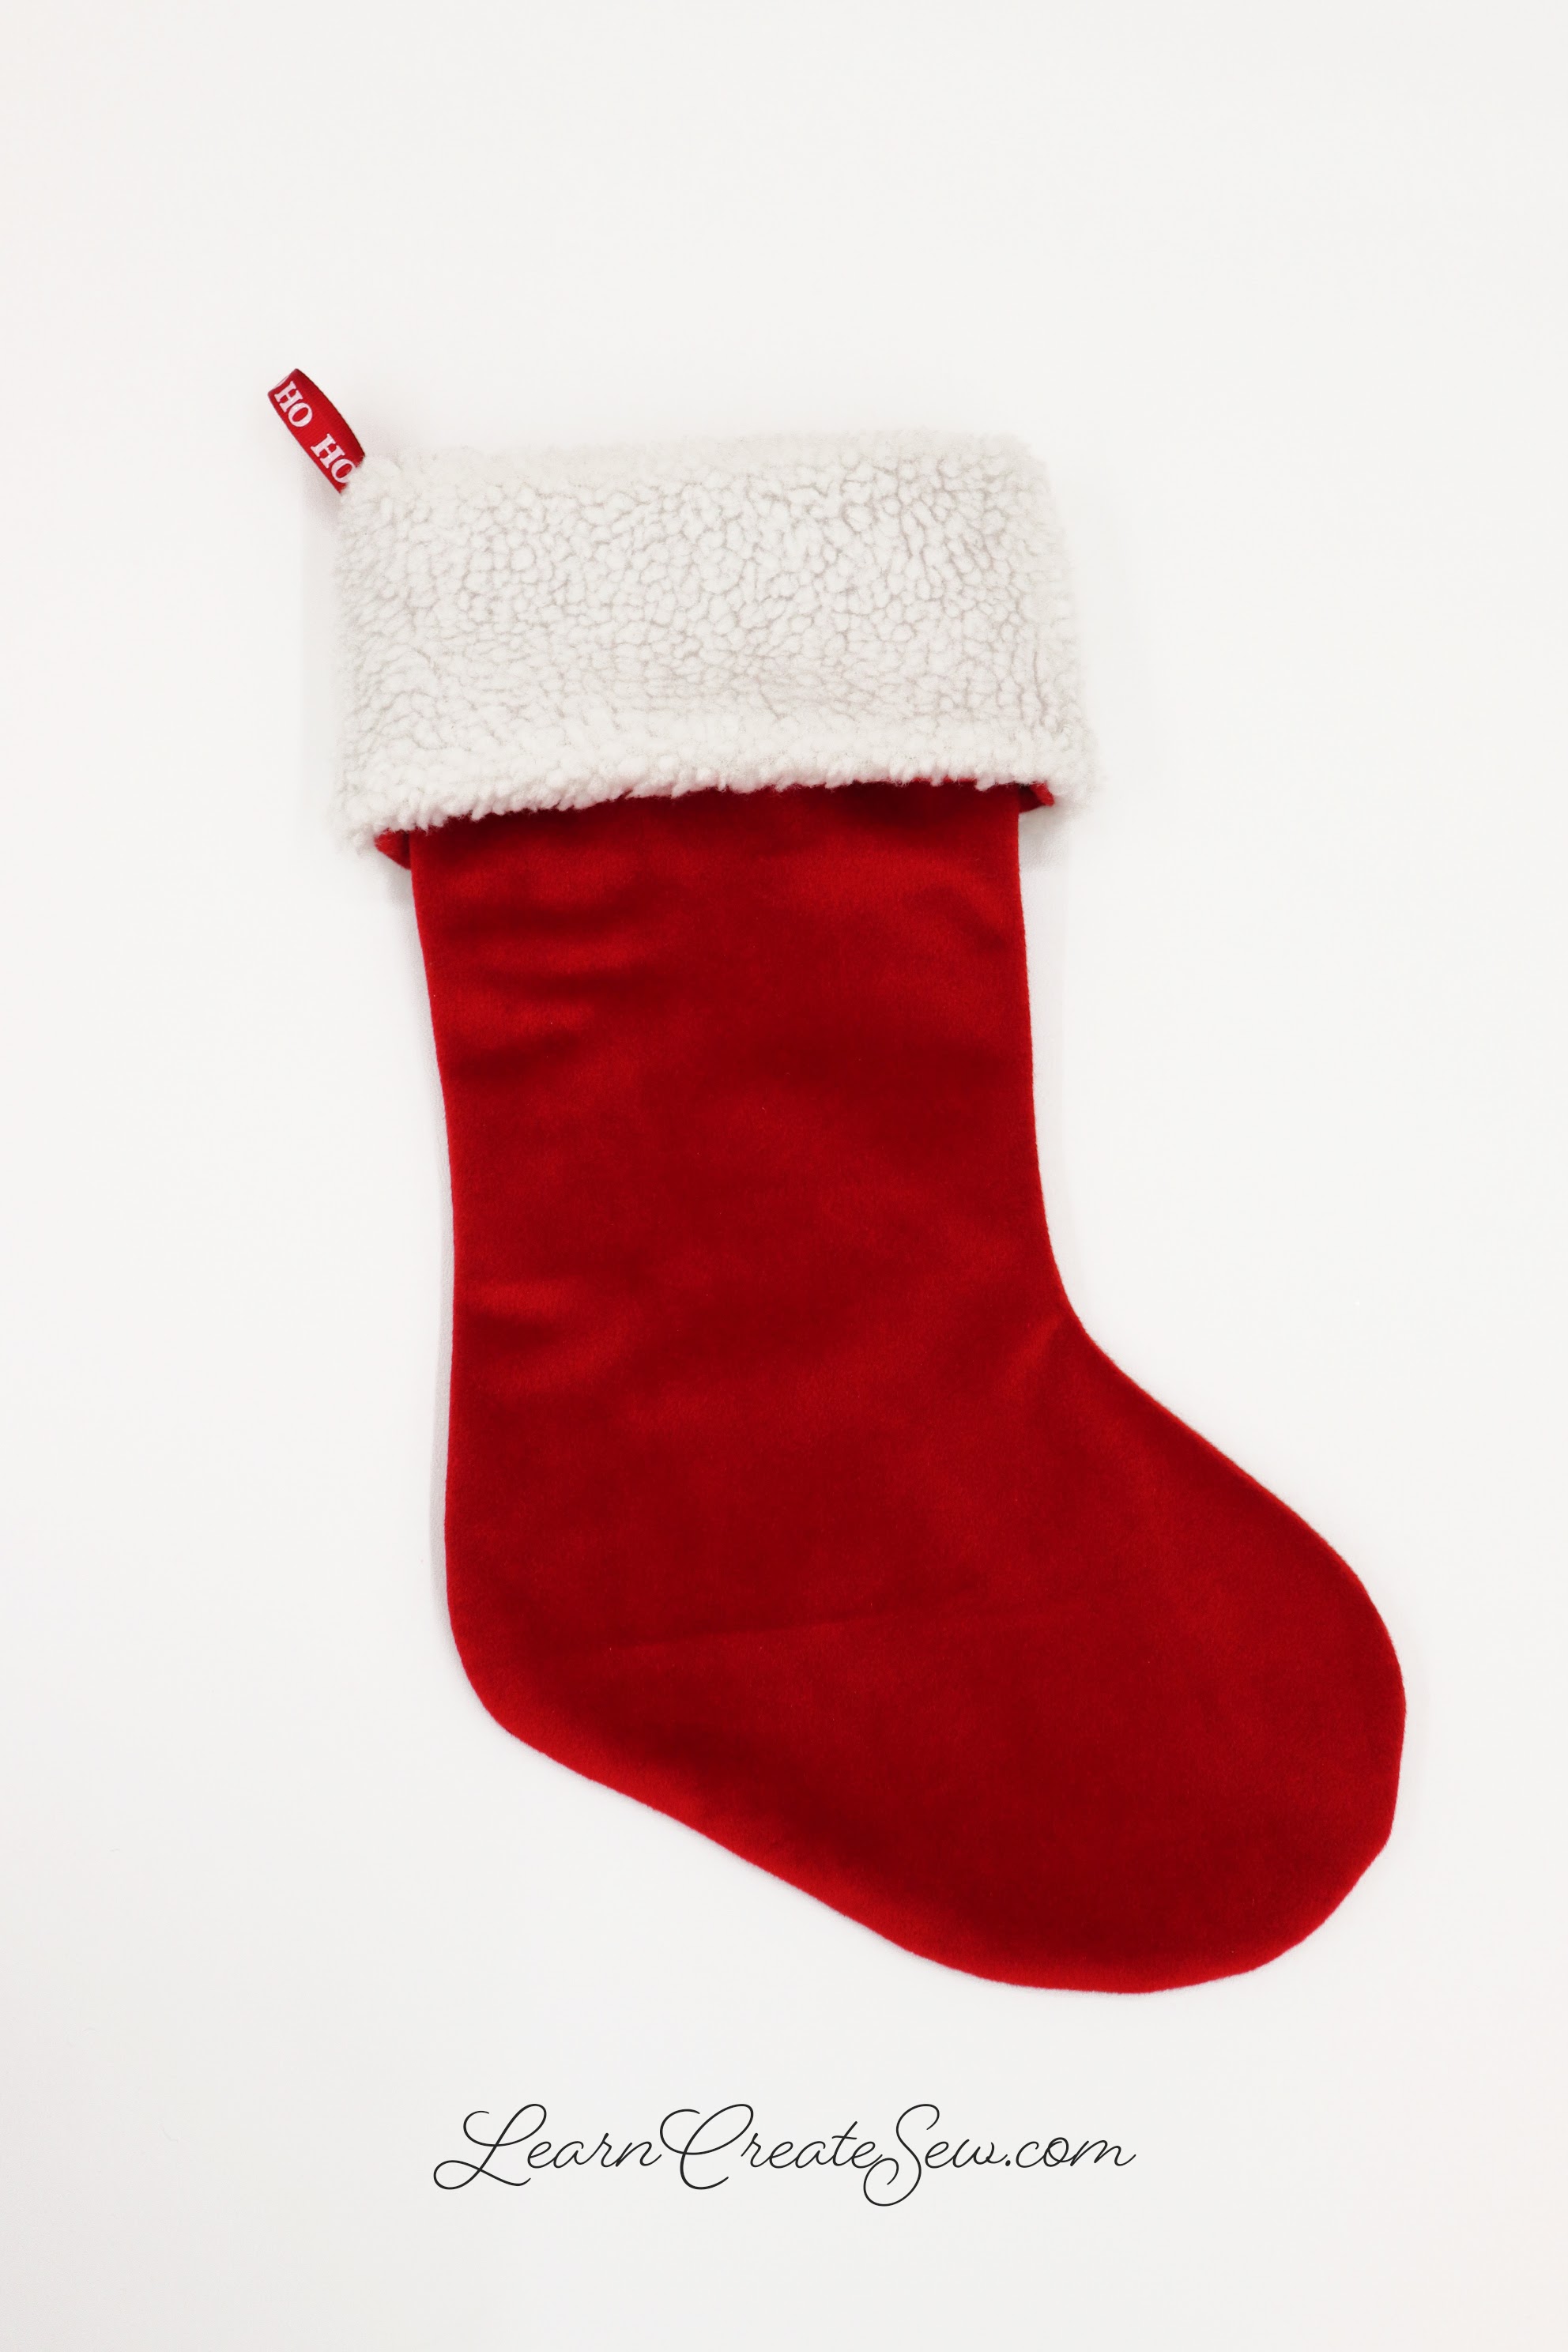
I had a lot of fun adapting the Christmas Stocking pattern for you! I don’t know about you, but I love options. But what if I did this…or this…? That is what I am always asking myself. As a result, I wasn’t satisfied with just the basic stocking. I wanted to expand upon it to provide more great options for creativity.
The first video explains how to add a contrasting cuff, if you wanted the fabric of the lining to vary from the fabric of the cuff. The stocking shown here has a sherpa cuff but a flannel lining.
The next video adds a burlap overlay to the main fabric as well as decorative embellishments.
I hope these videos inspire creativity, and I hope you have a lot of fun making your own stockings!
See the Christmas Stocking page for the free pattern.
I’m so excited to share this project with you today! It has been quite a while since my last post and I am happy to finally share with you a fun holiday project.
Life and work caught up with me the last few weeks and it took the excitement of Christmas projects to motivate me to get back to sewing!
This is a quick easy Christmas Stocking.
It is fully lined and has a fold over cuff!
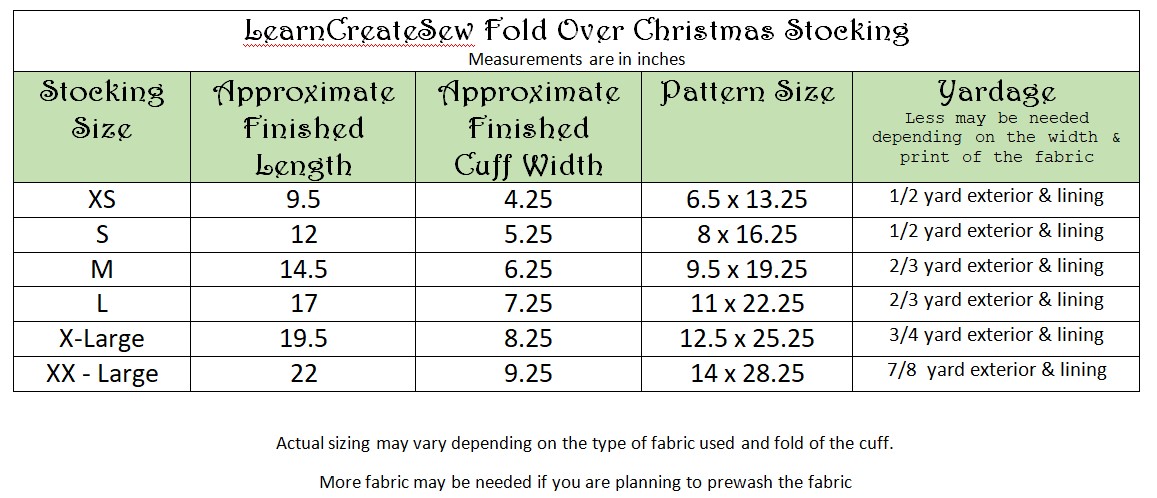
The free pattern is available in several sizes.
The pattern works great with flannel, fleece, and cotton fabrics.
If you enjoy this tutorial keep an eye out for future posts in which I’ll show you a few quick alterations to the same pattern.
SUPPLIES:
Coordinating Thread
Ribbon (4 – 8 inches)
7/8 yard (or less) Fabric for the Outside of the Stocking (Cotton, Flannel, or Fleece)
7/8 yard (or less) Fabric for the Lining and Cuff (Cotton, Flannel, or Fleece)
The project works best when the lining and outside fabrics are the same type of fabric.
The amount of fabric needed varies a lot depending on the size of the stocking you make and the direction you need to cut your fabric.
I recommend reviewing the pattern sizes in the table below if you would like more specific measurements.
Remember you will need two lining pieces and two outside pieces.
A bit more on yardage:
For instance, if I want to make a size small I know I need two pieces of outside fabric that will fit the pattern (which is 8 by 16.25 inches). If the direction of my fabric doesn’t matter 1/4 yard would work…but if I have to follow the selvage, for example on fabrics with words or a specific direction, I may need 1/2 yard.
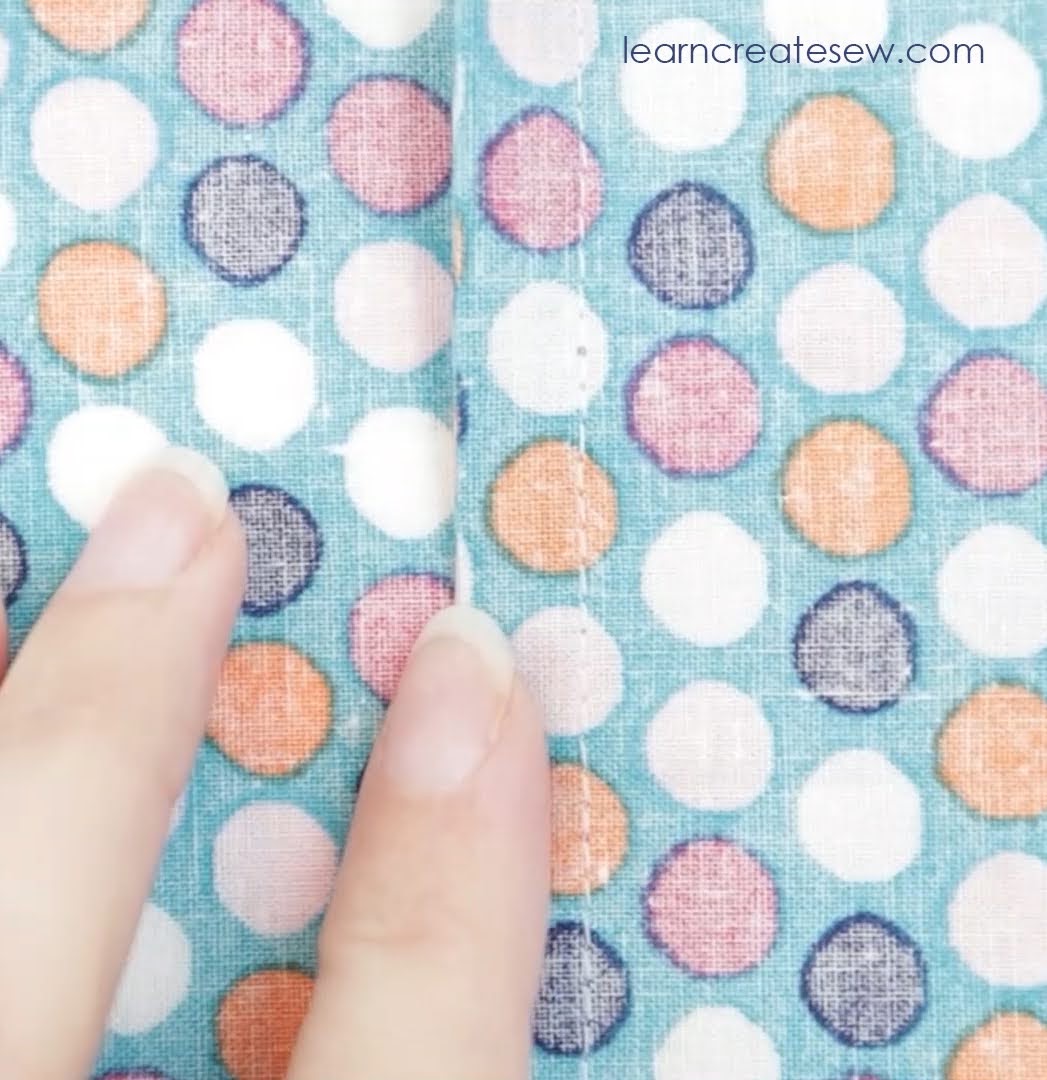
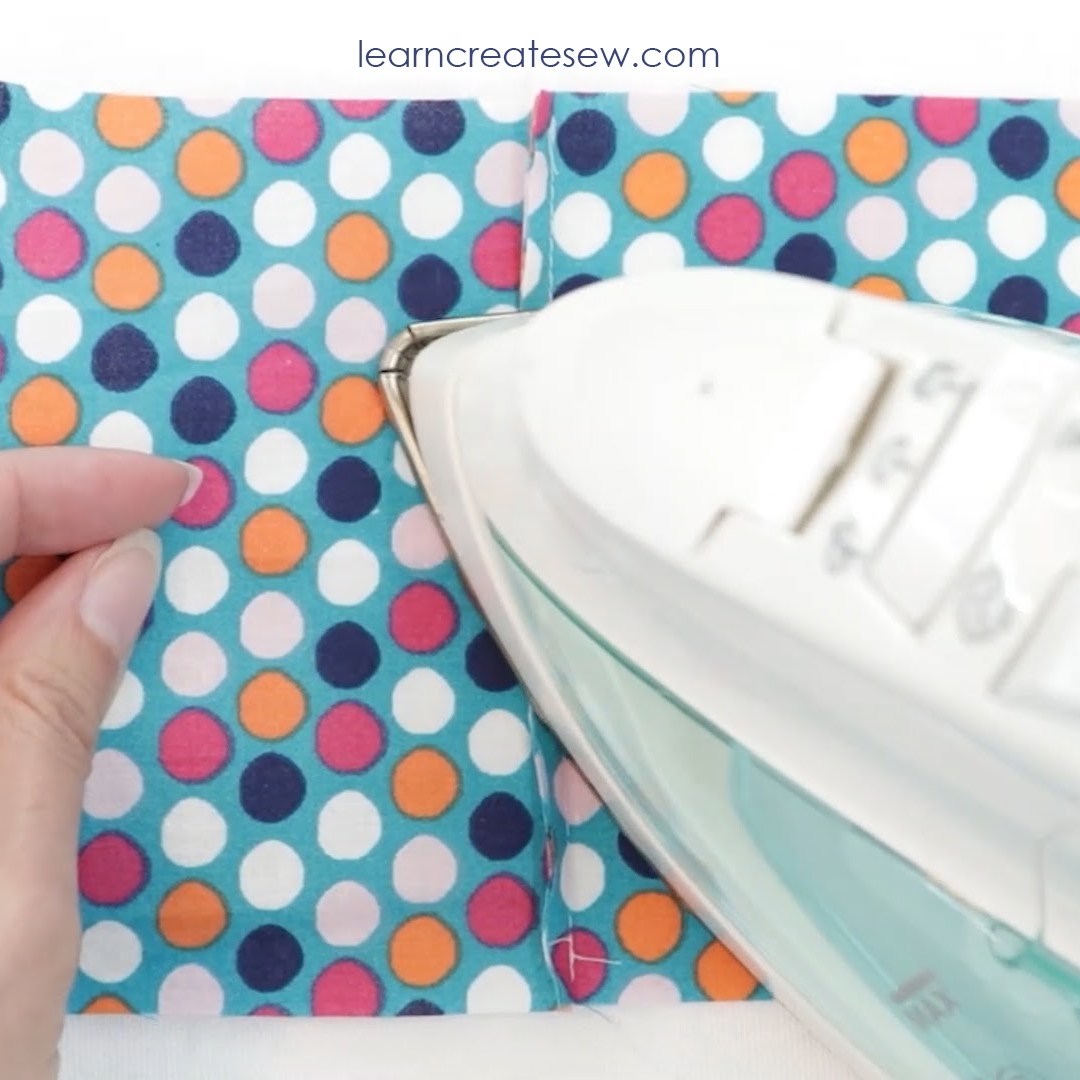
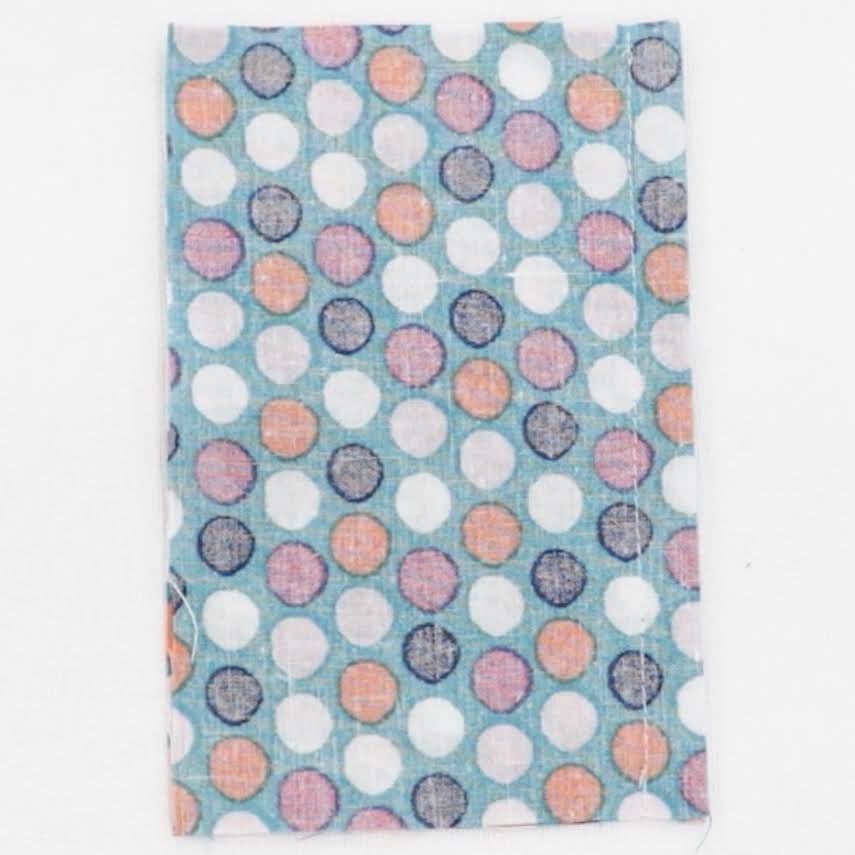
A French seam provides a great finish to many projects. In a French seam no raw edges are visible, as they all become trapped inside a small casing.
This can be a really great feature as you won’t have any frayed edges. I have found this seam to be very helpful on projects that are going to be washed a lot, which usually creates a lot of strings. I also like to use a French seam on projects in which the inside will be visible.
To sew a French seam you actually sew twice.
You sew first with the fabric WRONG sides together. This can seem strange since we usually sew with right sides together.
Then we trim, press, fold with the fabric RIGHT sides together and sew again along the same edge with a larger seam allowance.
Now, on both the right and wrong sides of the seam, no raw edges will be visible.
Once you get the hang of it, a French seam is fairly simple, and it’s a great skill to have in your Sewing Bag of Tricks 🙂
In this lesson we will learn several topics that are applicable in a wide variety of sewing projects. The drawstring bag introduces how to make a casing or channel that can be used to hold, a drawstring, elastic, ribbon, and more. This skill is used everywhere from bag making to garment construction and makes the drawstring bag a great project for beginning sewers.
Lesson Category:
Machine Sewing – Straight Seams
Lesson Topics:
Making a Drawstring
Making a Casing
Sewing Straight seams
Finishing Seams
Pressing
This bag measured approximately 13.5 x 15 inches when finished, but could easily be adapted for other sizes.
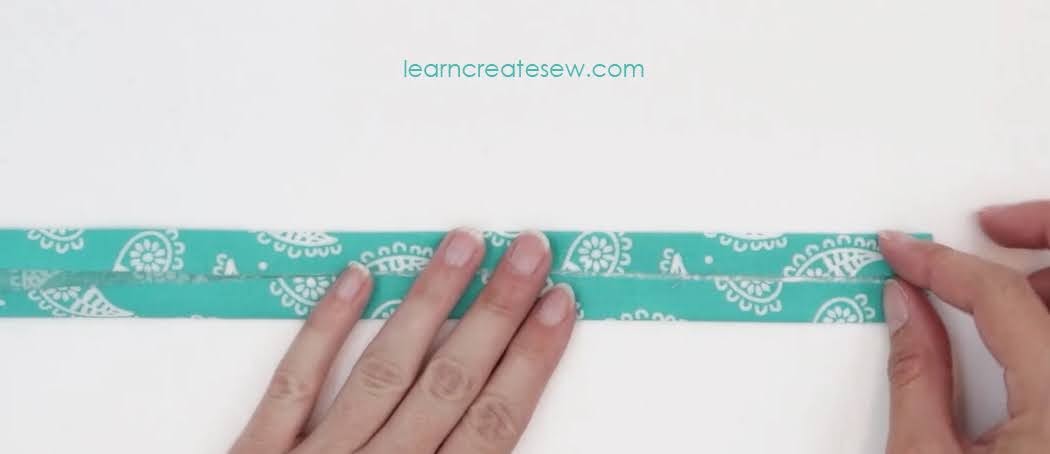
The bag features a 1/2 inch wide drawstring made by piecing and folding 2 inch strips of fabric.
This project was designed to only use 1/2 yard of fabric, and as a result the drawstring is pieced, but you could use more fabric if you prefer to make the drawstring out of a continuous piece of fabric rather than multiple pieces.
It has a wide casing for easy threading of the drawstring. I’ll show you a quick way to make sure the sizing of your channel is consistent.
It also introduces finishing seams, which is a great skill in general. If you are interested in learning more about finishing seams check out my Skill Building Video on the topic!
In the video also introduces tips for how to turn a corner exactly, how to finish the edges of the drawstring channel and more.
No matter how long you’ve been sewing, or how much experience you have unpicking seams is inevitable.
Sooner or later, you will have to unpick a seam. It’s actually good to do so. In most cases, when something goes wrong, it is best to redo it right away. Ignoring it can often make the issue worse, as you may find that what went wrong impacts what you will need to do four or five steps down the road. So, if we can become comfortable and skilled at unpicking seams, we will be able to improve the overall results of our sewing projects!
In this video I will show you four different ways to unpick seams. Since many fabrics are different, often the way we unpick the seams differs as well. All of the methods have their uses and are helpful in a variety of situations.
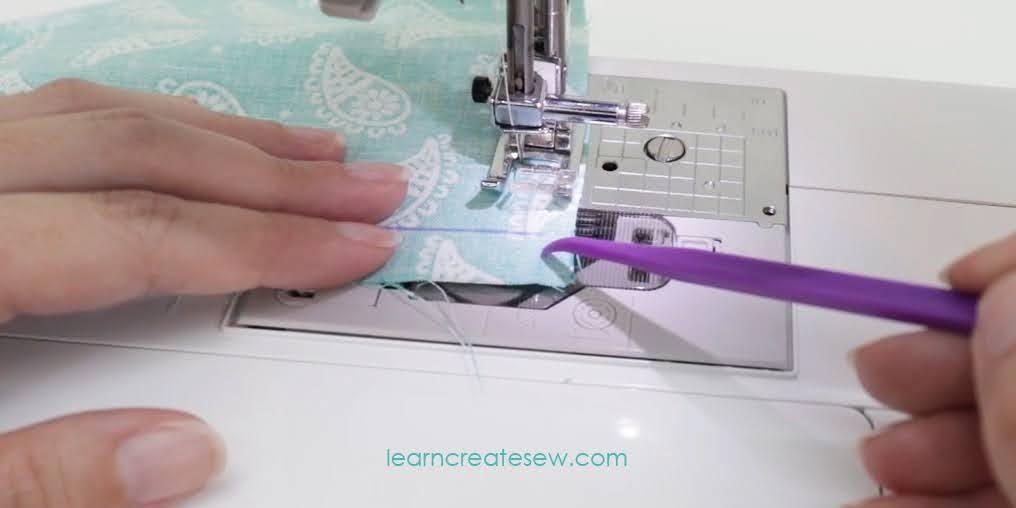
Method 1: Unpicking from the Wrong Side
This is usually done with the fabric laying flat and right sides together. It is the most common method of unpicking, and is my go to method in most cases.
This method is actually quite simple, but it’s easy to do more work than you need to. Just remember…you don’t have to unpick EVERY stitch! That’s usually not necessary unless you are using a very small stitch length or are working in an area that was backstitched.
Simply slide the seam ripper under every 4th or 5th stitch, tearing the thread, and then pull thread from the back and ta da! It’s all undone!
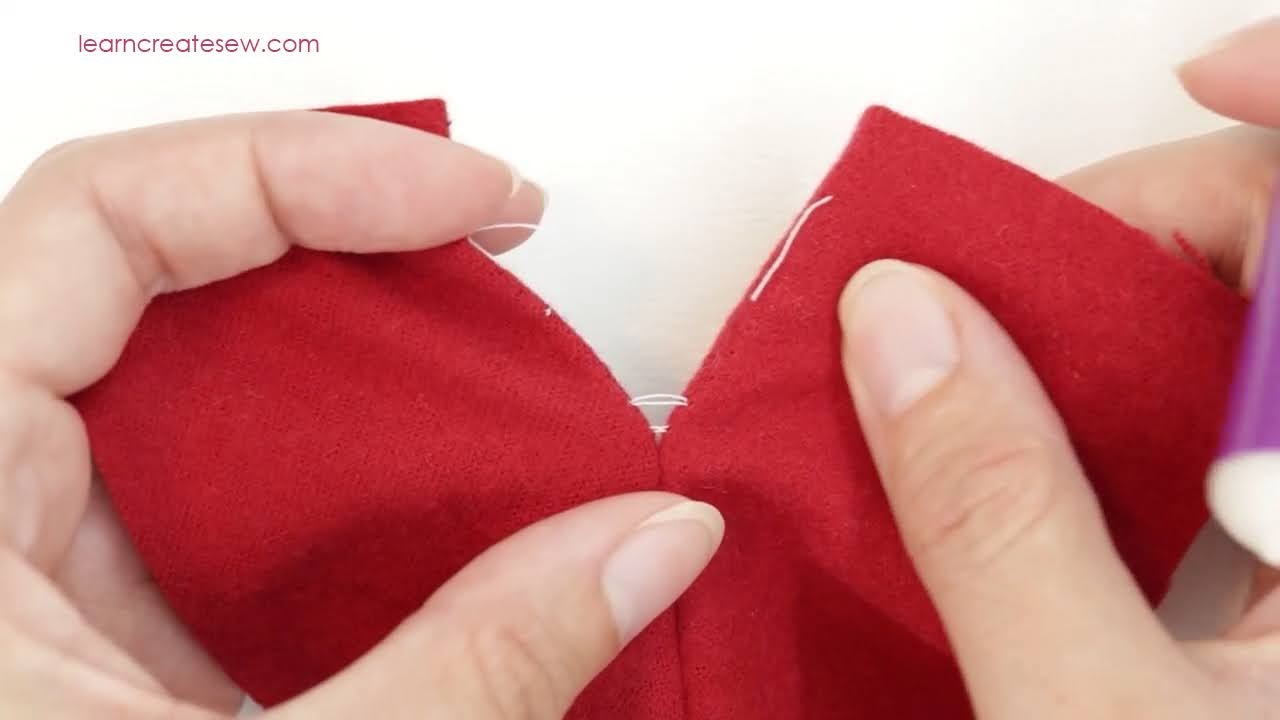
Method 2: Unpicking from the Right Side
I use this method a lot on fleece or plush fabrics. I find on these fabrics my stitches sink right into the fabric, and sliding the seam ripper under the stiches can be difficult. I also like using this method in situations where the stitches are difficult to see, especially if you are using coordinating thread.
Lay your fabric flat with the seam allowance open. Unpick the first few stitches one by one, and then gently pull the fabric on each side away from each other. You will then be able to see the thread between them. This makes sliding the seam ripper under the threads much easier! And since you are gently pulling as you go, it often is quite quick.
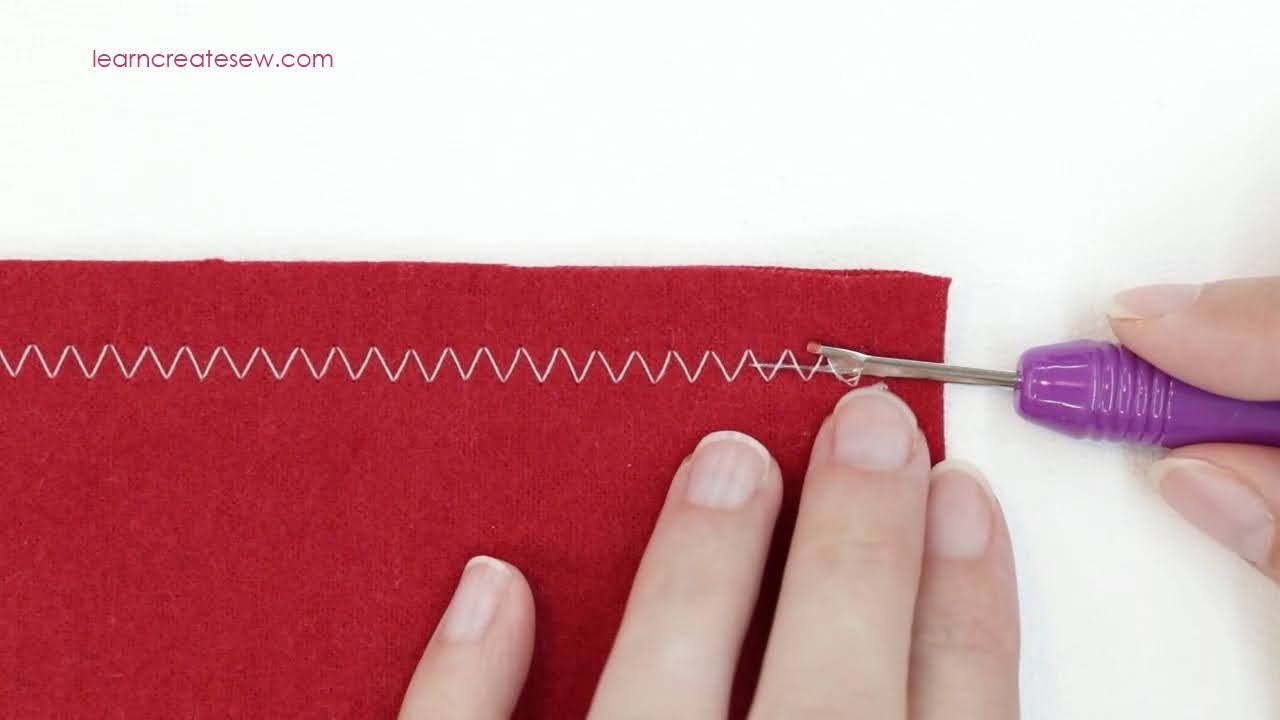
Method 3: Unpicking Zig Zag Stitches
Zigzag stitches are probably the easiest stitches to unpick. You simply slide and go. Guide the point of the seam ripper under the stitches and slide right through. The seam ripper is usually able to glide under several stitches at once, ripping the stitches of the seam in seconds.
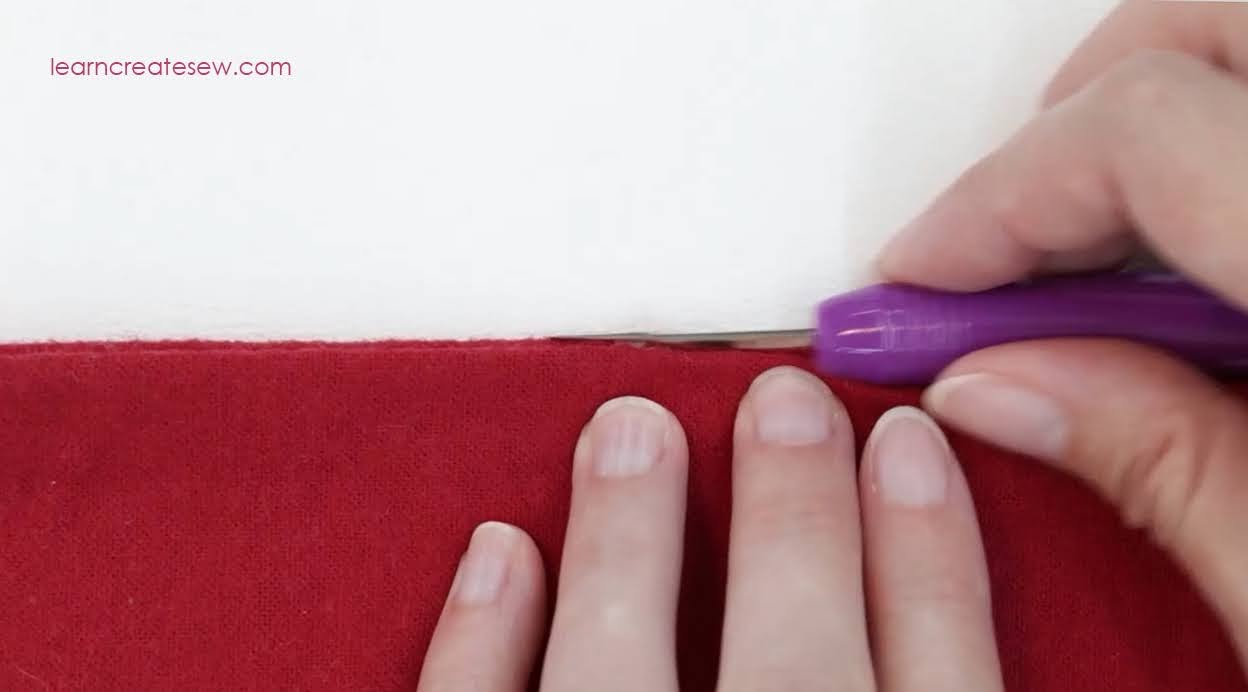
Method 4: Using the Little Red Ball
This is a really popular method for unpicking and is super convenient. Simply unpick a few stitches in the seam to get it started, then slide the little red ball between the layers of fabric, and gently push it through the seam. The little ball helps separate the fabric so only the threads are cut.
As the seam ripper slides down the seam it will cut the stitches. This method is SO fast. If you are careful it works great. This can be done with the fabric wrong sides together such as on the edge of a closed project, or with the fabric laying flat and the seam allowance open (which protects the fabric a bit more). It is actually pretty fun to watch the seam ripper slide smoothly along the edge and take out those unwanted stitches 🙂
I want to love this method, I really do. It is so easy and it’s nice to just slide that seam ripper along and let it do its’ work. Unfortunately, this method does have its drawbacks. Every once in a while a bit of fabric gets caught in the groove and the blade can tear a hole in your fabric. This could happen for a lot of reasons. It could be the weight or position of your fabric, a dull seam ripper, unexpectedly tight stitches, or any number of other reasons. I have on multiple occasions cut a hole in my fabric using this technique. As a result, I don’t use it very frequently. I also avoid attempting it on expensive fabrics or project that don’t have any leeway in sizing. I’ve found it’s just a bit too risky for me. That said, a lot of people love it and this is the method they use all of the time. So, give it a try! Find the method that works best for you and don’t hesitate to unpick a seam when needed!