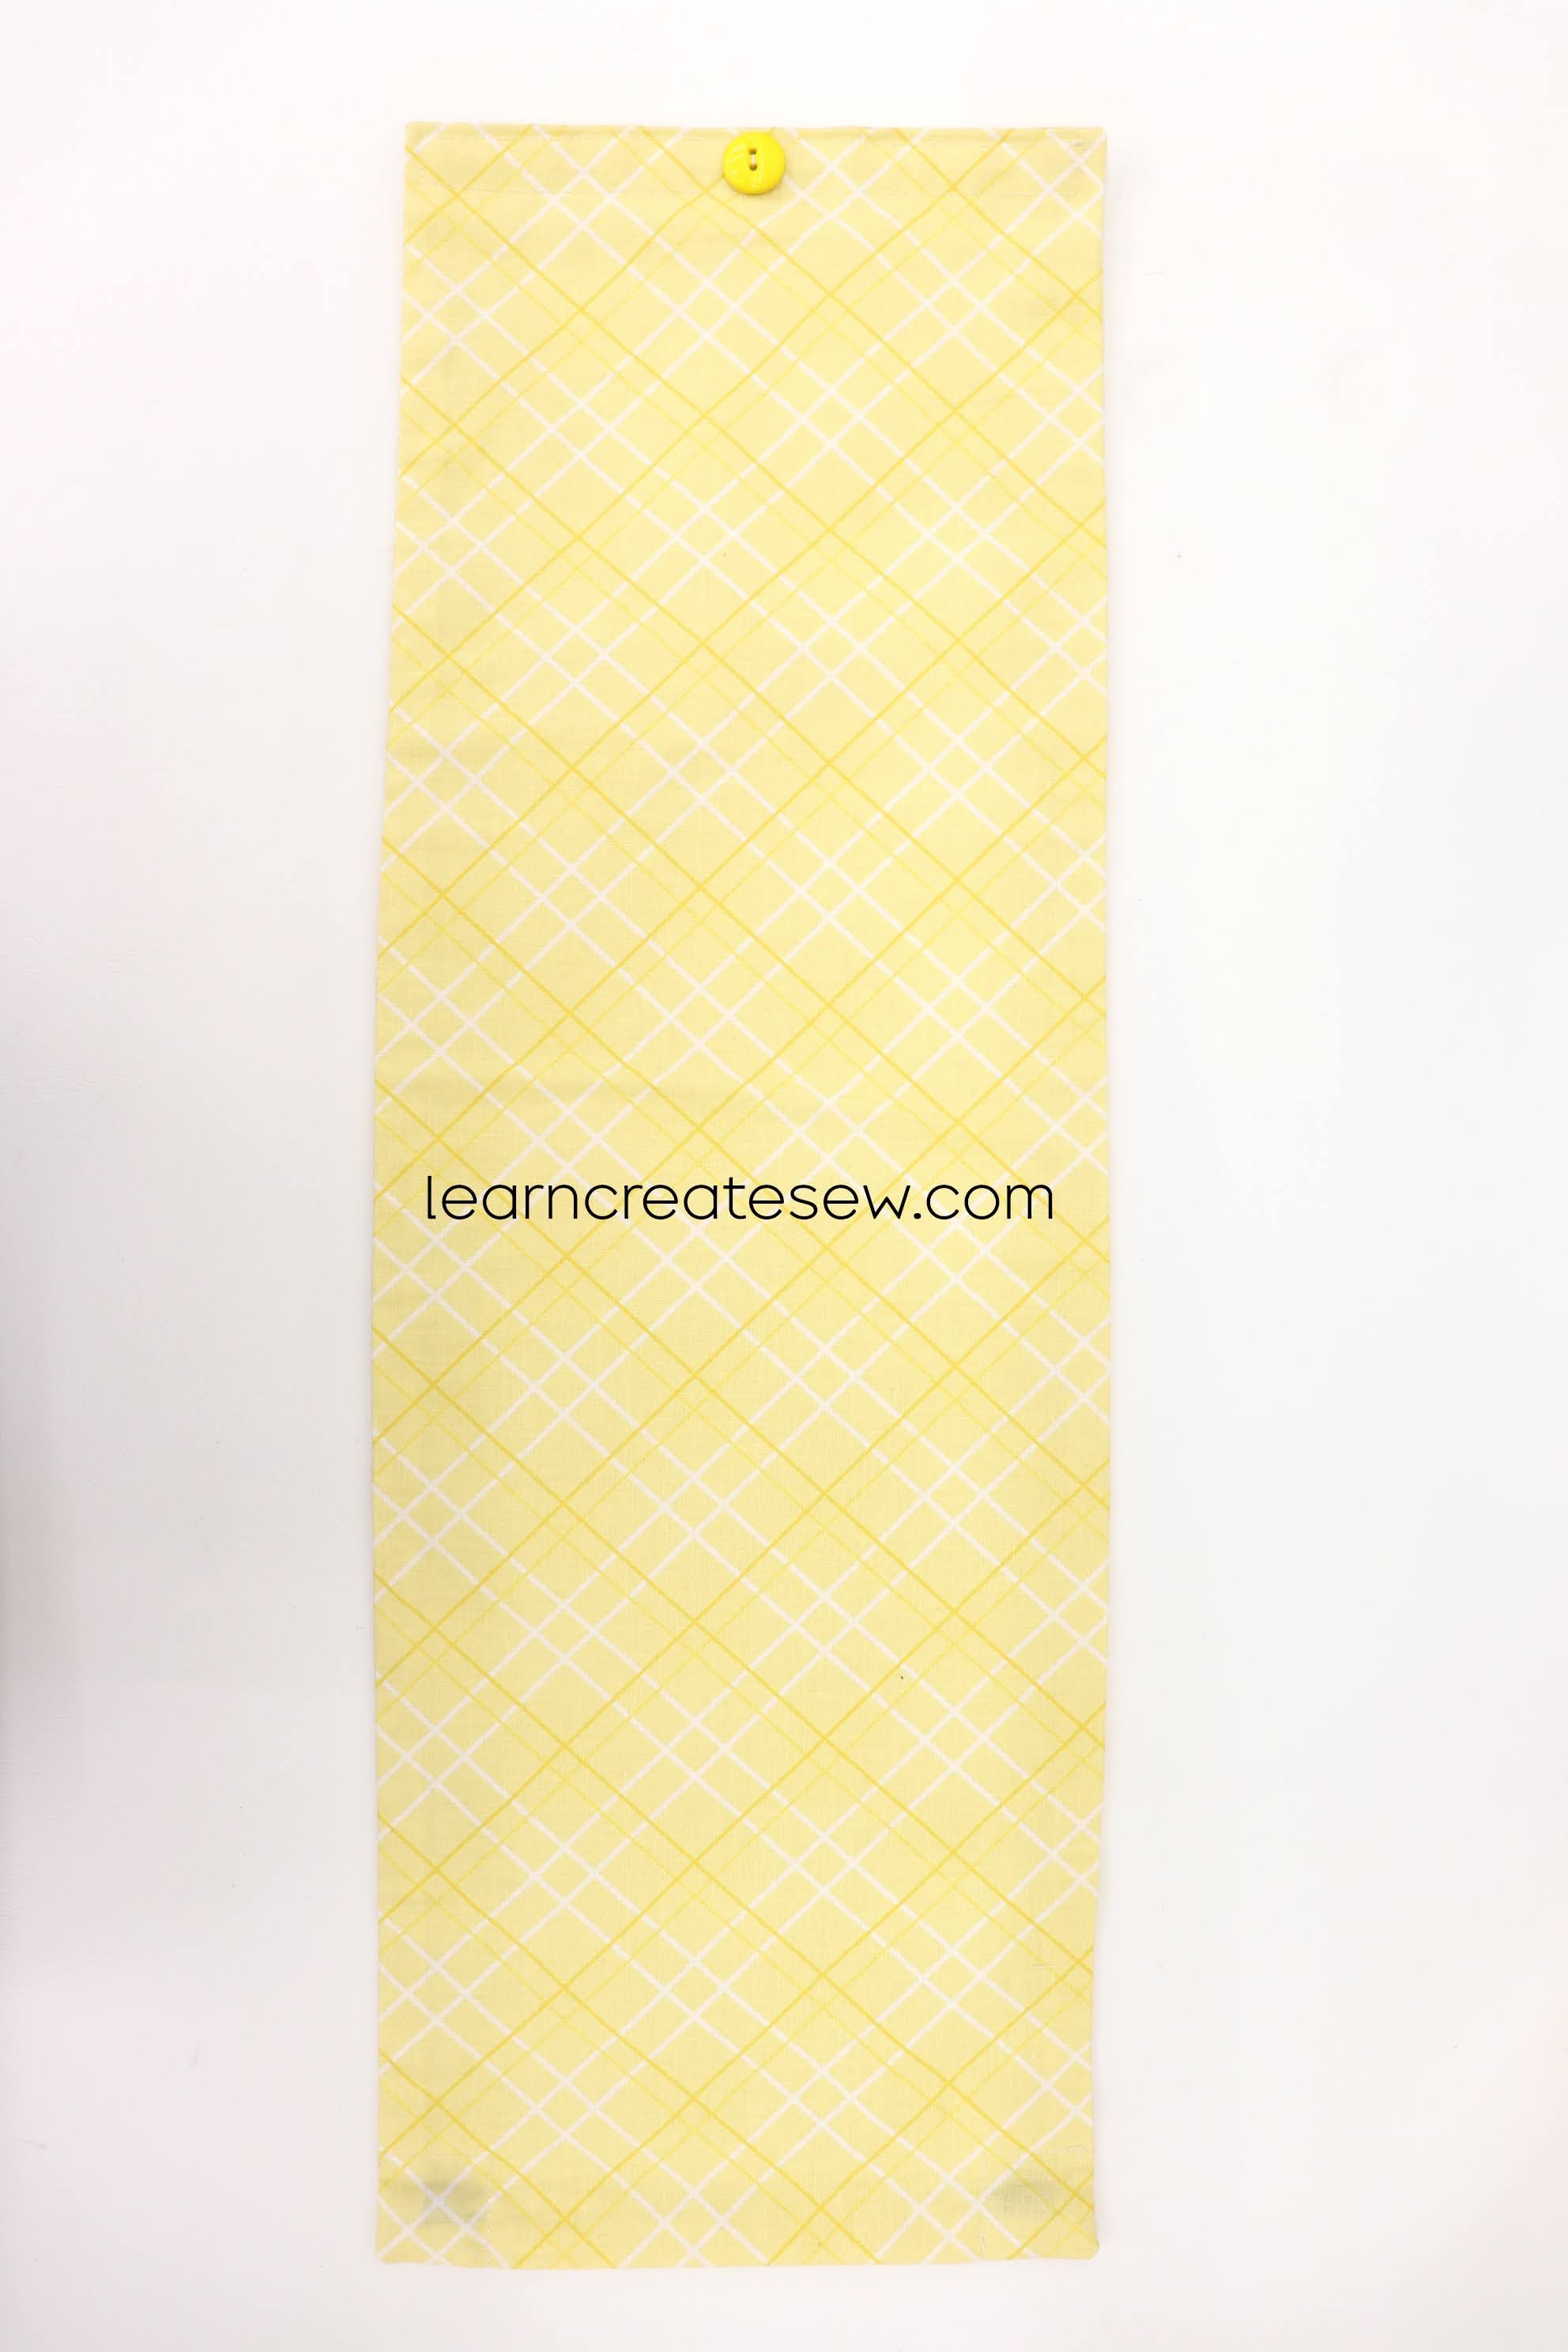
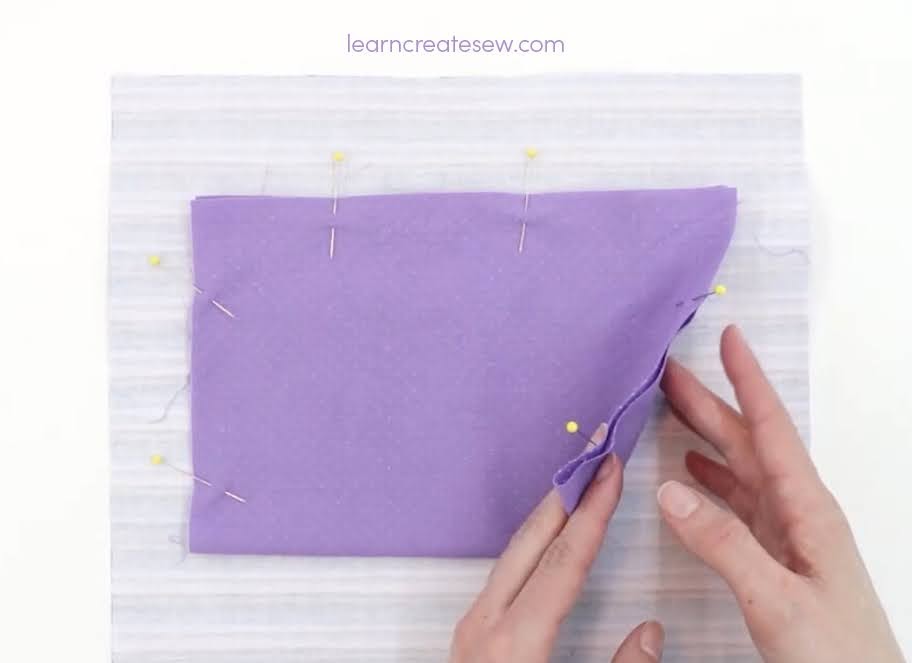
I was recently asked to help with a service project at our school. Parent volunteers are making curtains for all the classroom windows! They are going to be so nice!
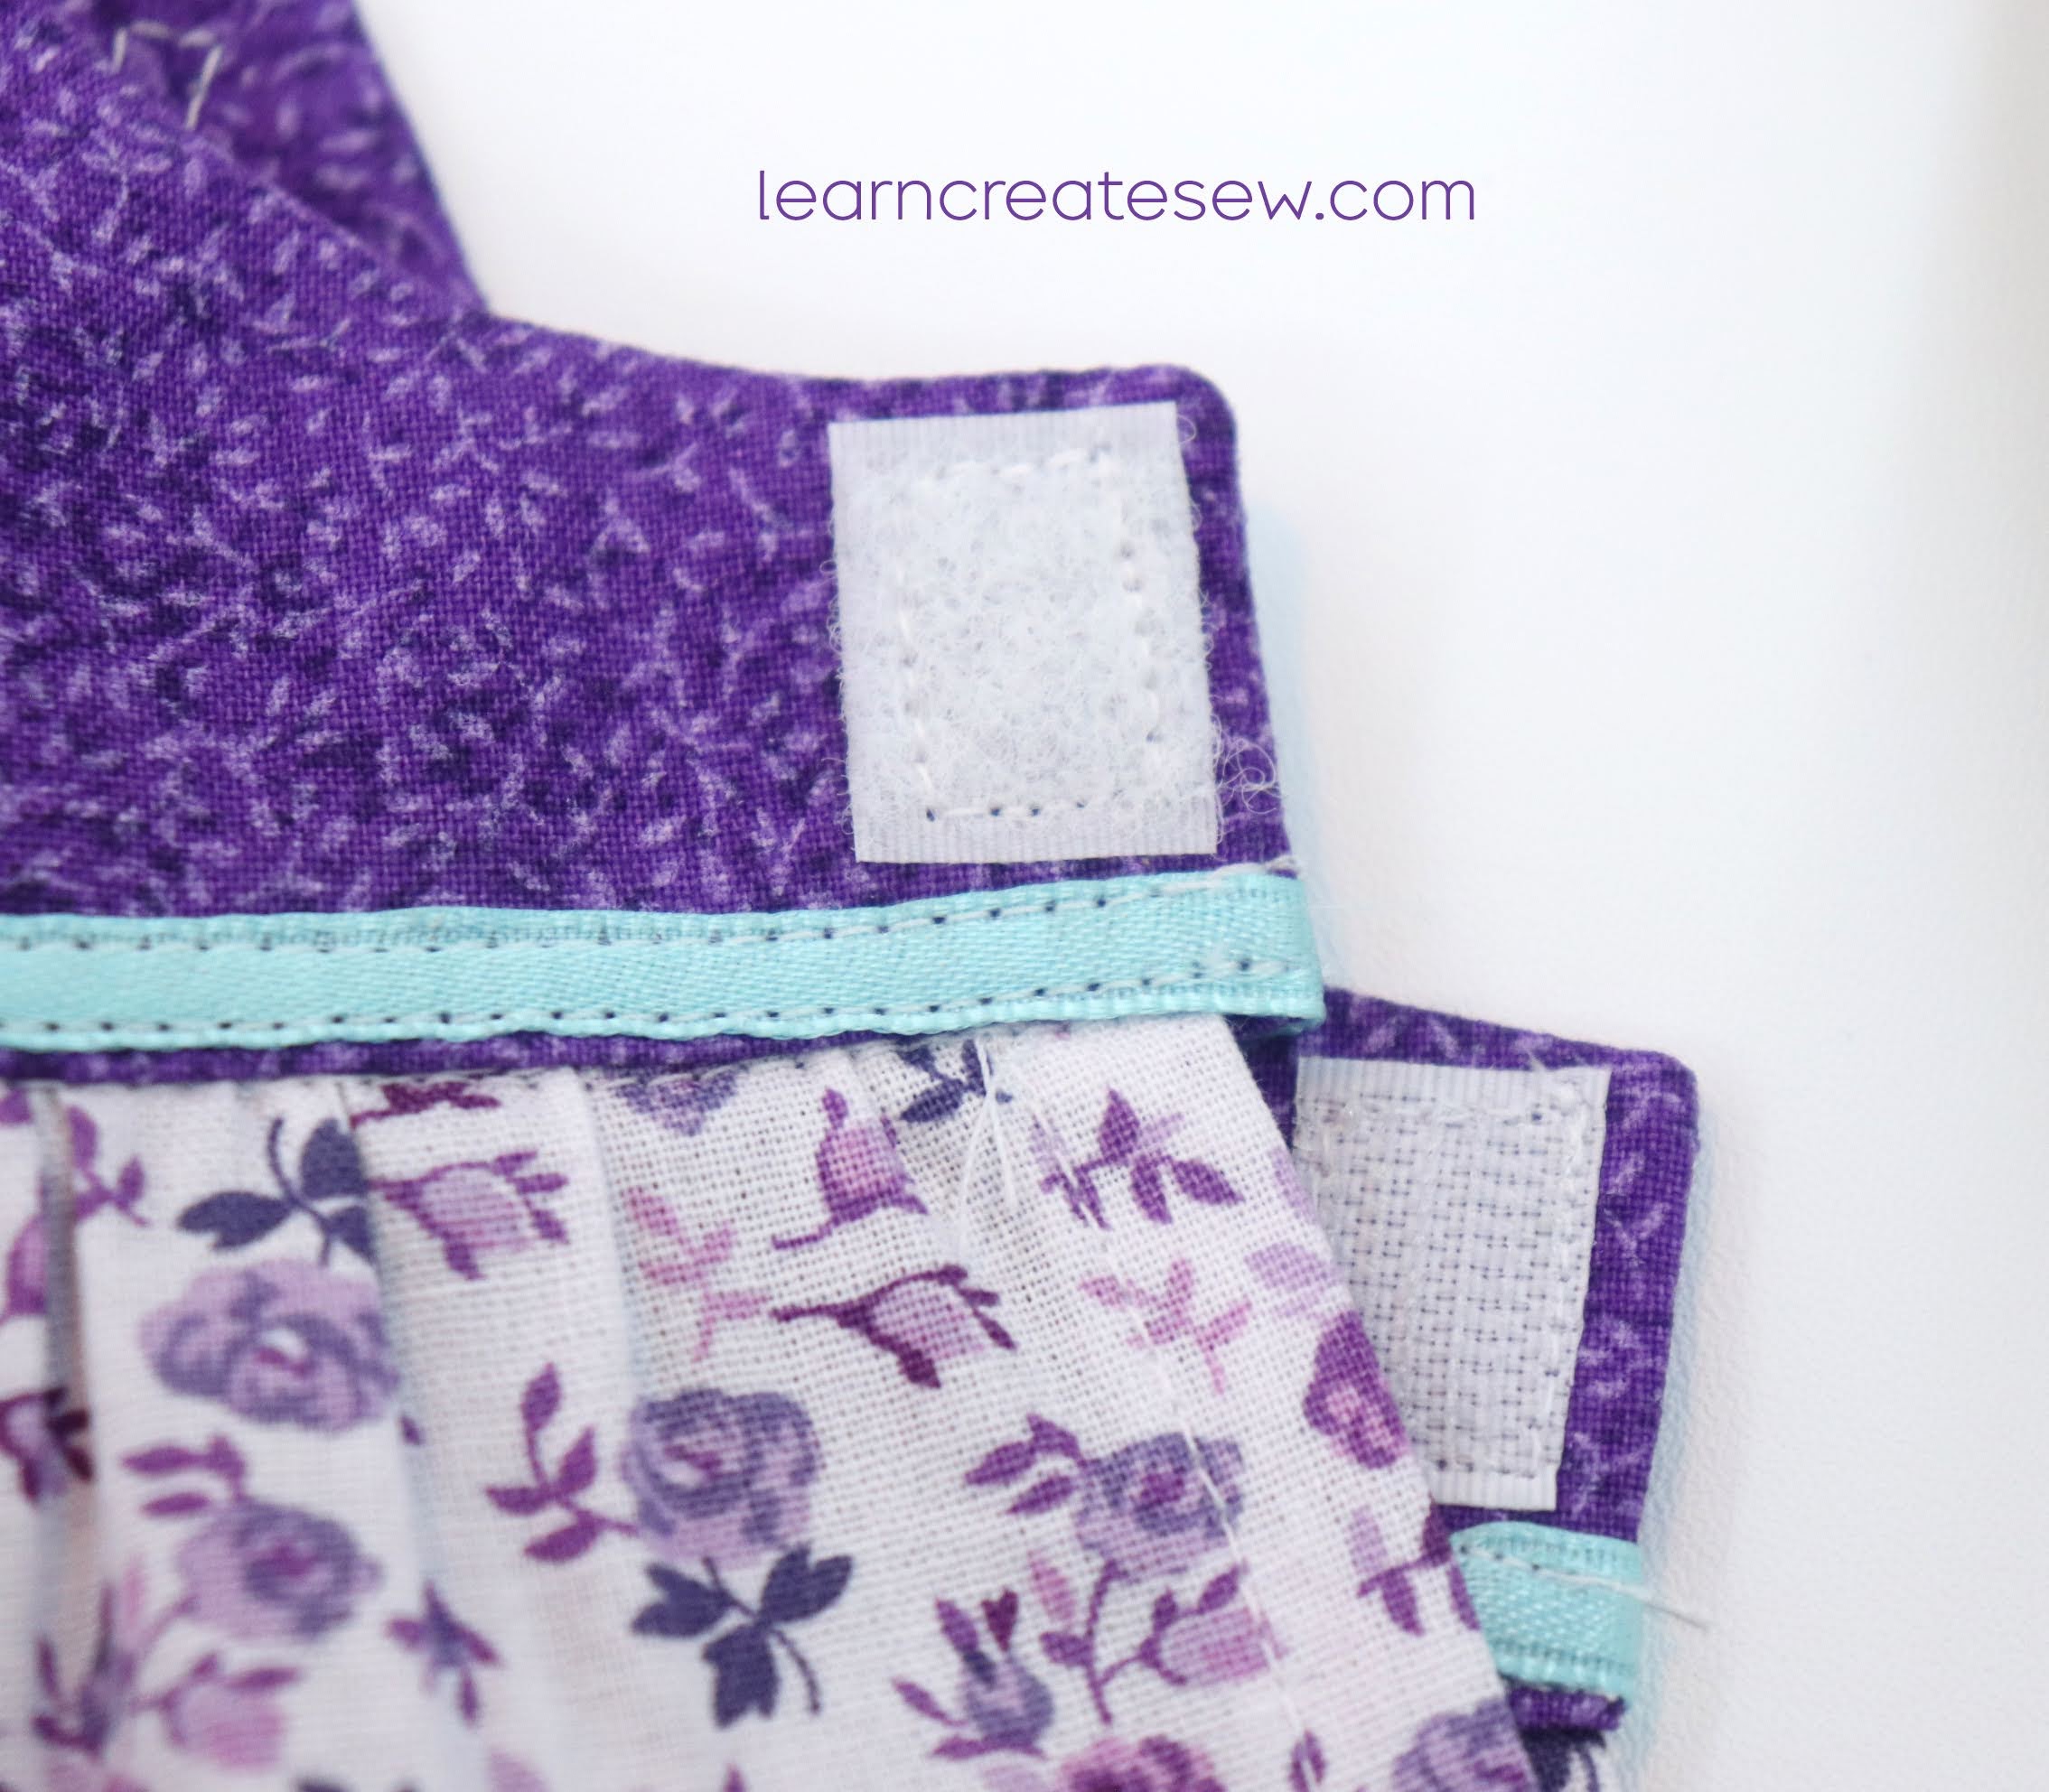
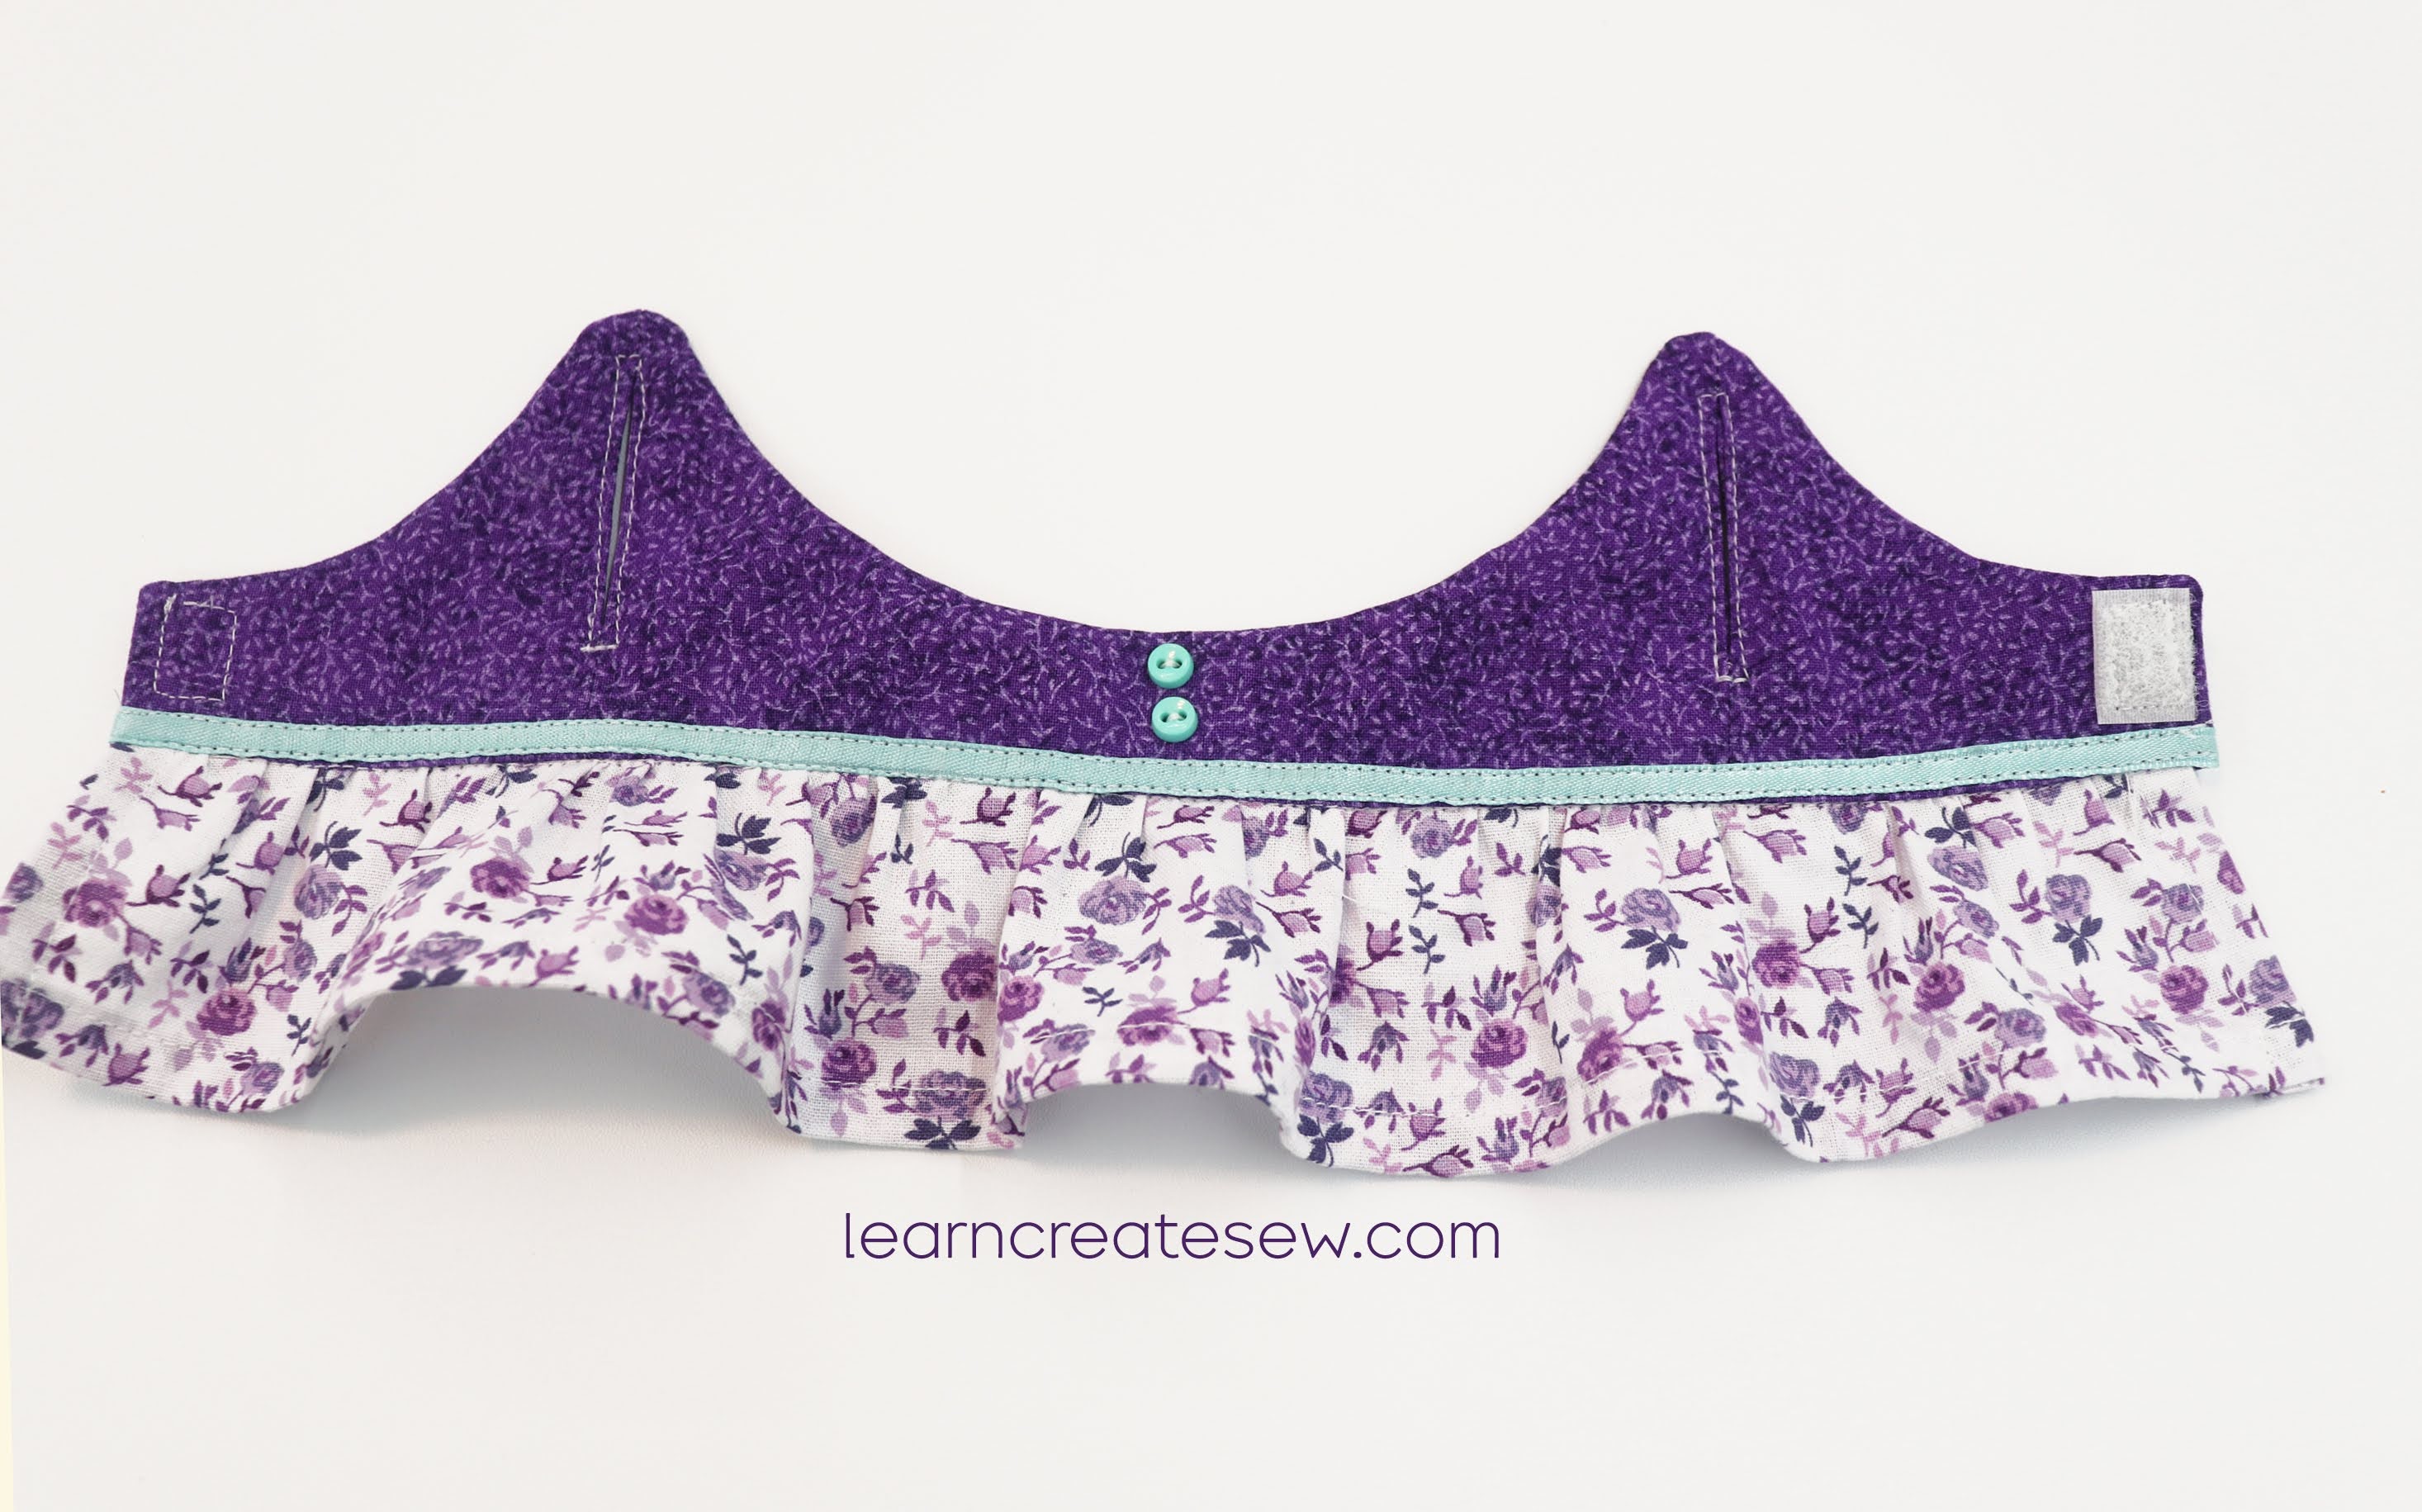
Our school will be attaching the curtains to the door using velcro. If your school isn’t doing that you can use magnets, or ribbon loops with 3M hooks instead.
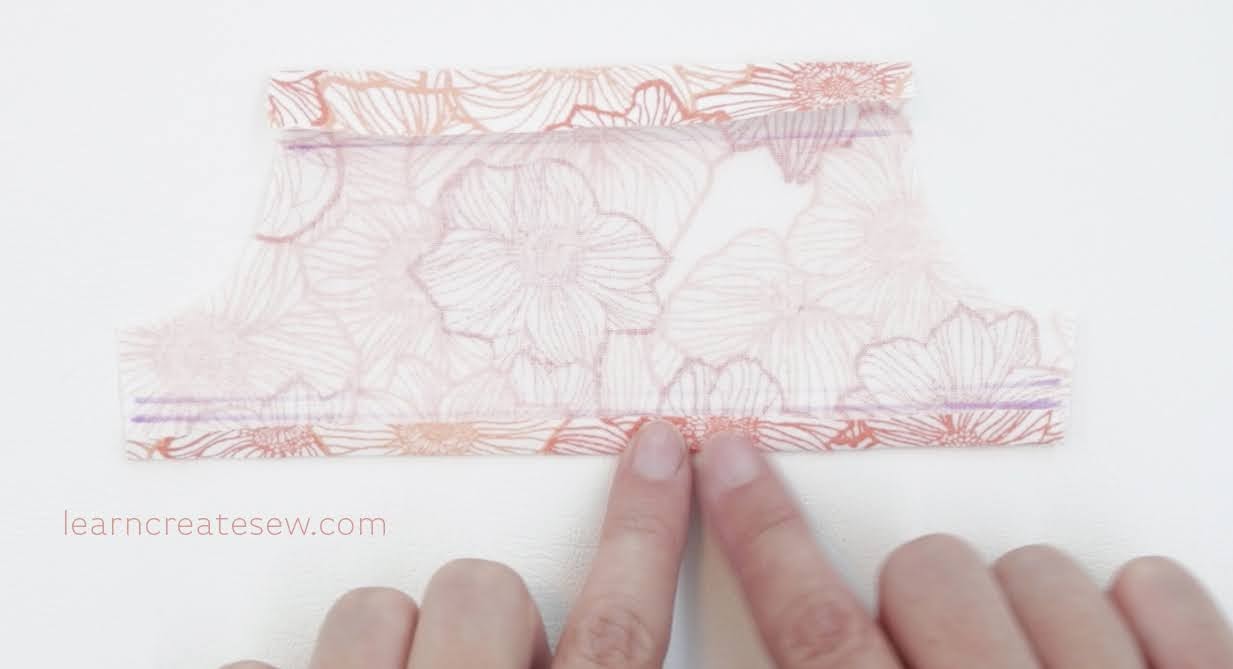
There are two magnets at the base of the curtain which will help it stay in place when in use. If you don’t want the magnets to be visible on the outside of the curtain, select a darker fabric print.
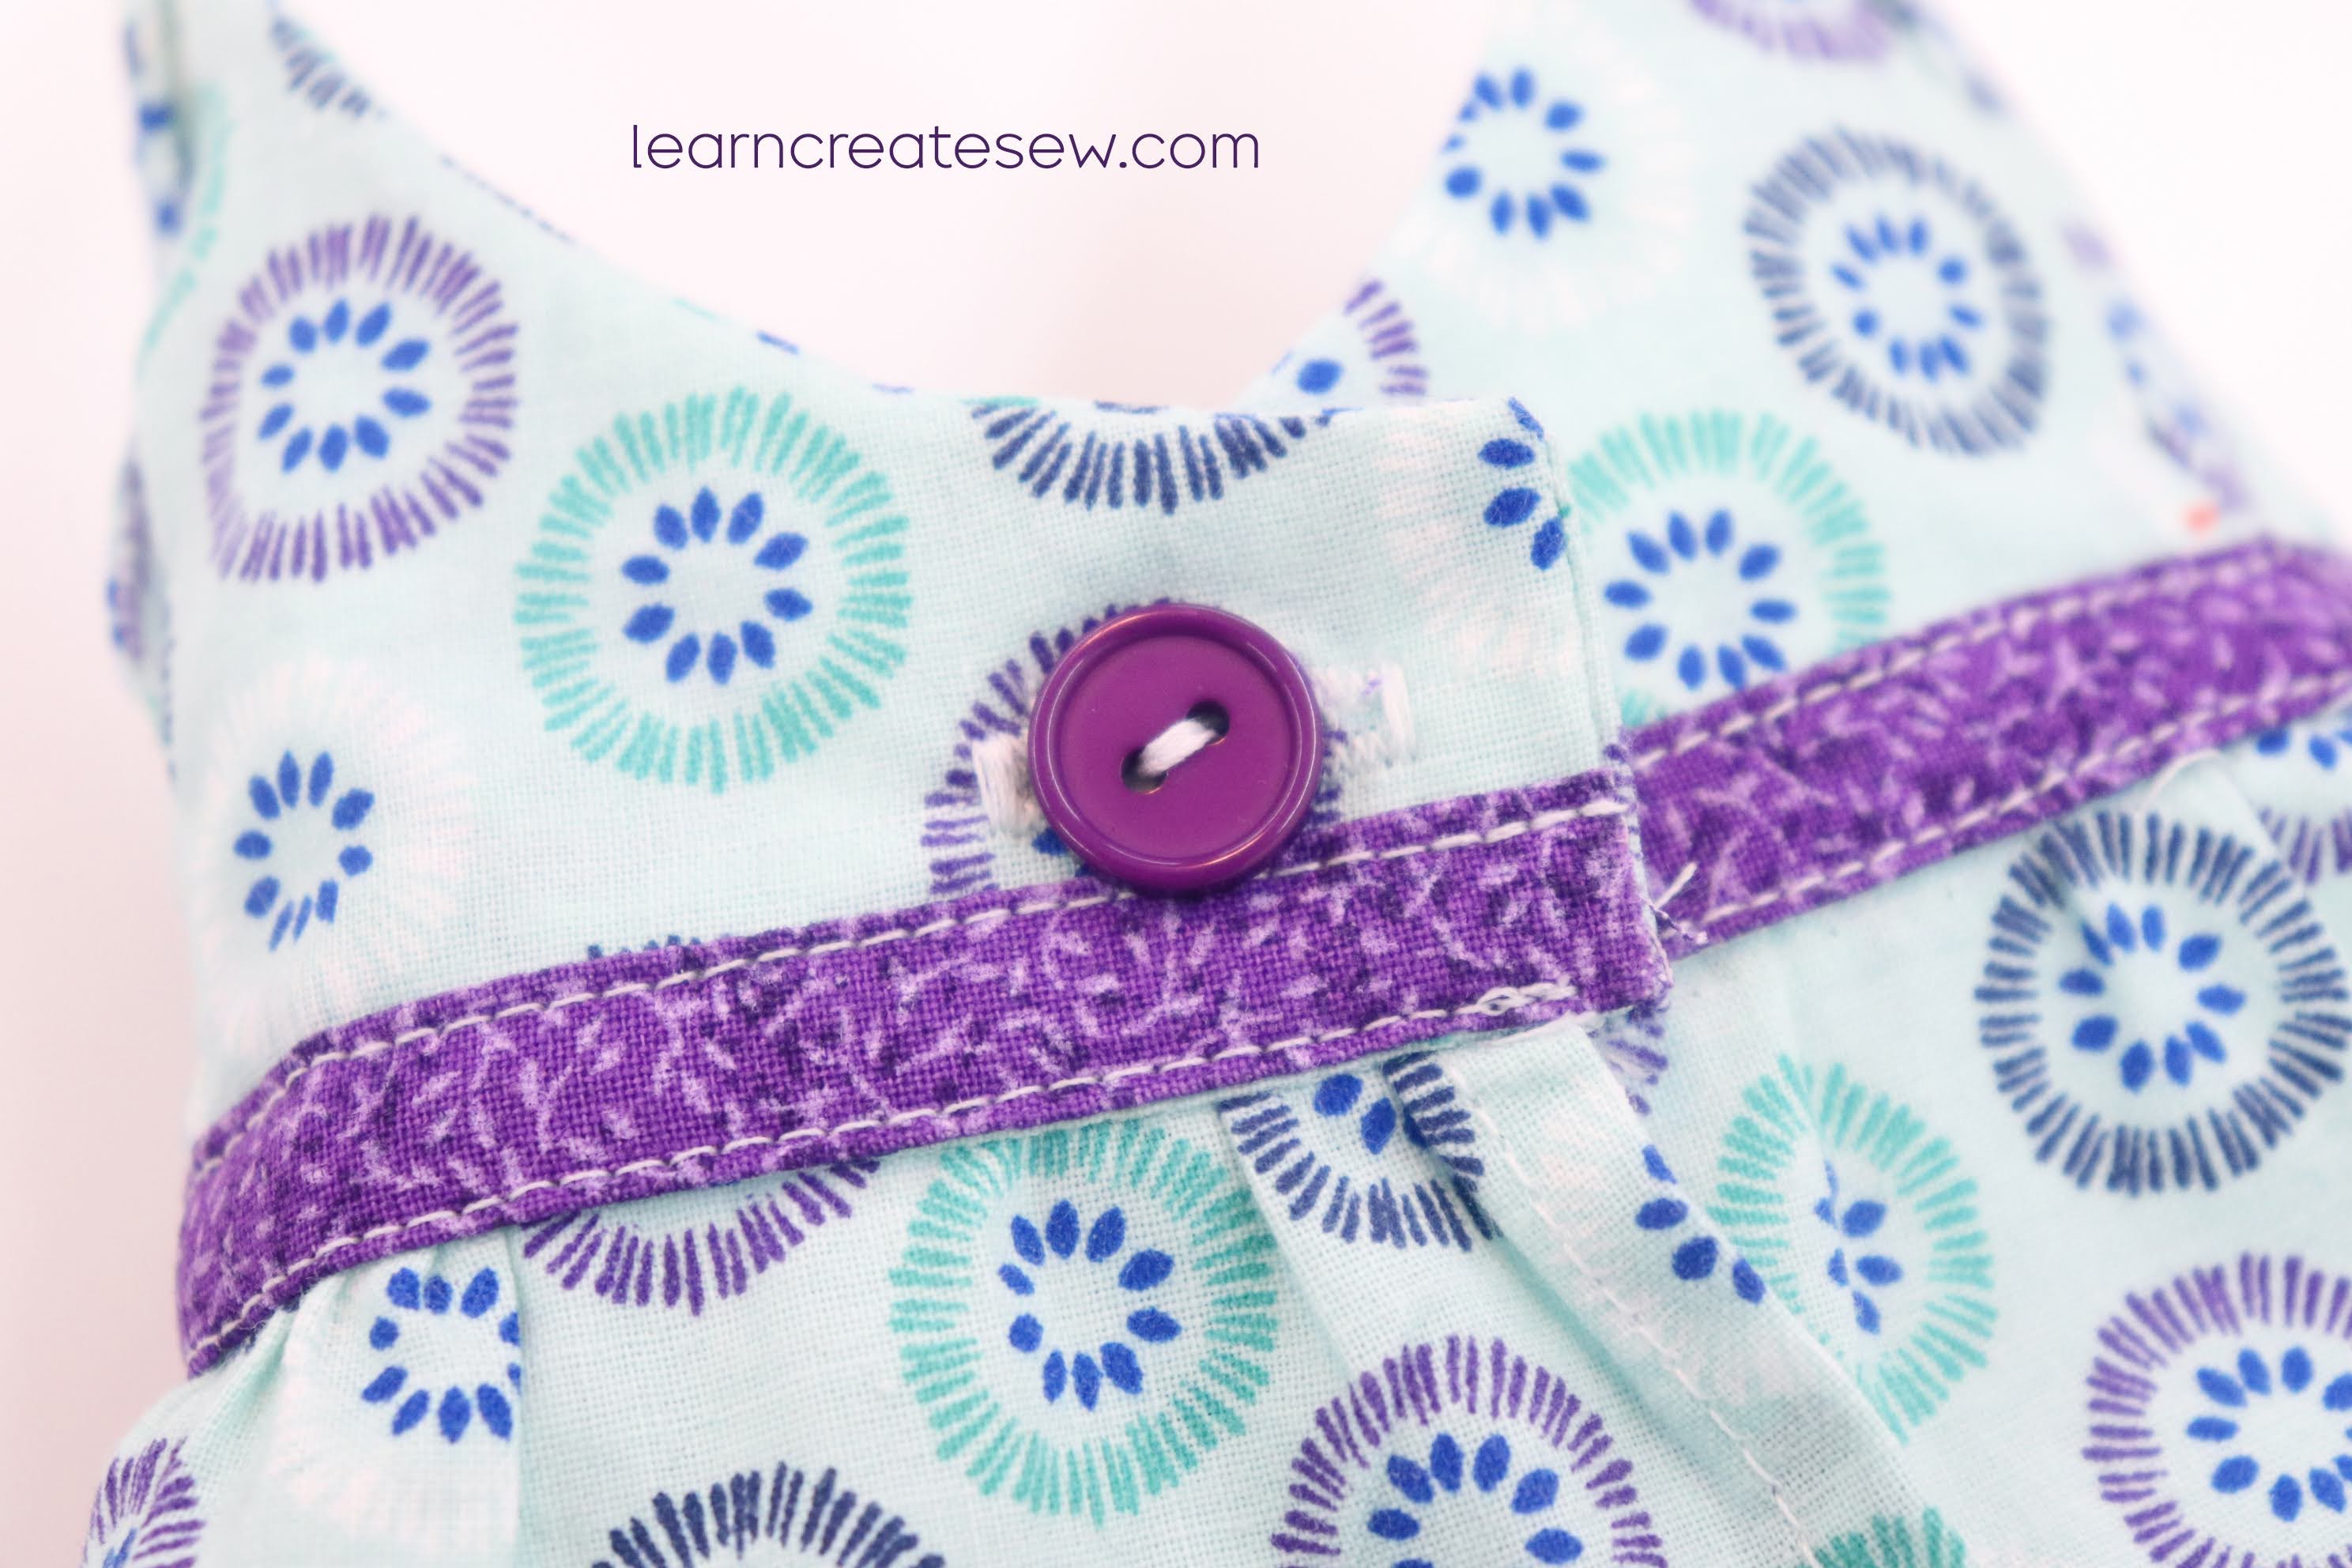
A ribbon and button will hold up the curtain when it is not being used.
This is a quick and easy project and can usually be completed in 15 – 30 minutes.
Supplies:
3/4 yard of cotton fabric (this is enough fabric for two curtains)
1/2 yard ribbon (1/4 inch wide) – (You will need more if you plan to attach the curtain using loops)
One Button (3/4 – 1 inch wide)
Sew-on Velcro (Loop side only – Approximately 1/4 yard)
Two Magnets (18mm) – (I needed 6 magnets to attach the curtain to the frame without the velcro)
Coordinating thread
Tools
Sewing Machine
Ruler
Fabric Marking Tool
Zipper foot (optional, but may be necessary on some machines)
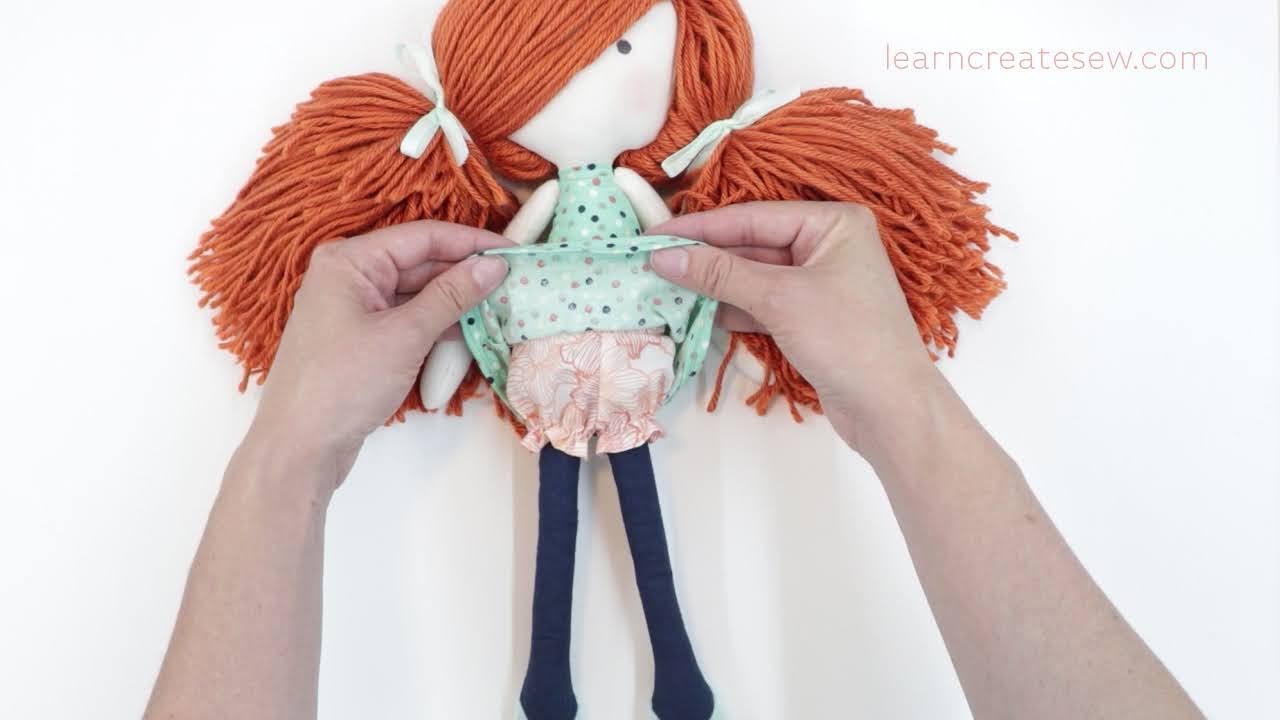
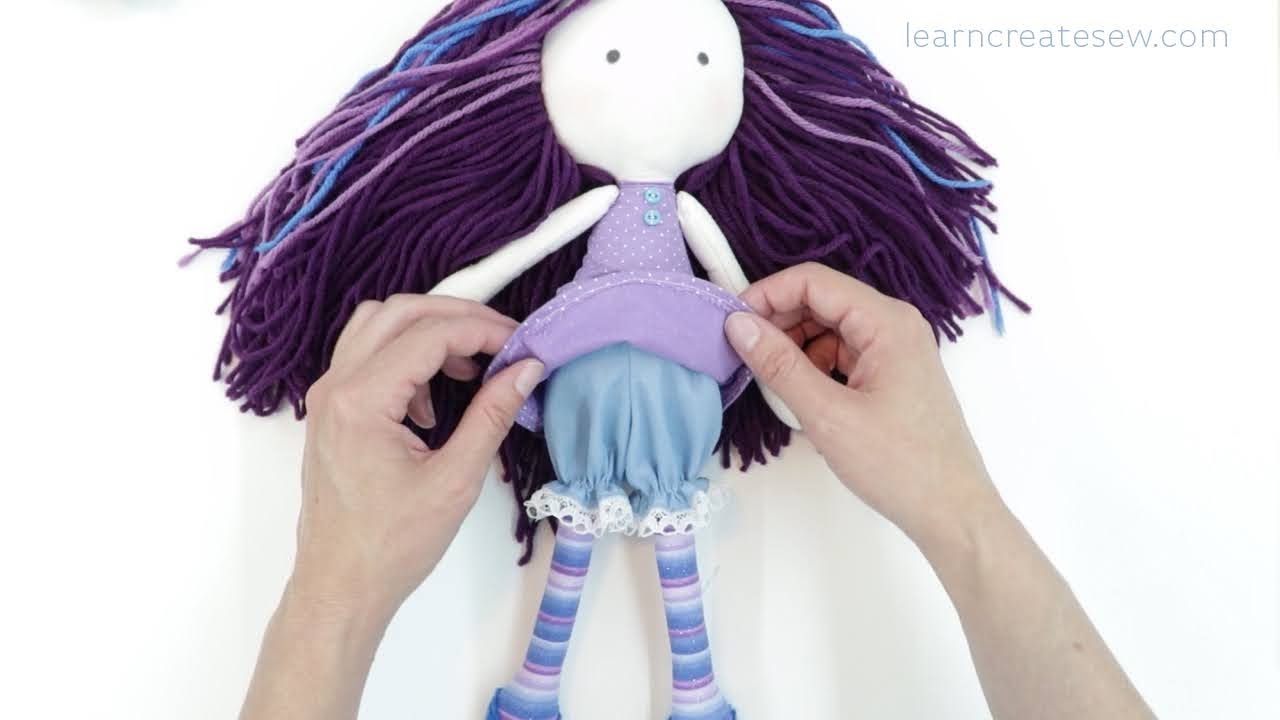
I have long been meaning to post a tutorial on how to make a dress for the Sloth plush, but it always seemed to slip my mind. A special thanks to Carol for reminding me about it! The dress is a cute little addition to the sloth plush and a lot of fun to make.
I don’t have a video for this one, but I do have several photos. I hope you find them helpful.
Here are some quick instructions on how to make the dress.
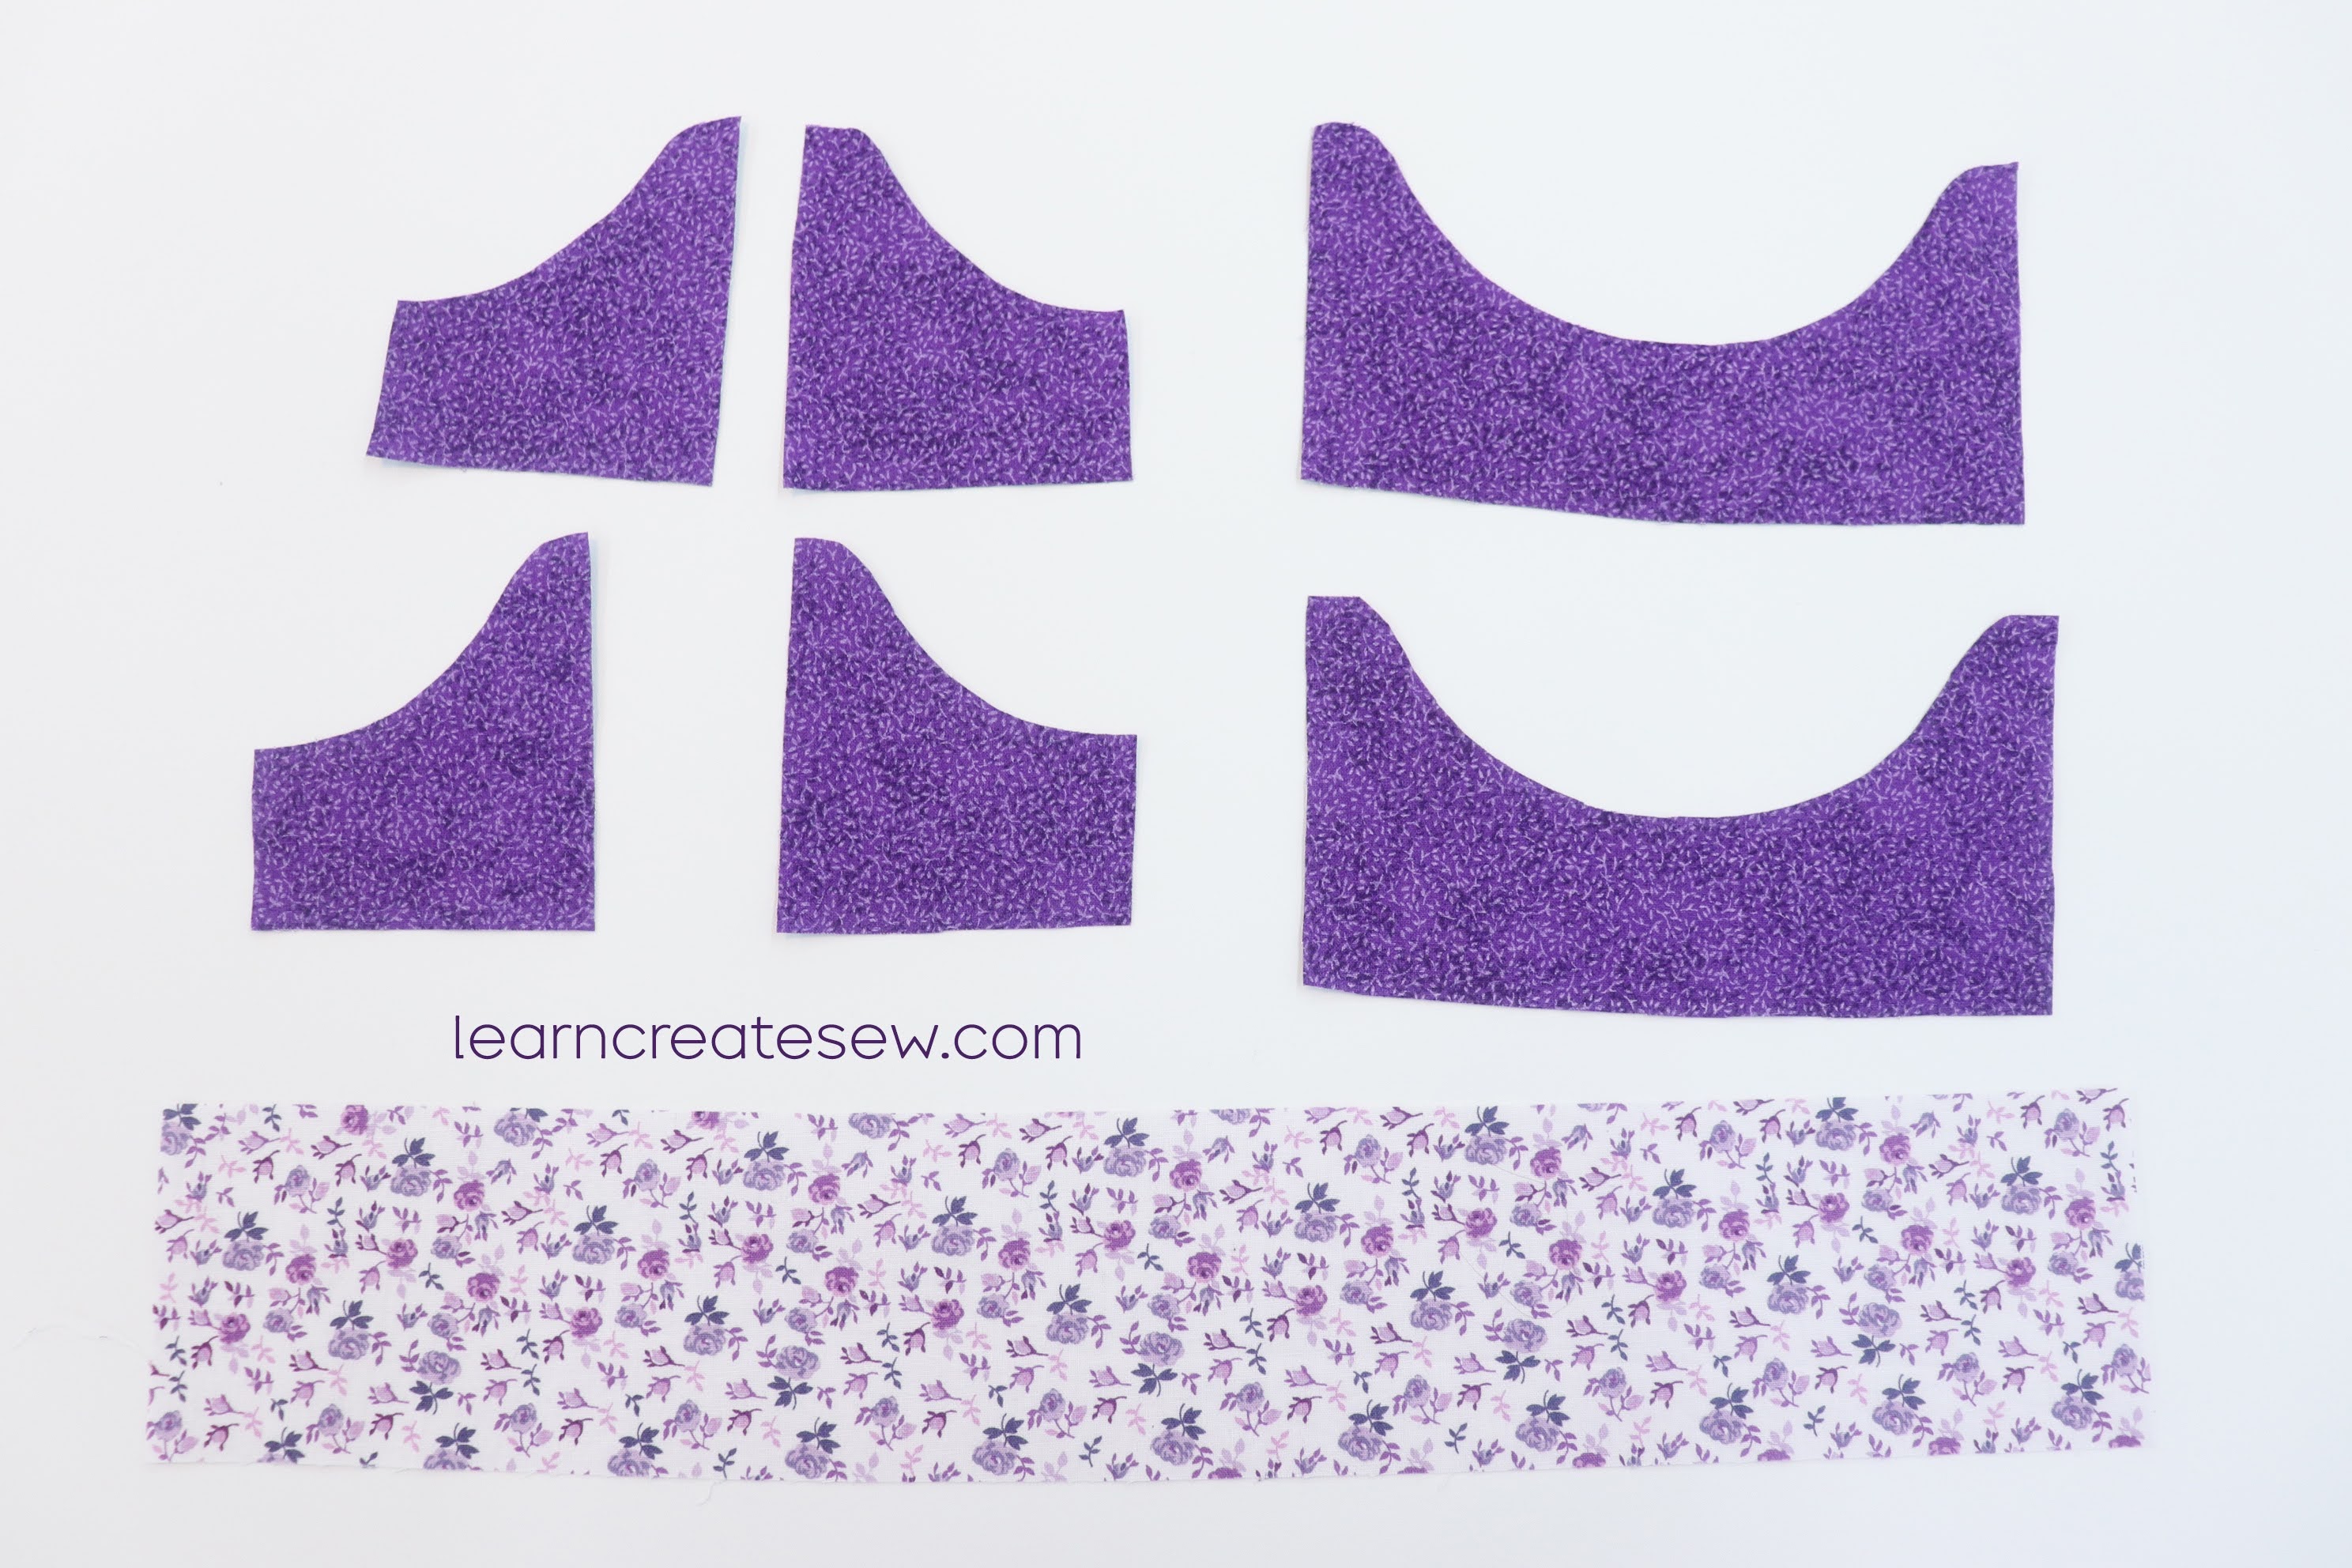
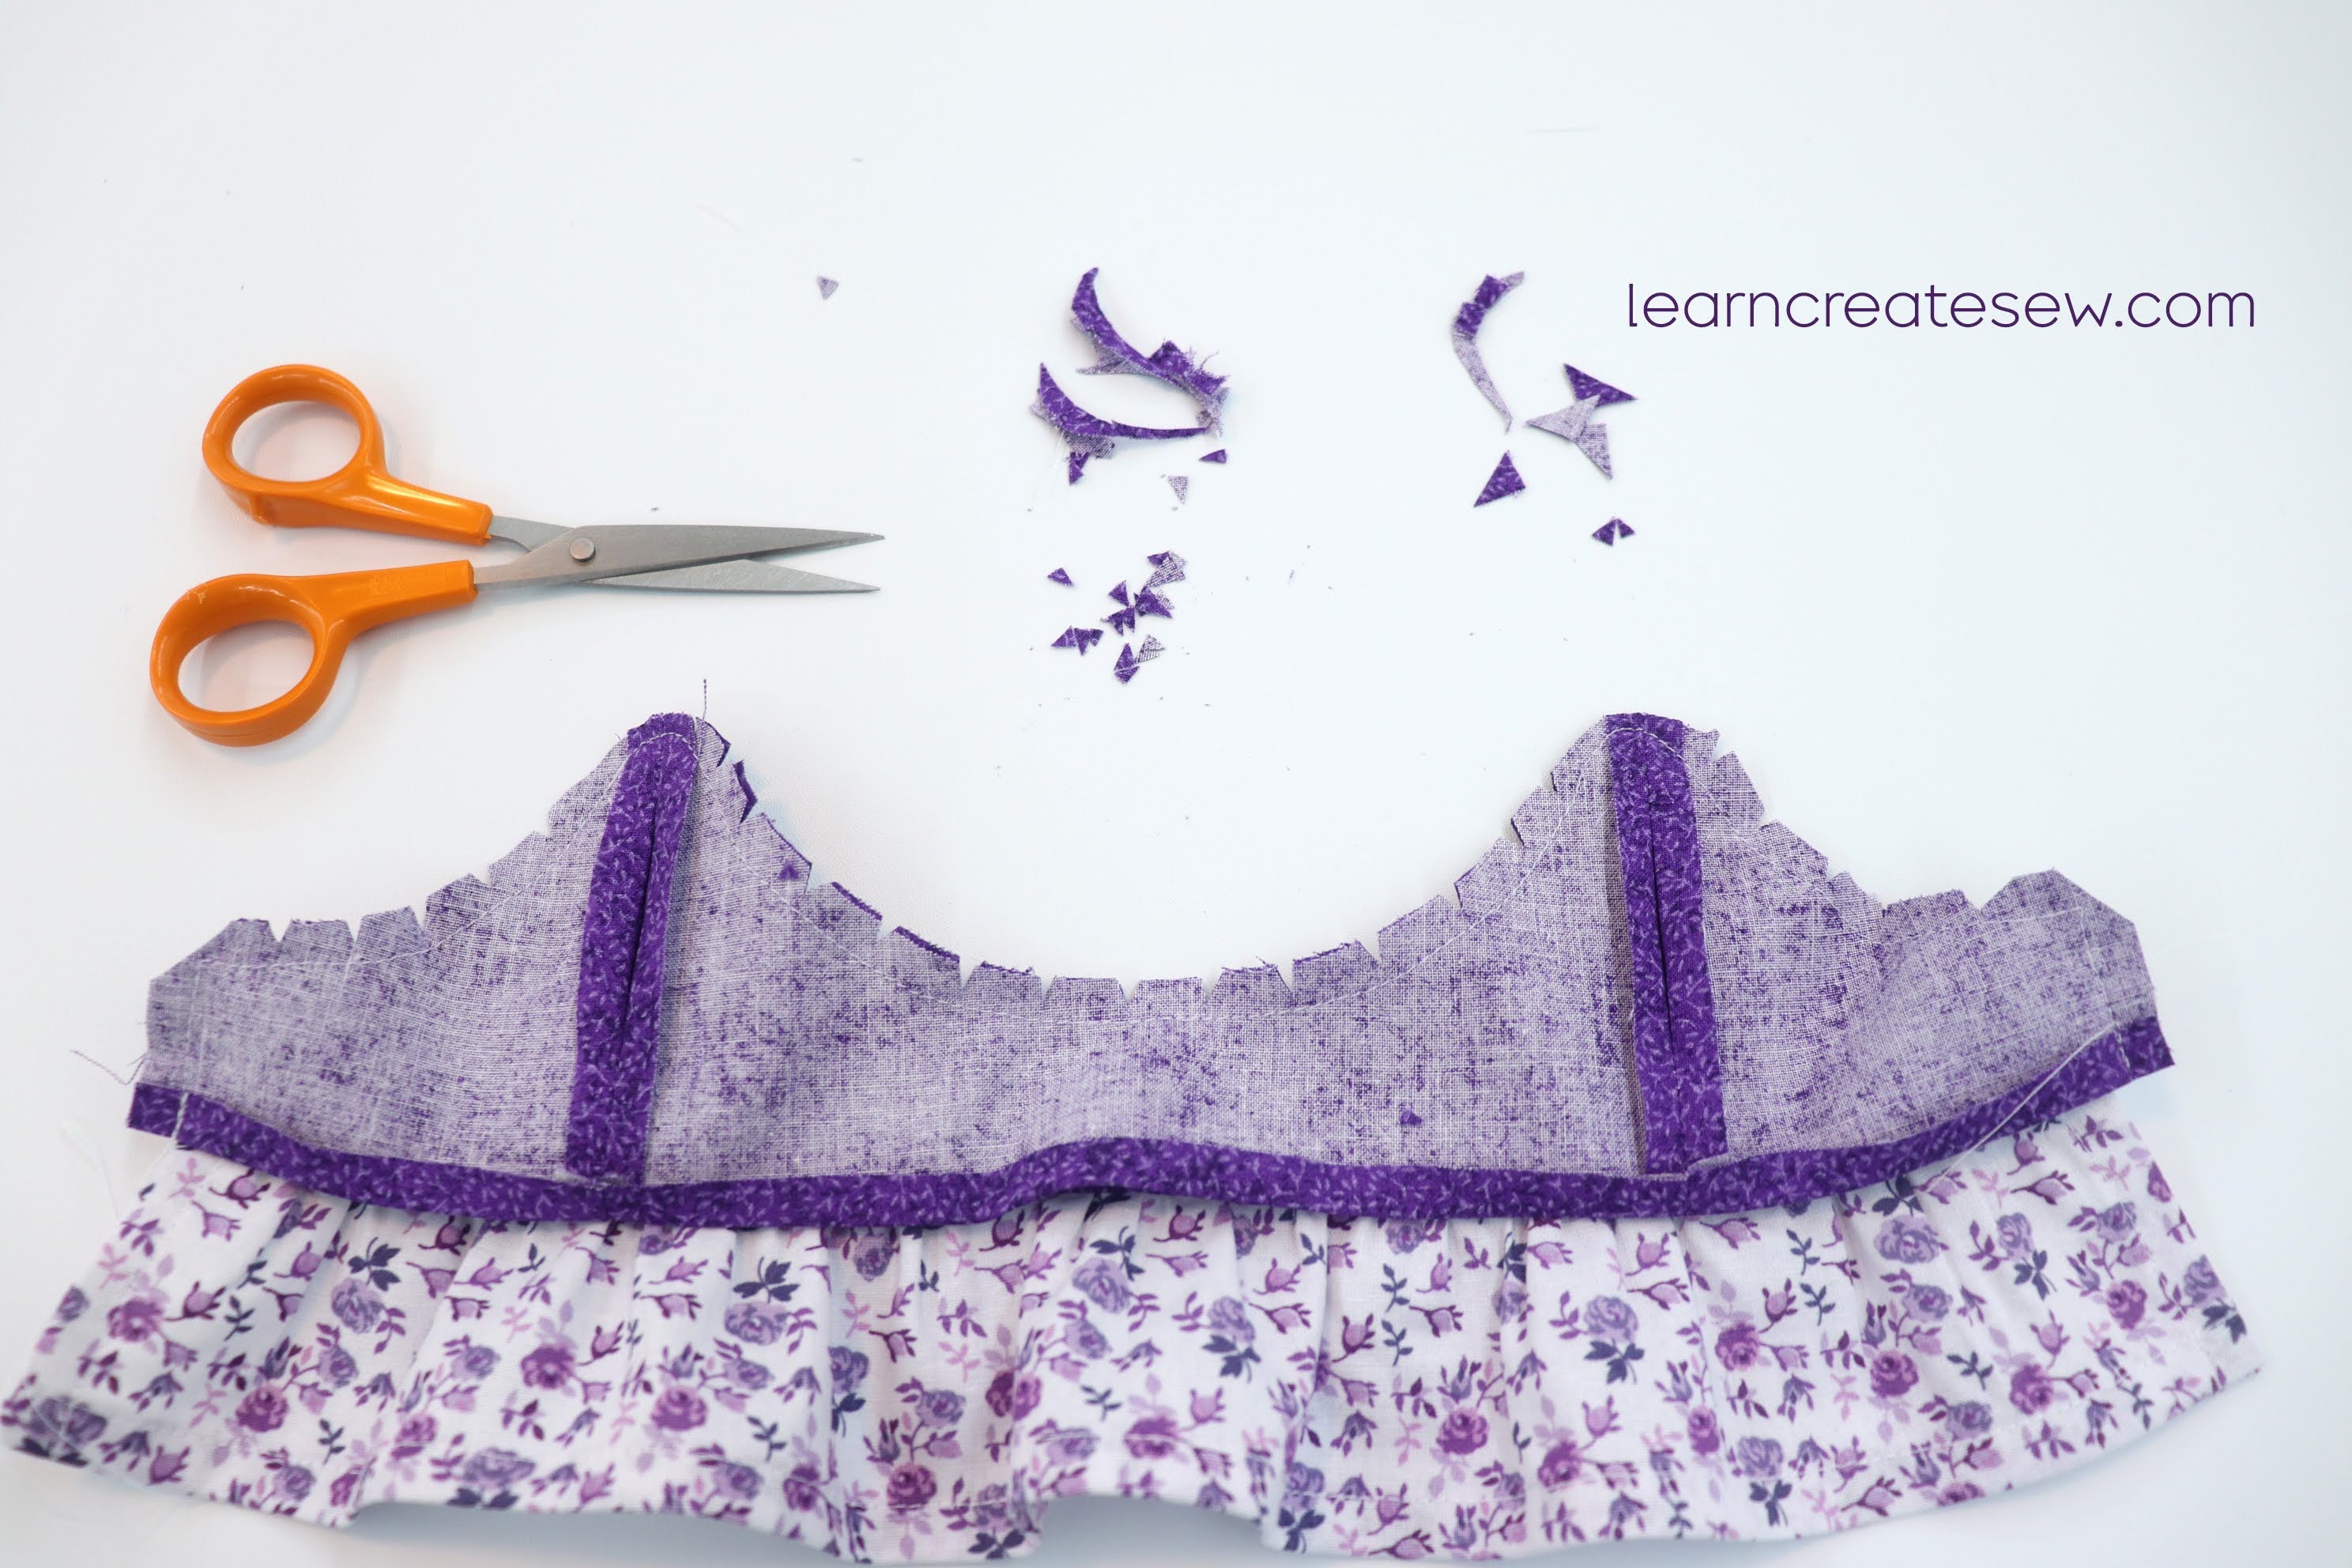
First, cut out the pieces. The skirt rectangle is approximately 3 x 18 inches, but you can adjust that as desired.
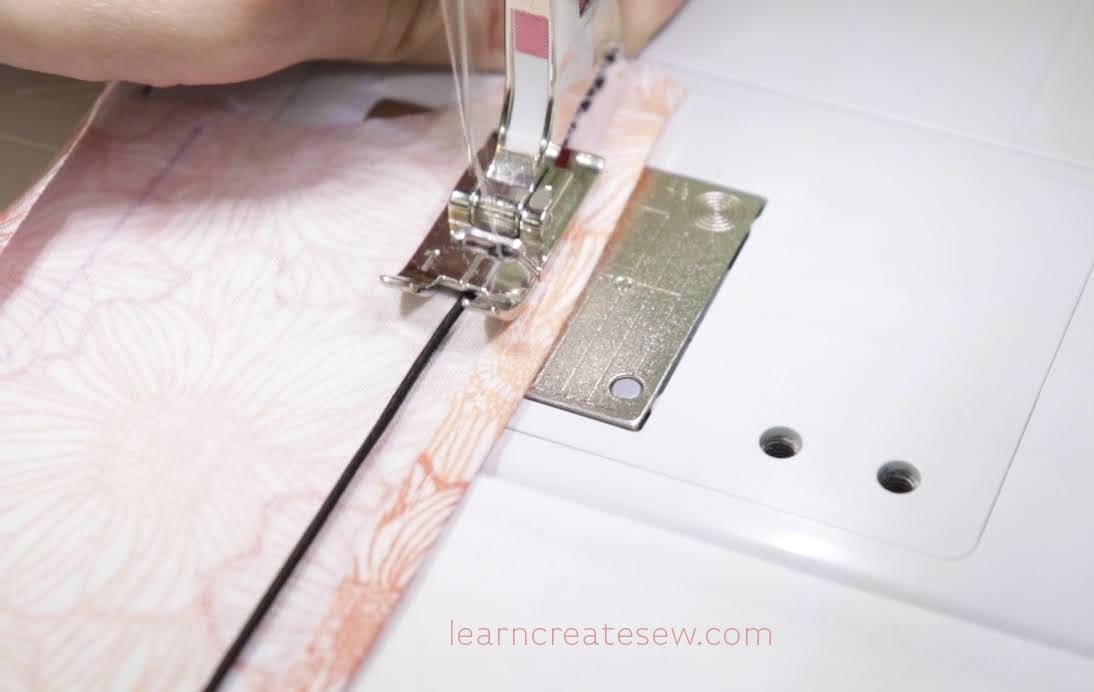
Hem the bottom and two sides of the skirt with a double-fold narrow hem. Approximately, 1/4 inch wide.
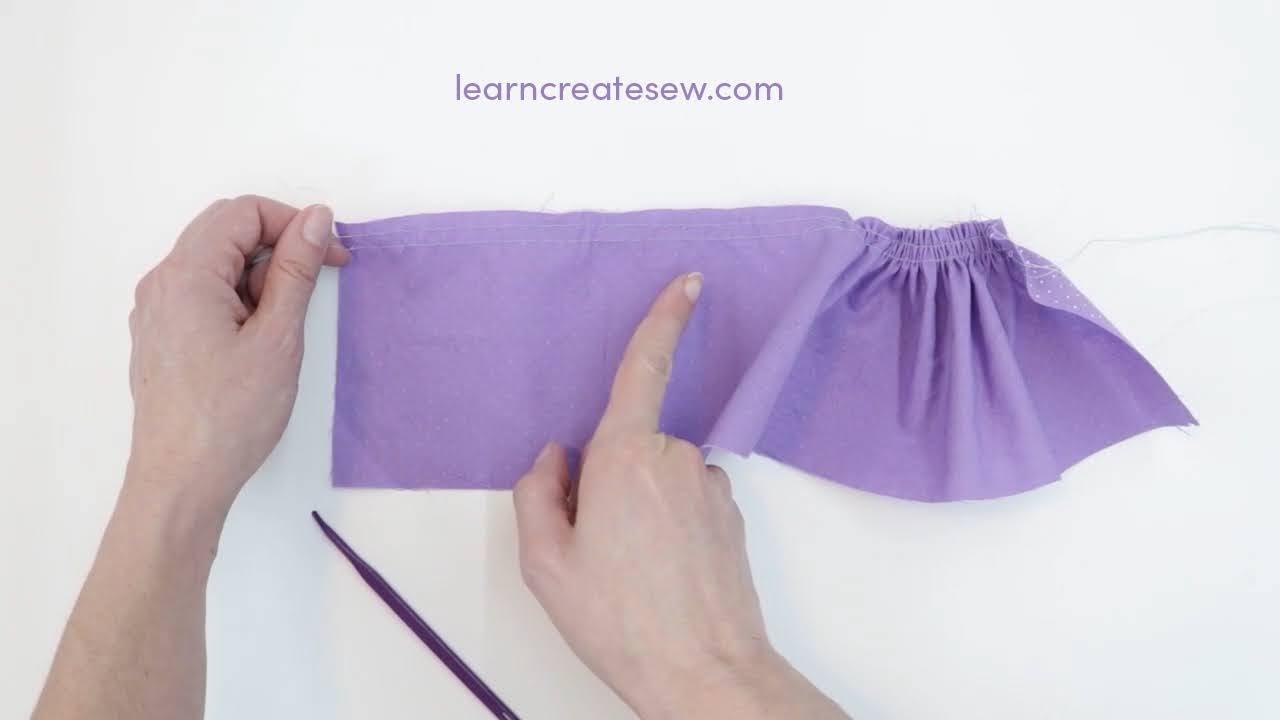
Gather the top edge.
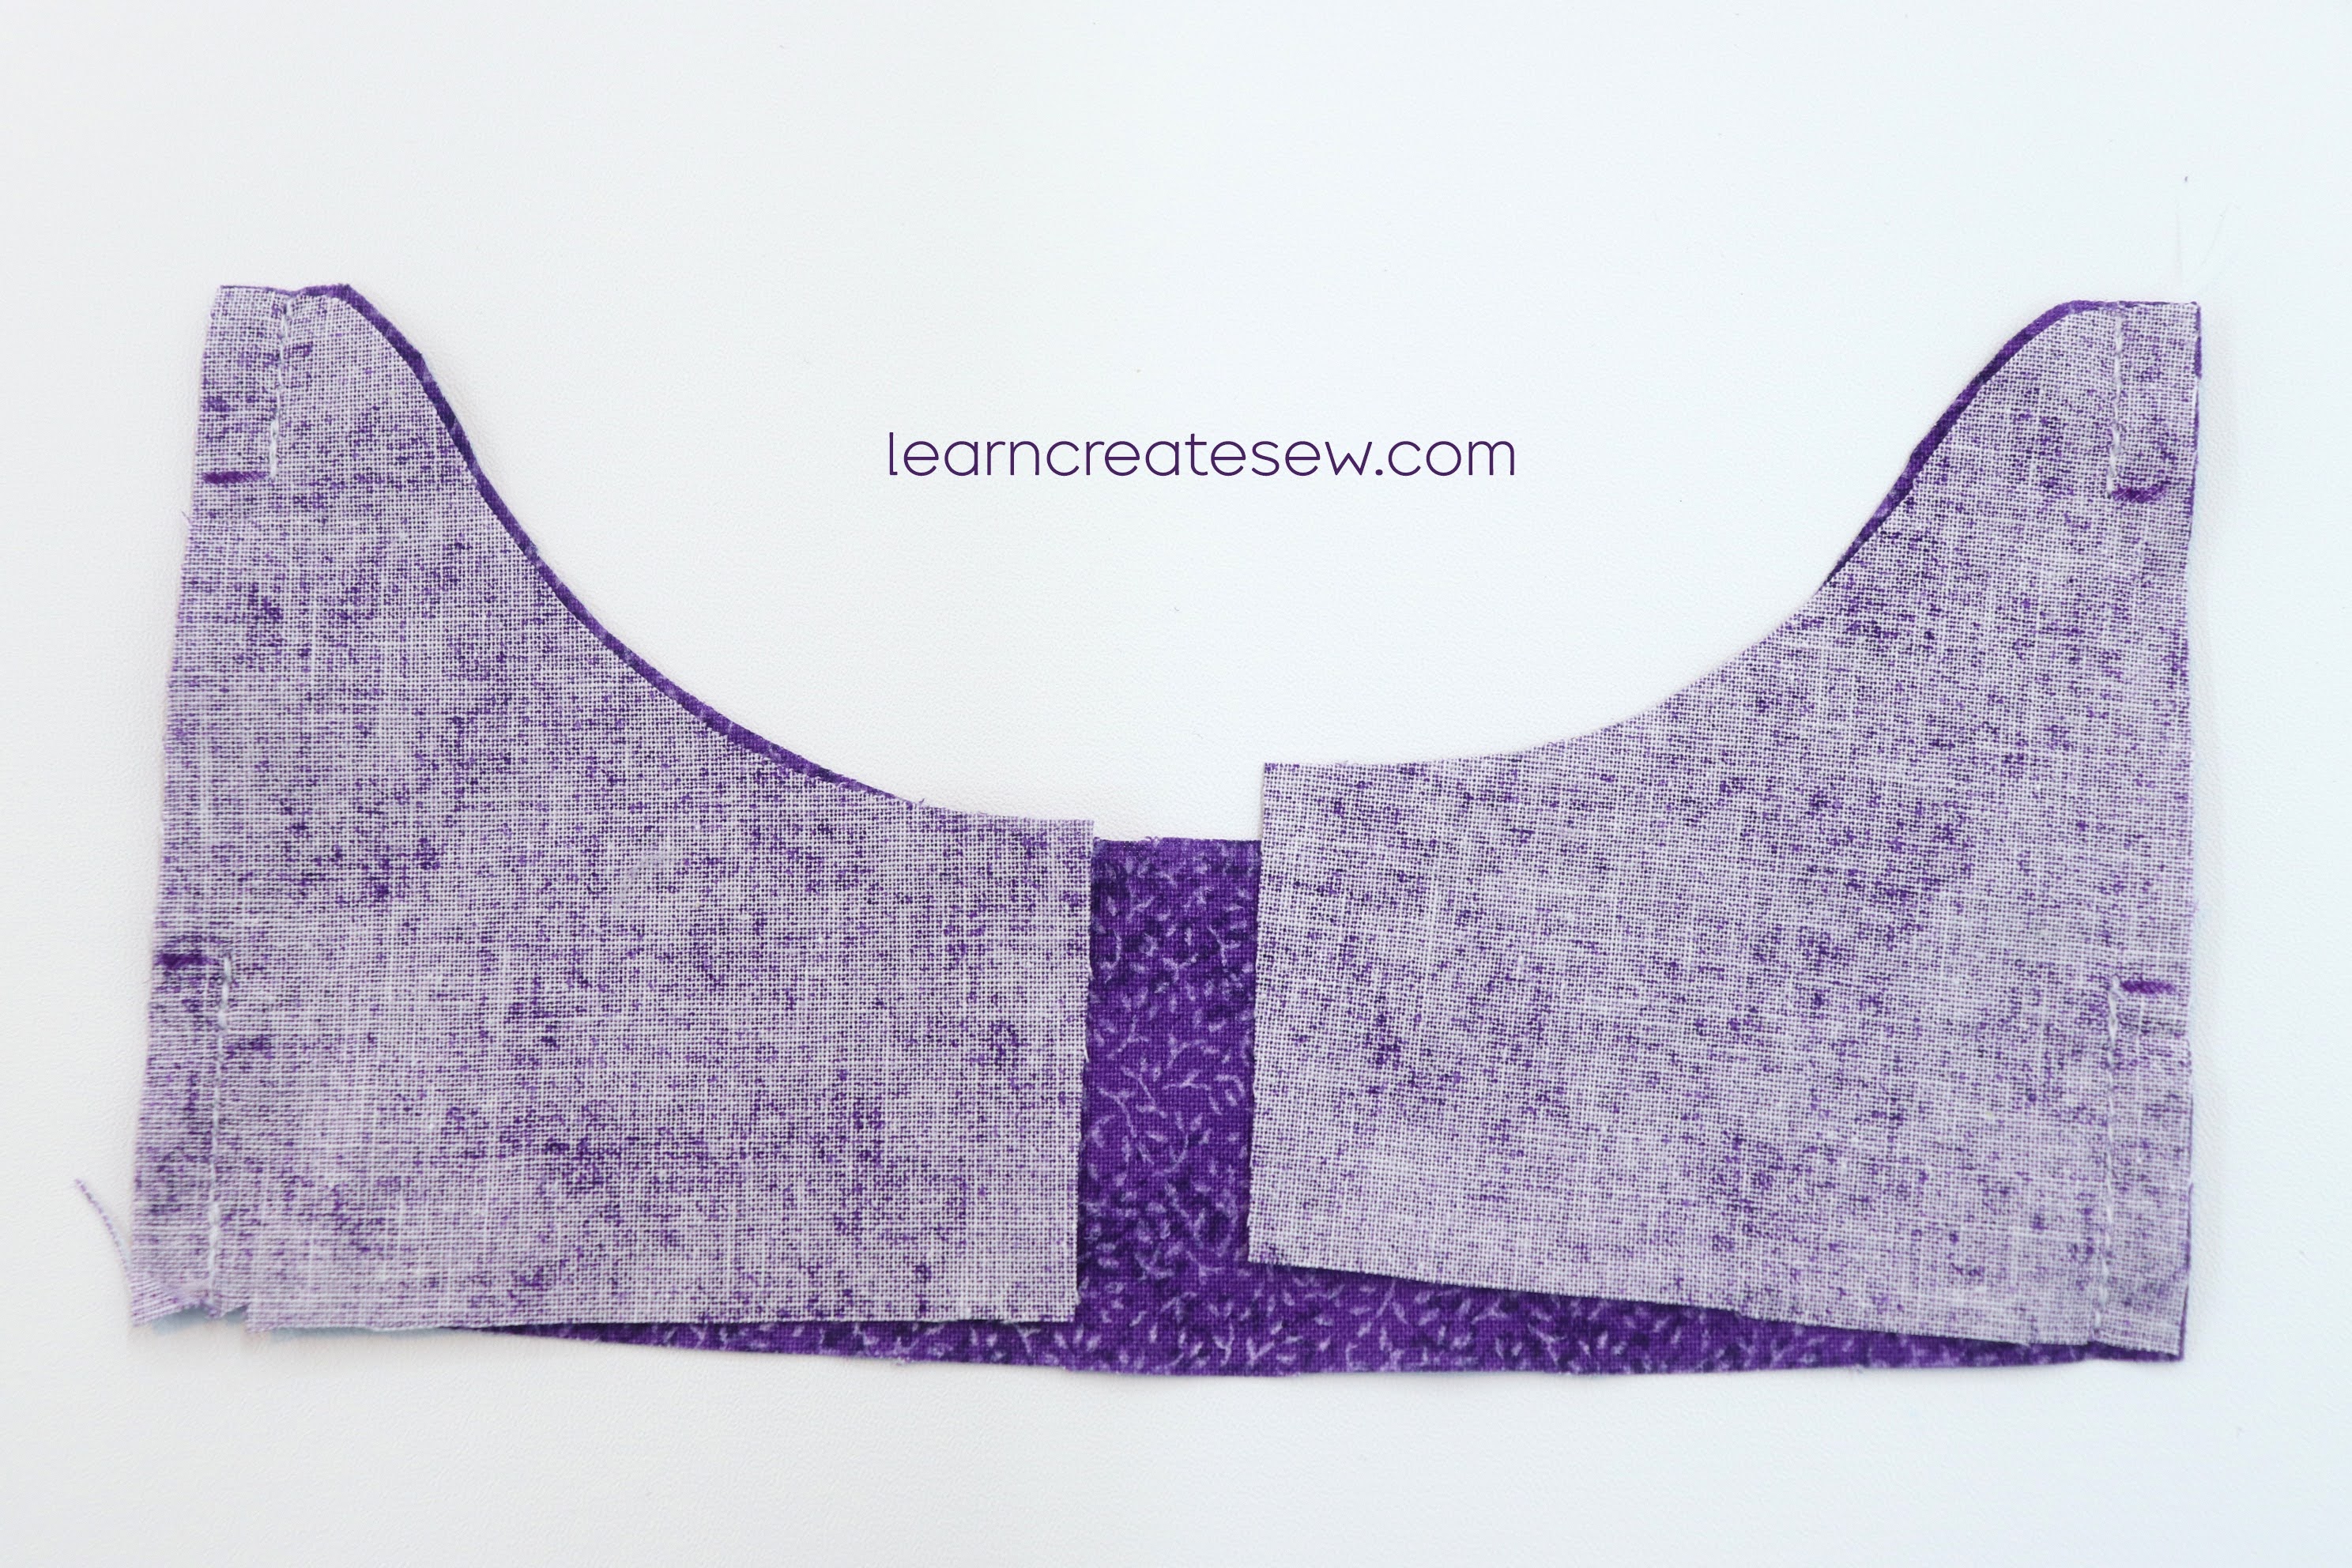
Pin two of the bodice front pieces to a bodice back piece, right sides together. Align the dashes marked on the pattern.
Stitch the side seams with a 1/4 inch seam allowance. Only sew above and below the dashes, leaving a gap in the middle. This is for the sloth’s arms to pass through.
Repeat this process again for the other front and back pieces. You should end up with two identical dress bodices. Press the side seams open on both bodices.
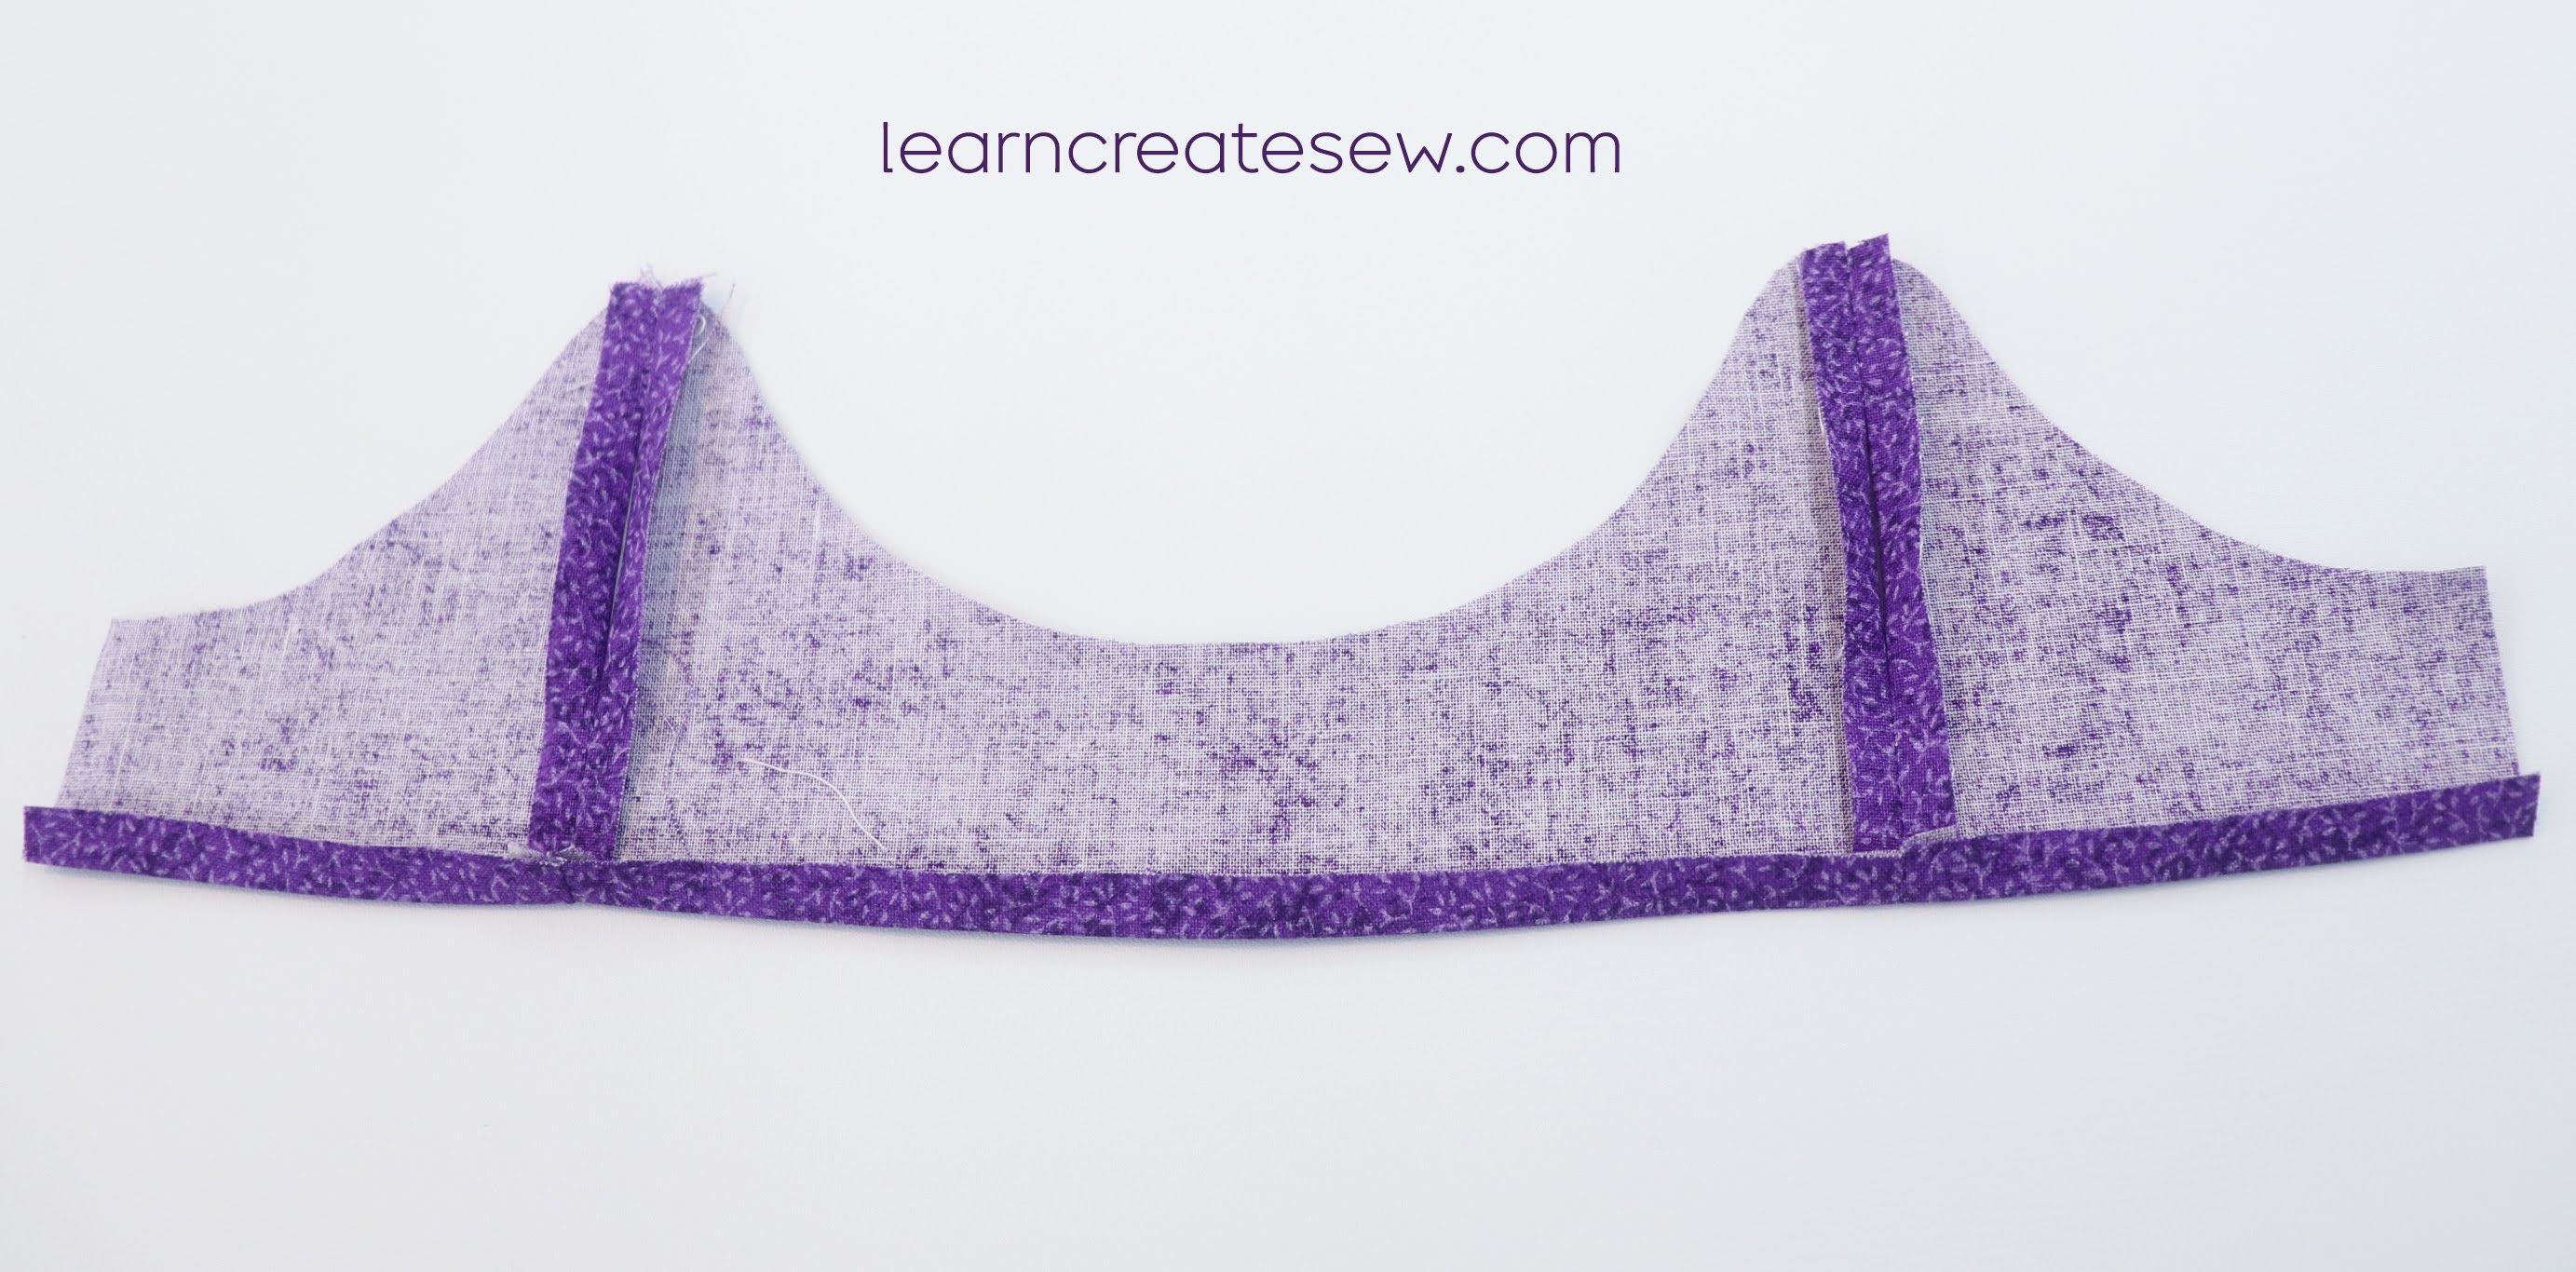
Fold up the bottom edge of one of the bodices 3/8 inch. Press. Keep the bottom edge of the other flat.
Lay the bodice with the bottom edge flat (the one you did not press) right side up. Place the skirt right side down on top of it. Align the gathered edge of the skirt with the raw edge of the bodice. Let the bodice extend an extra 1/4 inch on each side beyond the skirt. Stitch the skirt in place along the gathered edge with a 1/2 inch seam allowance.
Flip the skirt down and press the seam allowance toward the bodice.
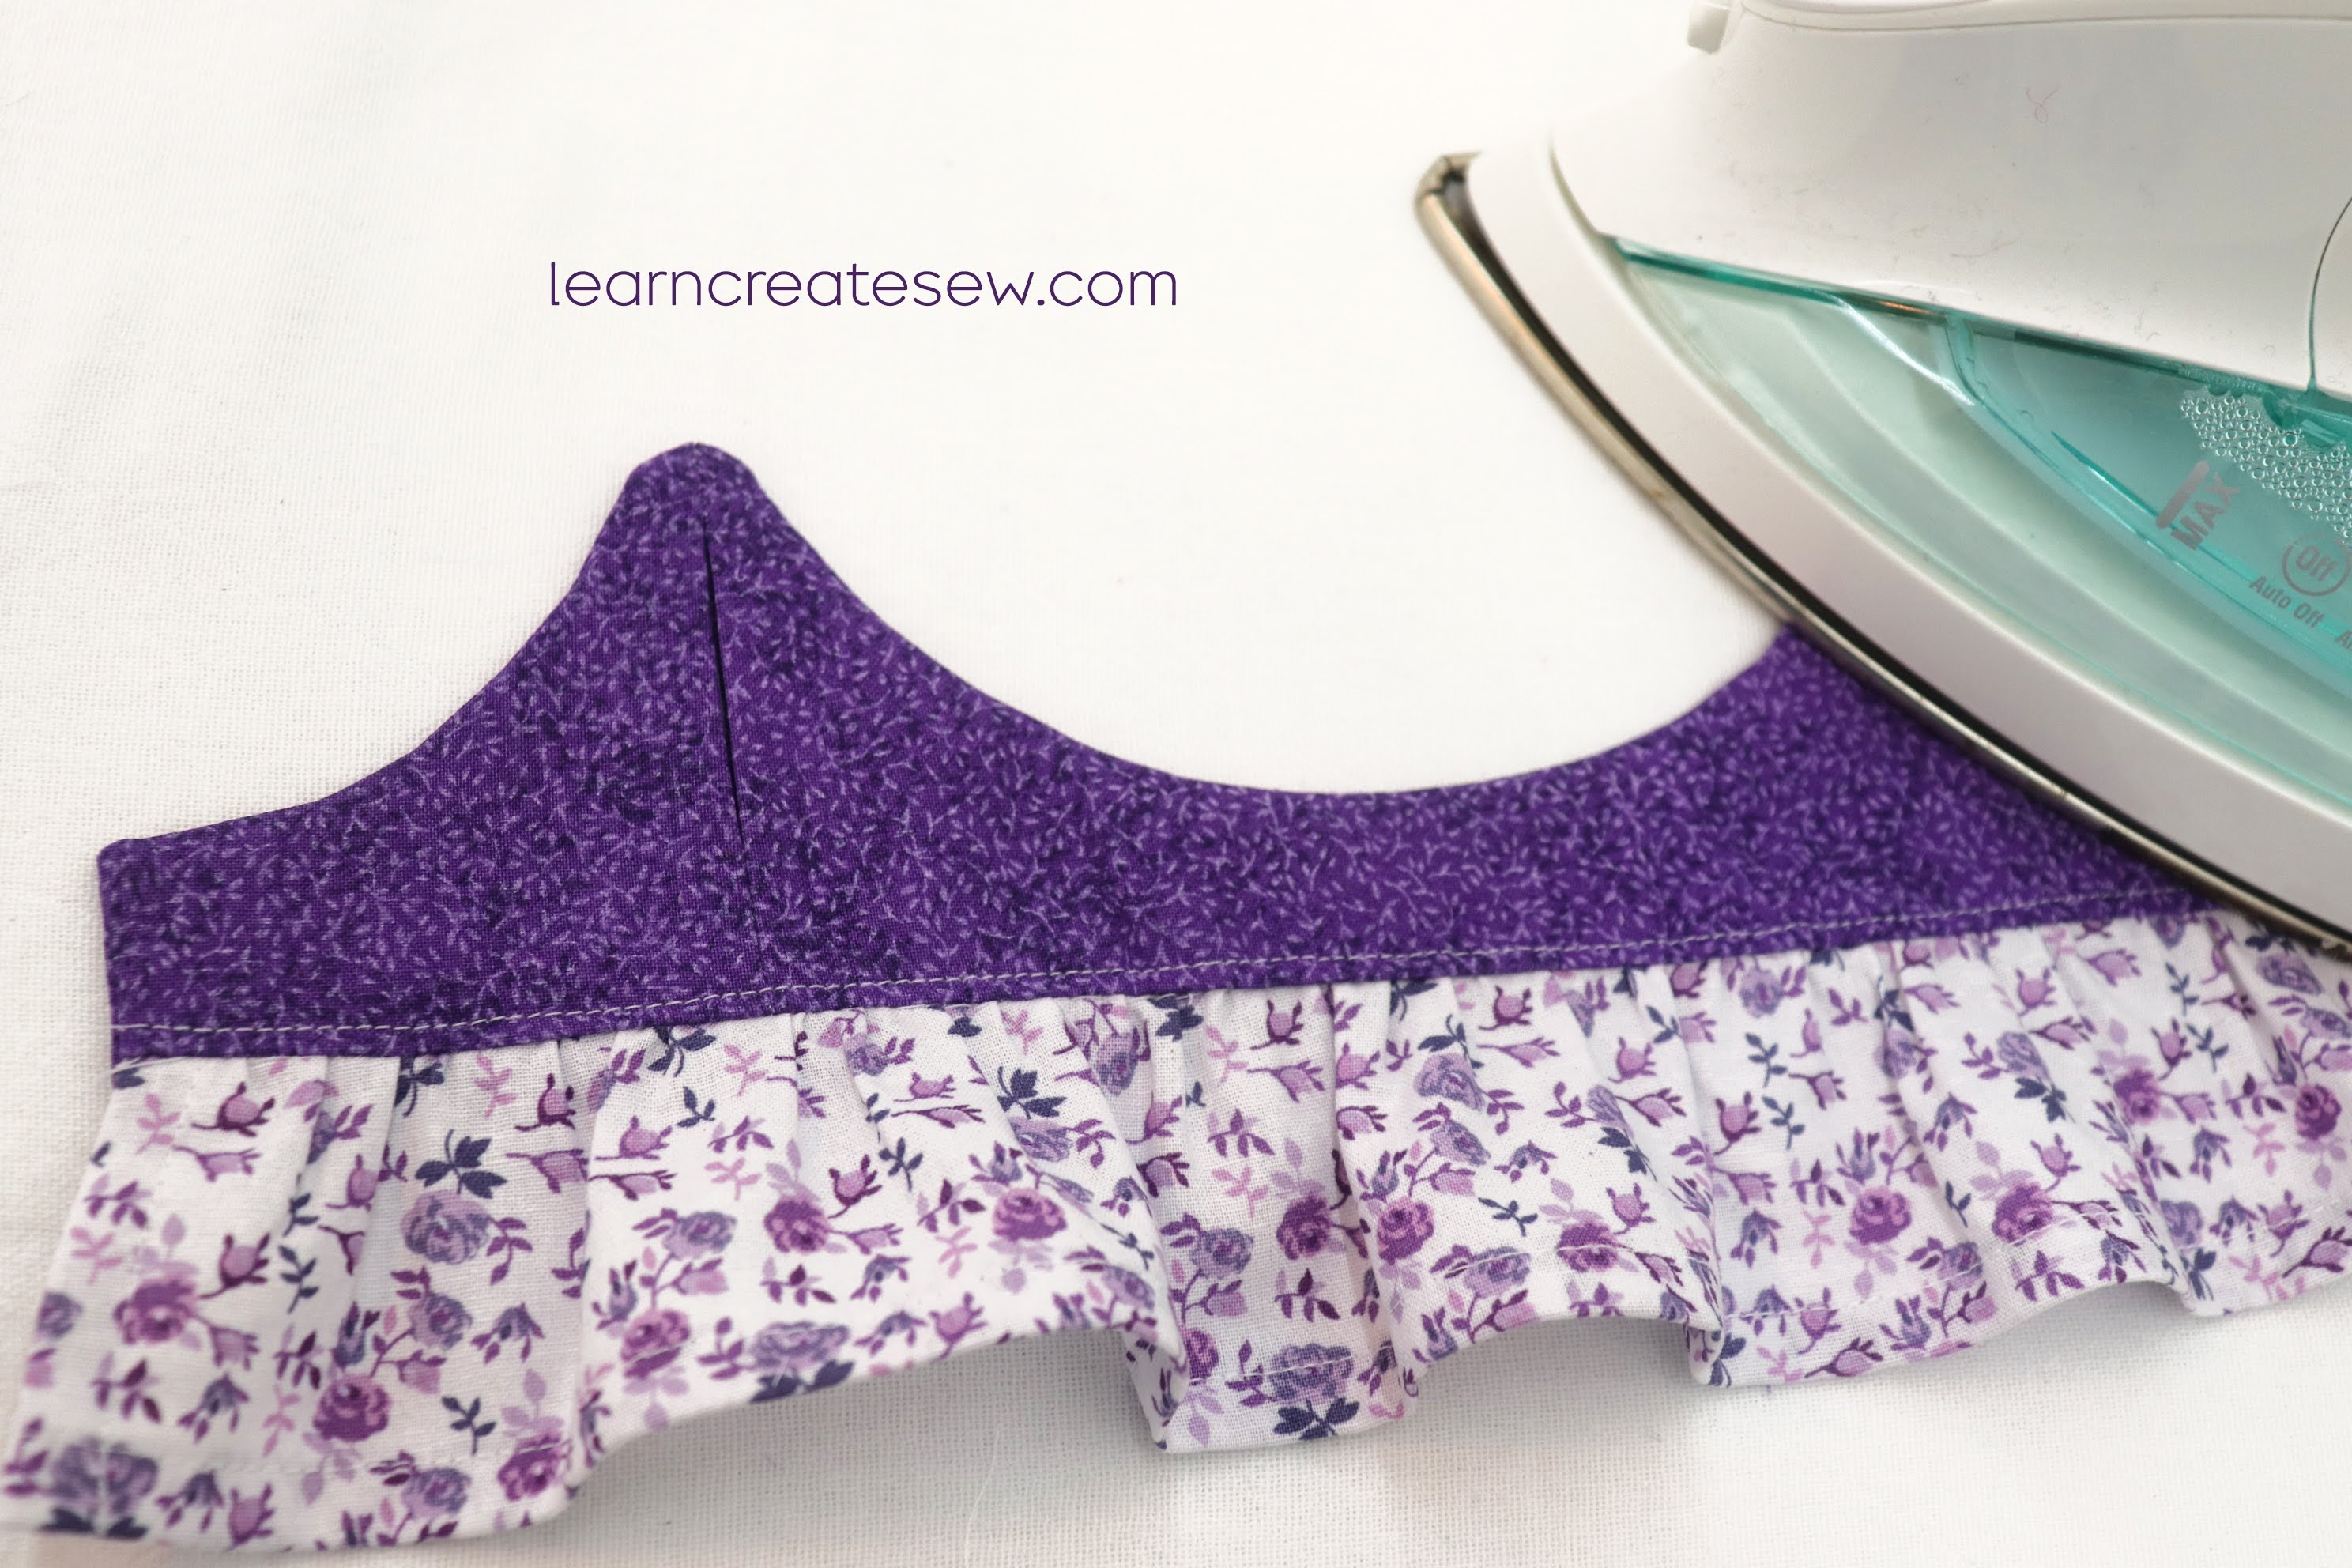
Place the dress right side up. (You can disregard the topstitching shown on the bodice in the photo. It’s not necessary in this step. We will get to that later.)
Lay the other bodice, the one with the folded bottom edge, right side down on top of the dress. Align seams and edges of the bodice pieces. Make sure the seams are open and flat. Sew all of the way around the edge of the bodice with a 1/4 inch seam allowance, everywhere except the bottom edge where the skirt is attached, that will stay open. (None of your stitches should be on the skirt section. Only the bodice fabric is being stitched.)
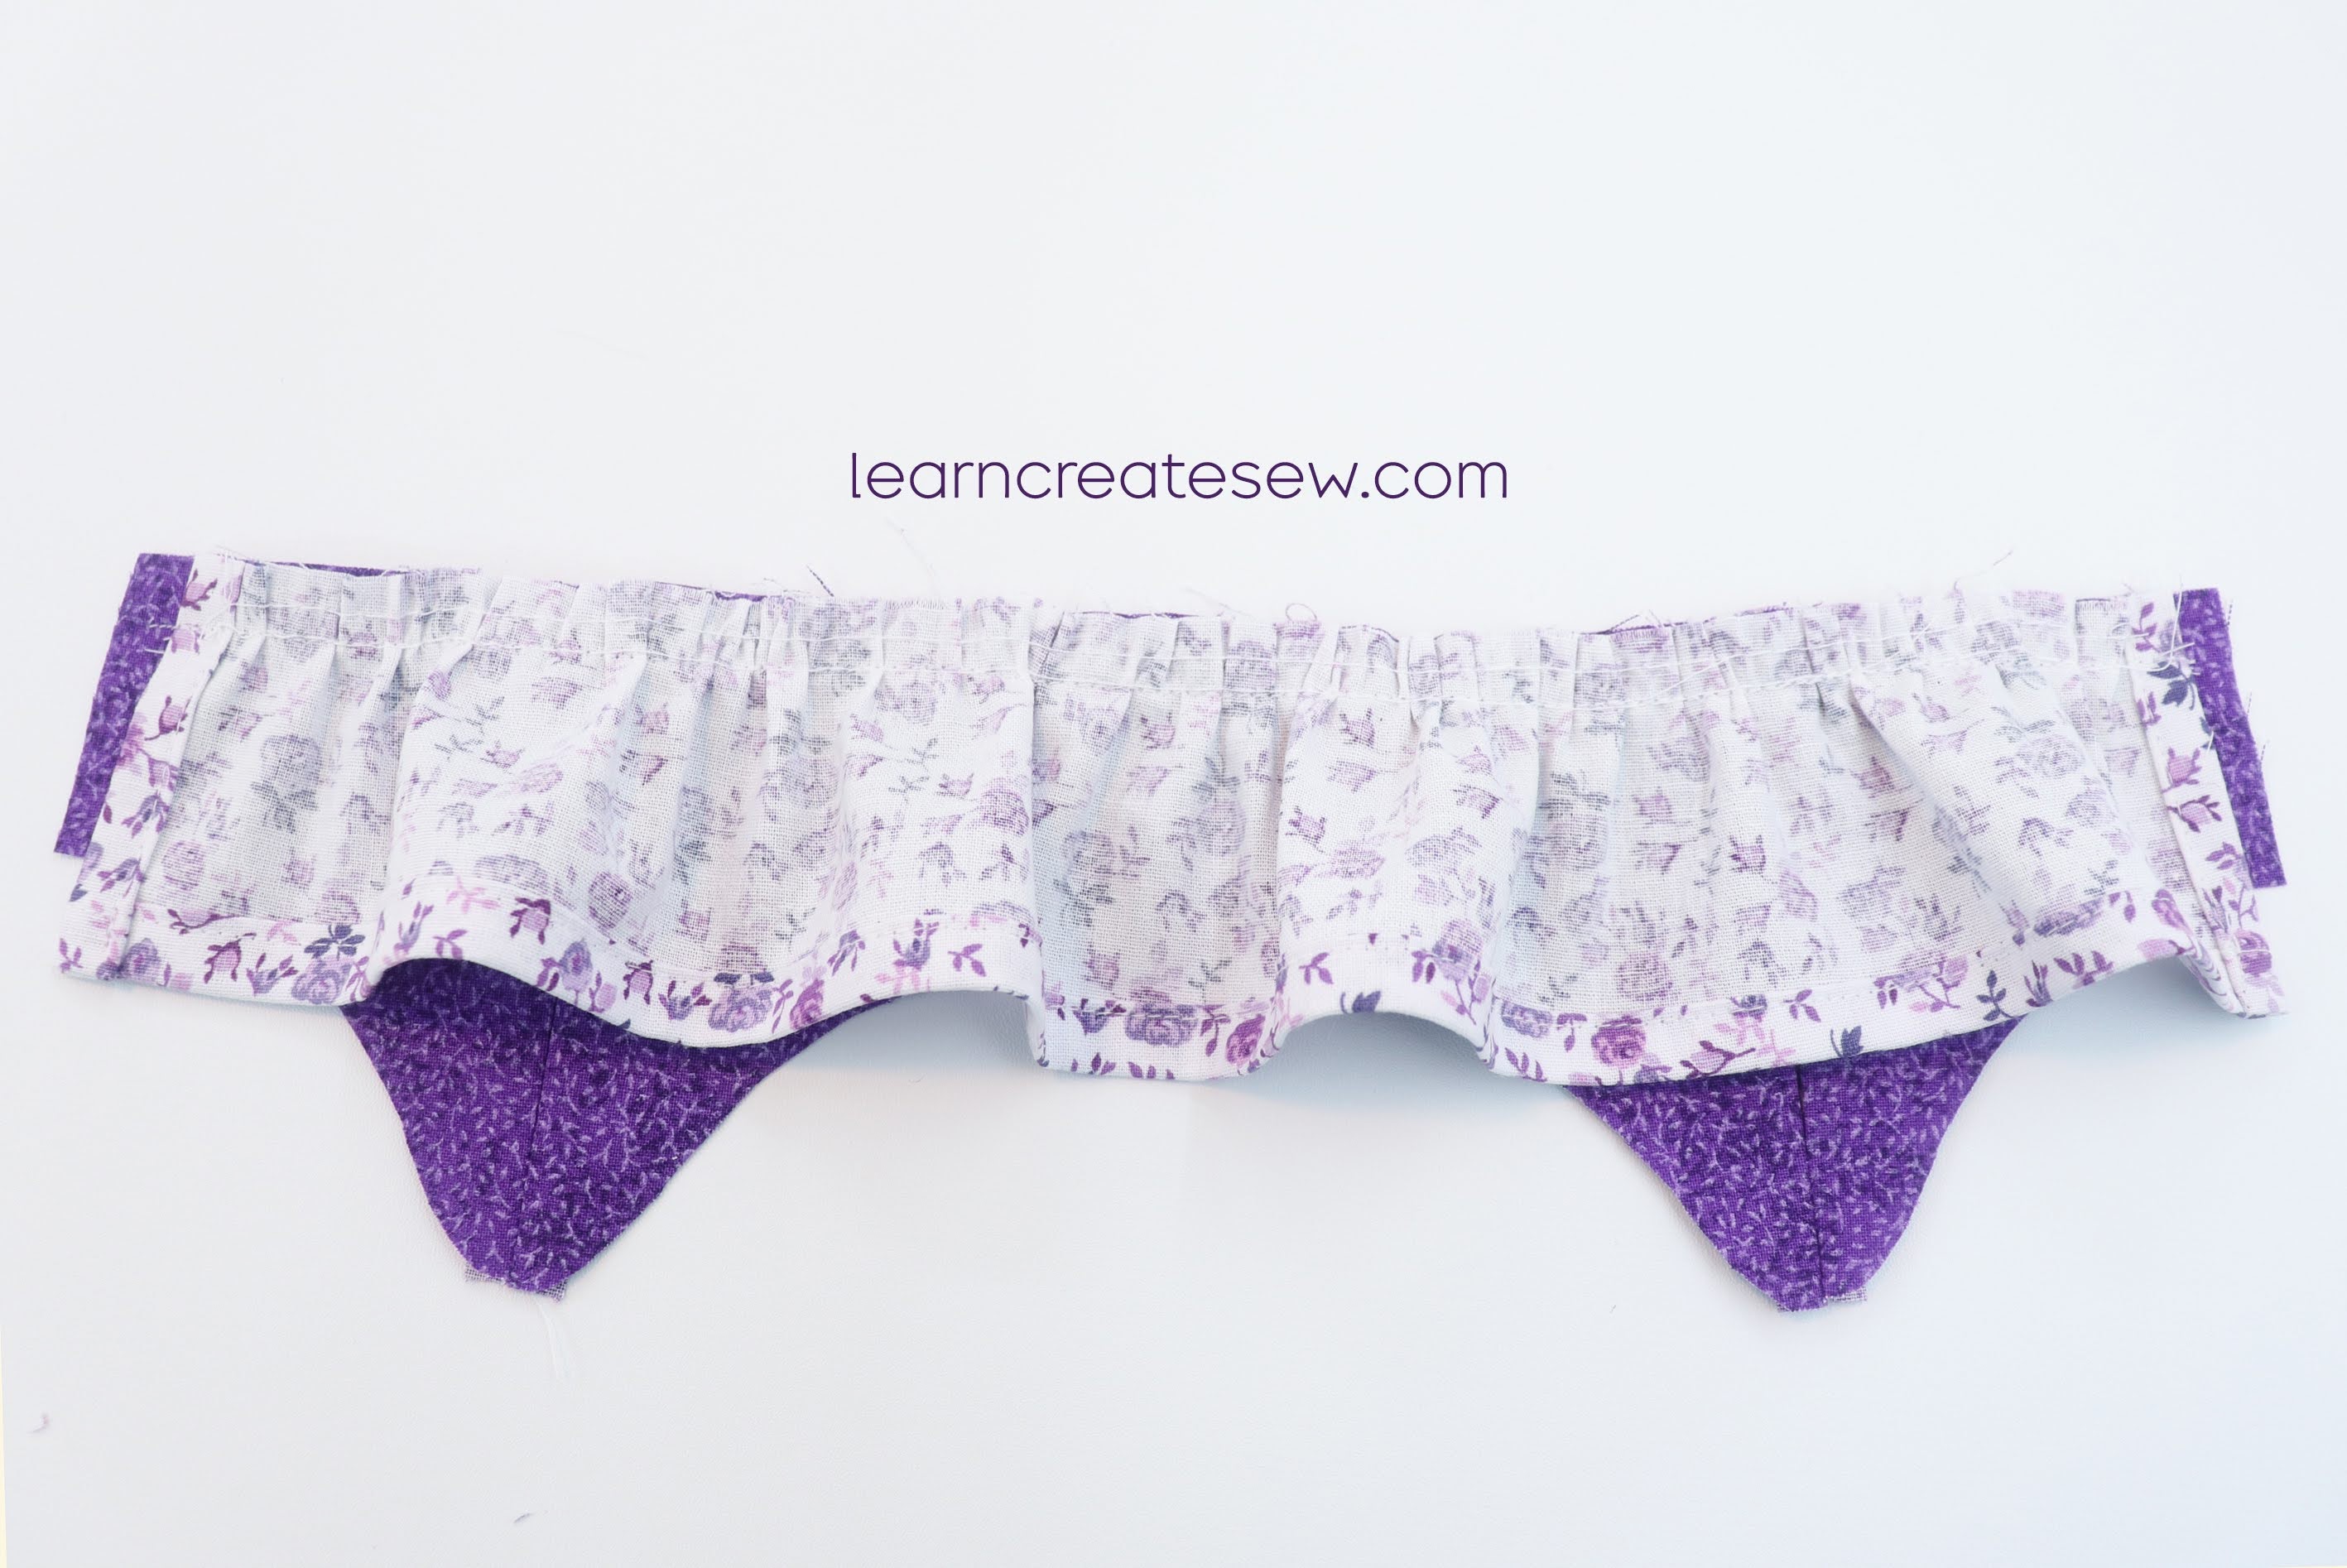
Clip the curves and corners.
Flip the bodice right side out and press. Carefully align the bottom edge of the folded bodice so it covers the gathers and hides the seam allowance on the inside. The folded bodice edge should extend about 1/8 inch below the stitch line of the skirt. Flip it over. Pin in place as needed. From the front side, topstitch along the bottom of the bodice edge (more detailed photos below) and then press again. The skirt will now be sandwiched between the two bodice layers.
I usually topstitch with a 1/8 inch seam allowance.
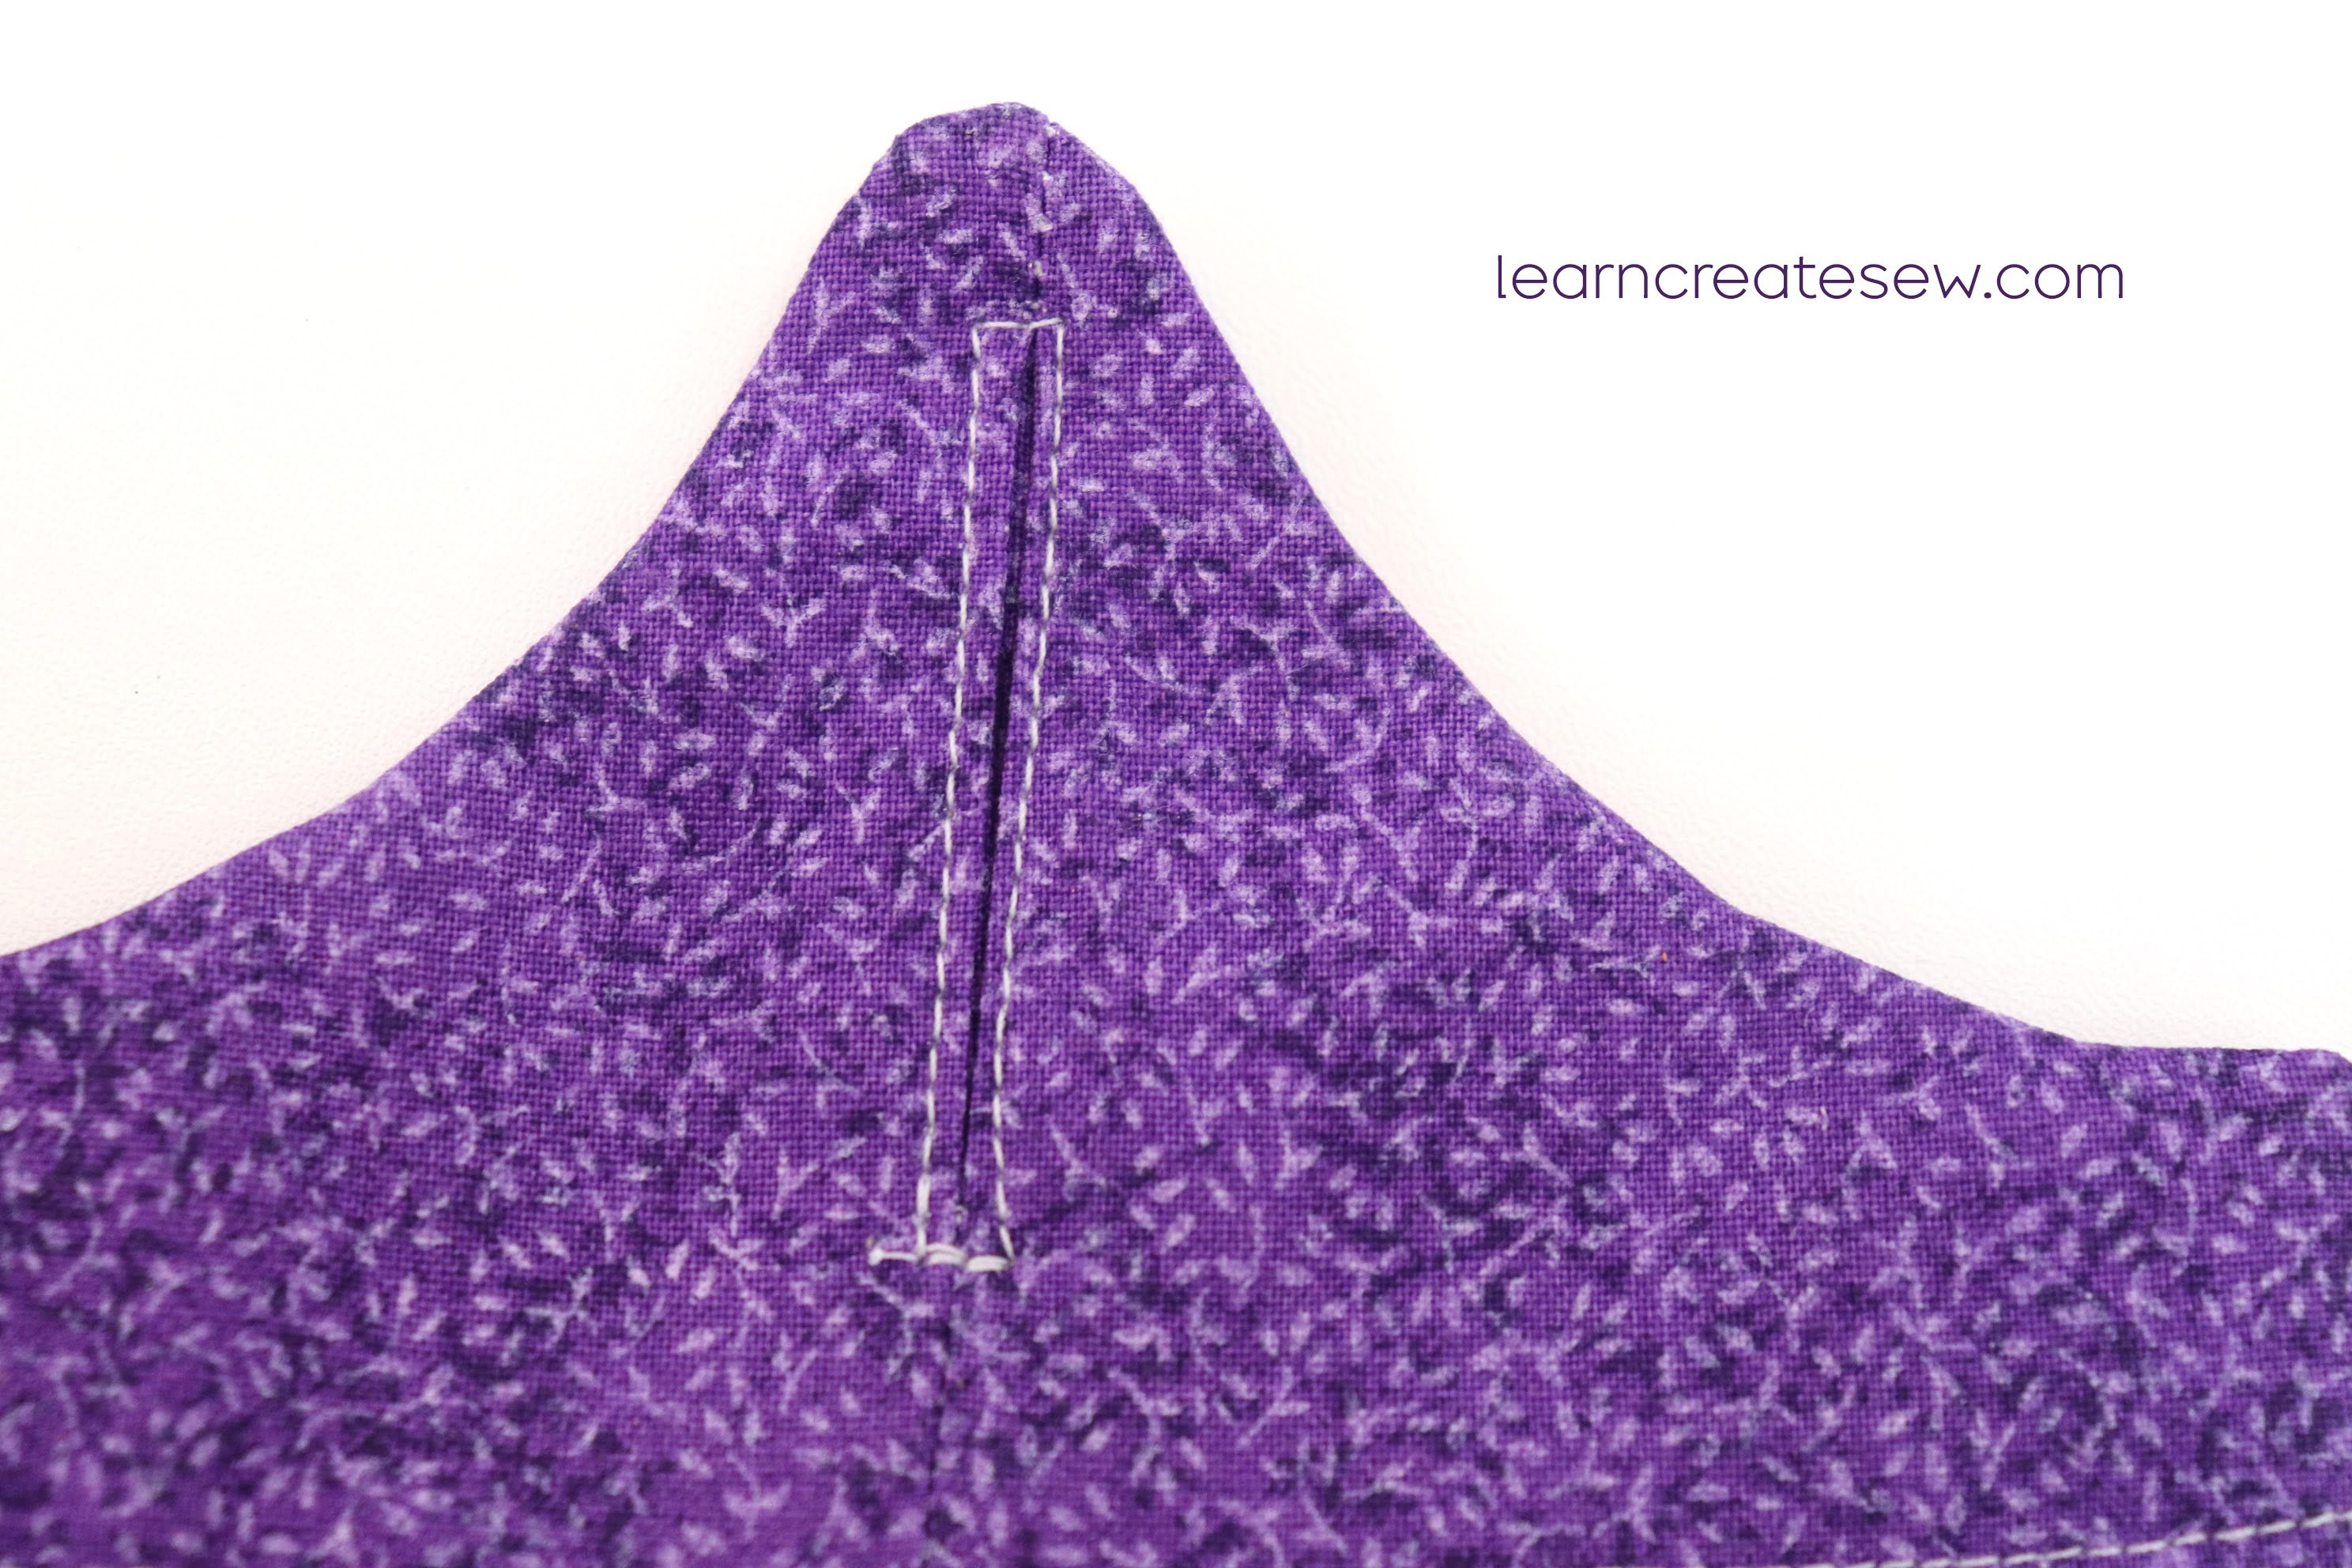
Notice there is an opening for the arm hole.
Topstitch around the slit with a 1/8 inch seam allowance.
Add decorative ribbon, buttons, or trim if you like.
Try the dress on your sloth and then attach a closure. Velcro, buttons, and snaps all work great.
And your dress is done!
Happy Sewing!
(FYI, the shoulder seams were done differently in this picture. I still love the dress but prefer the technique described above.)
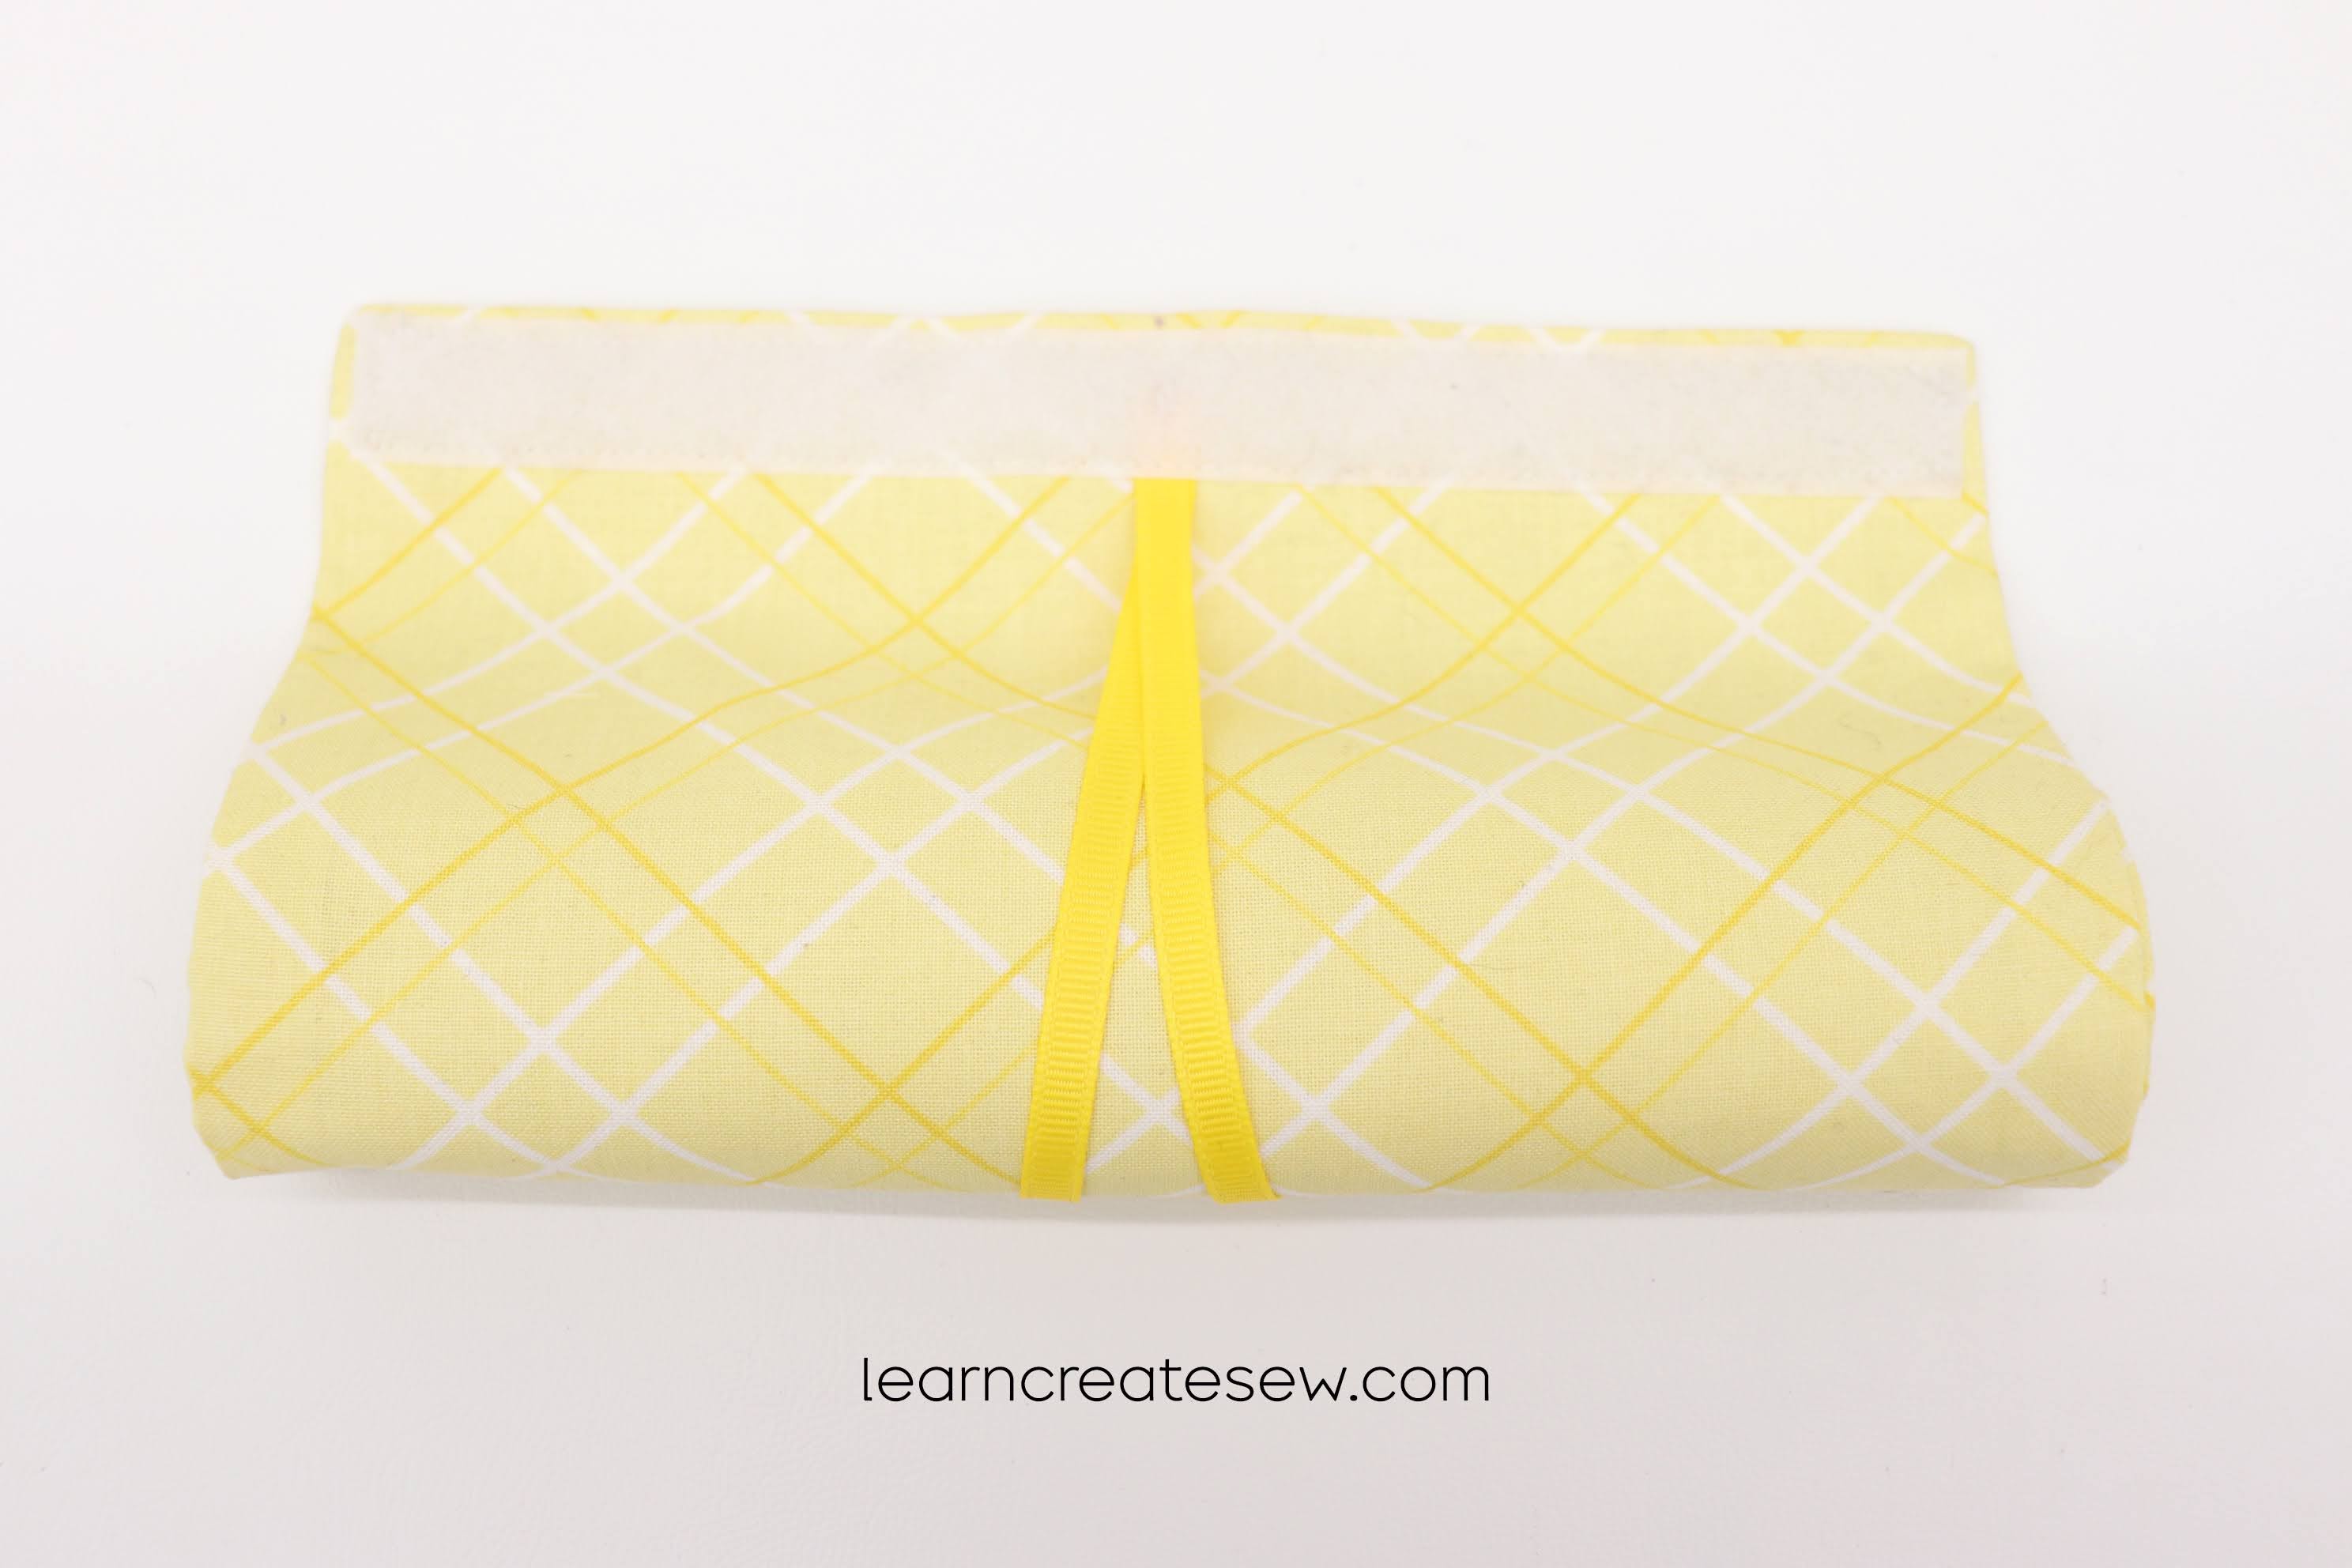
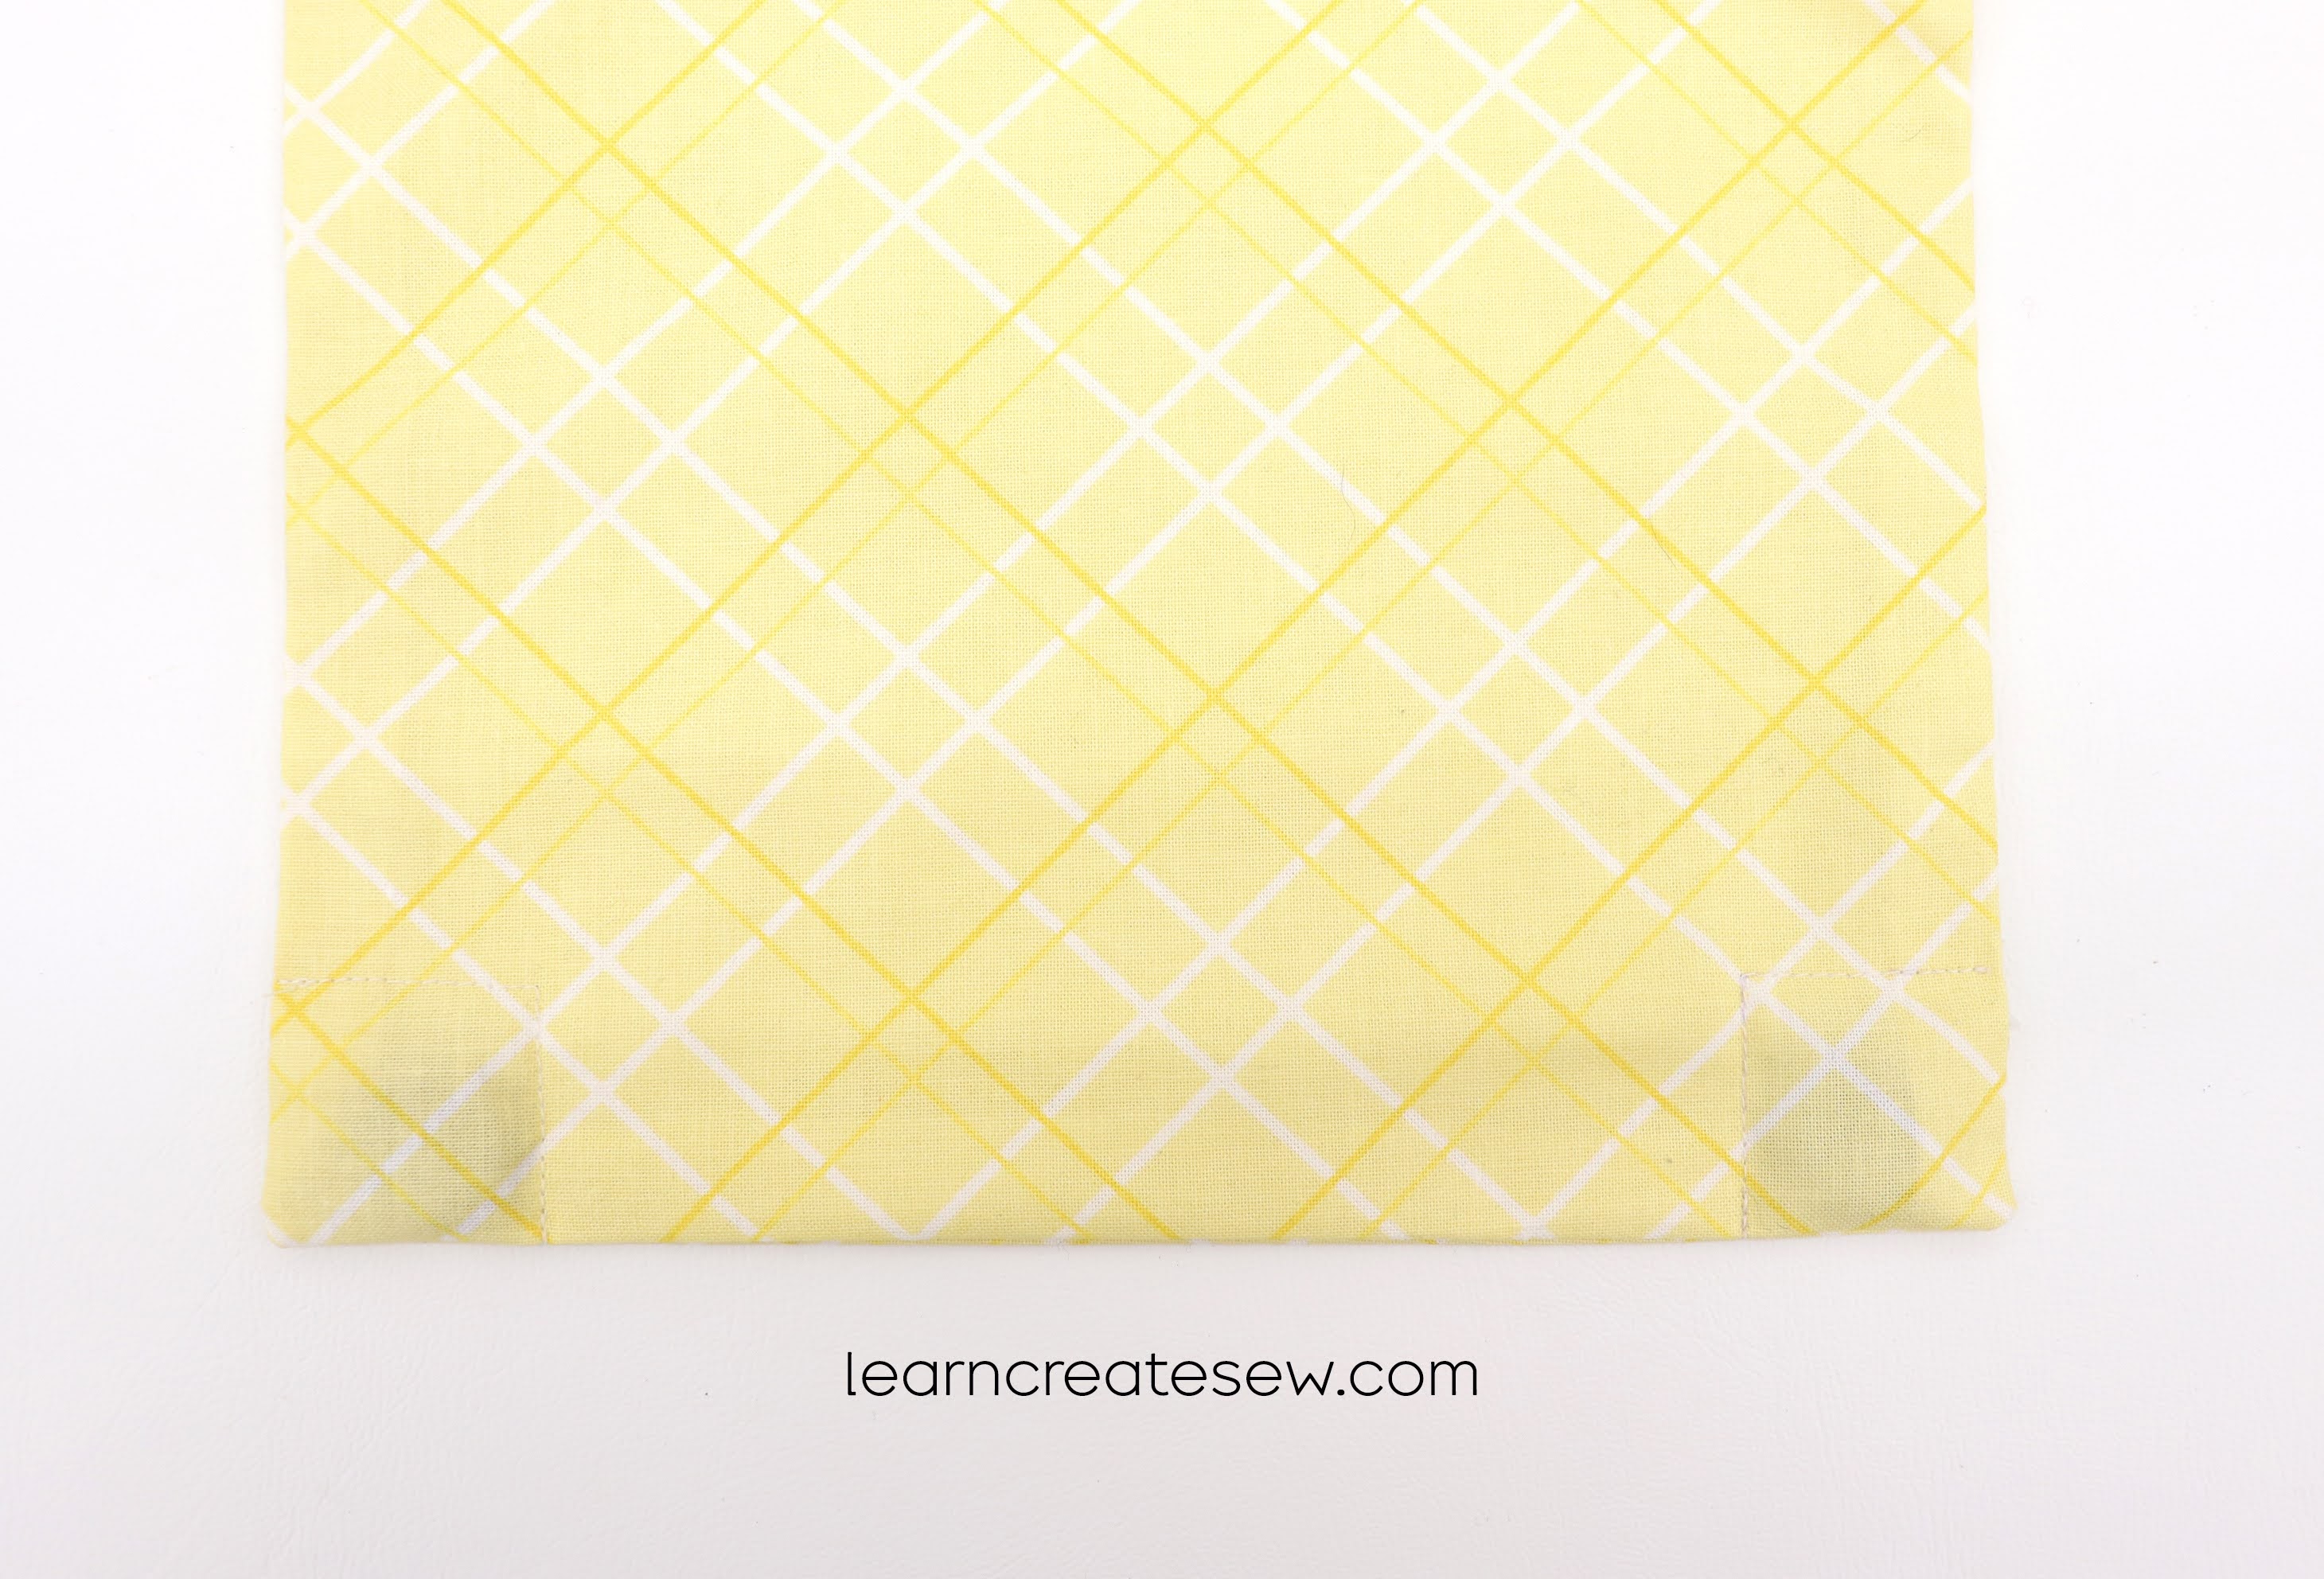
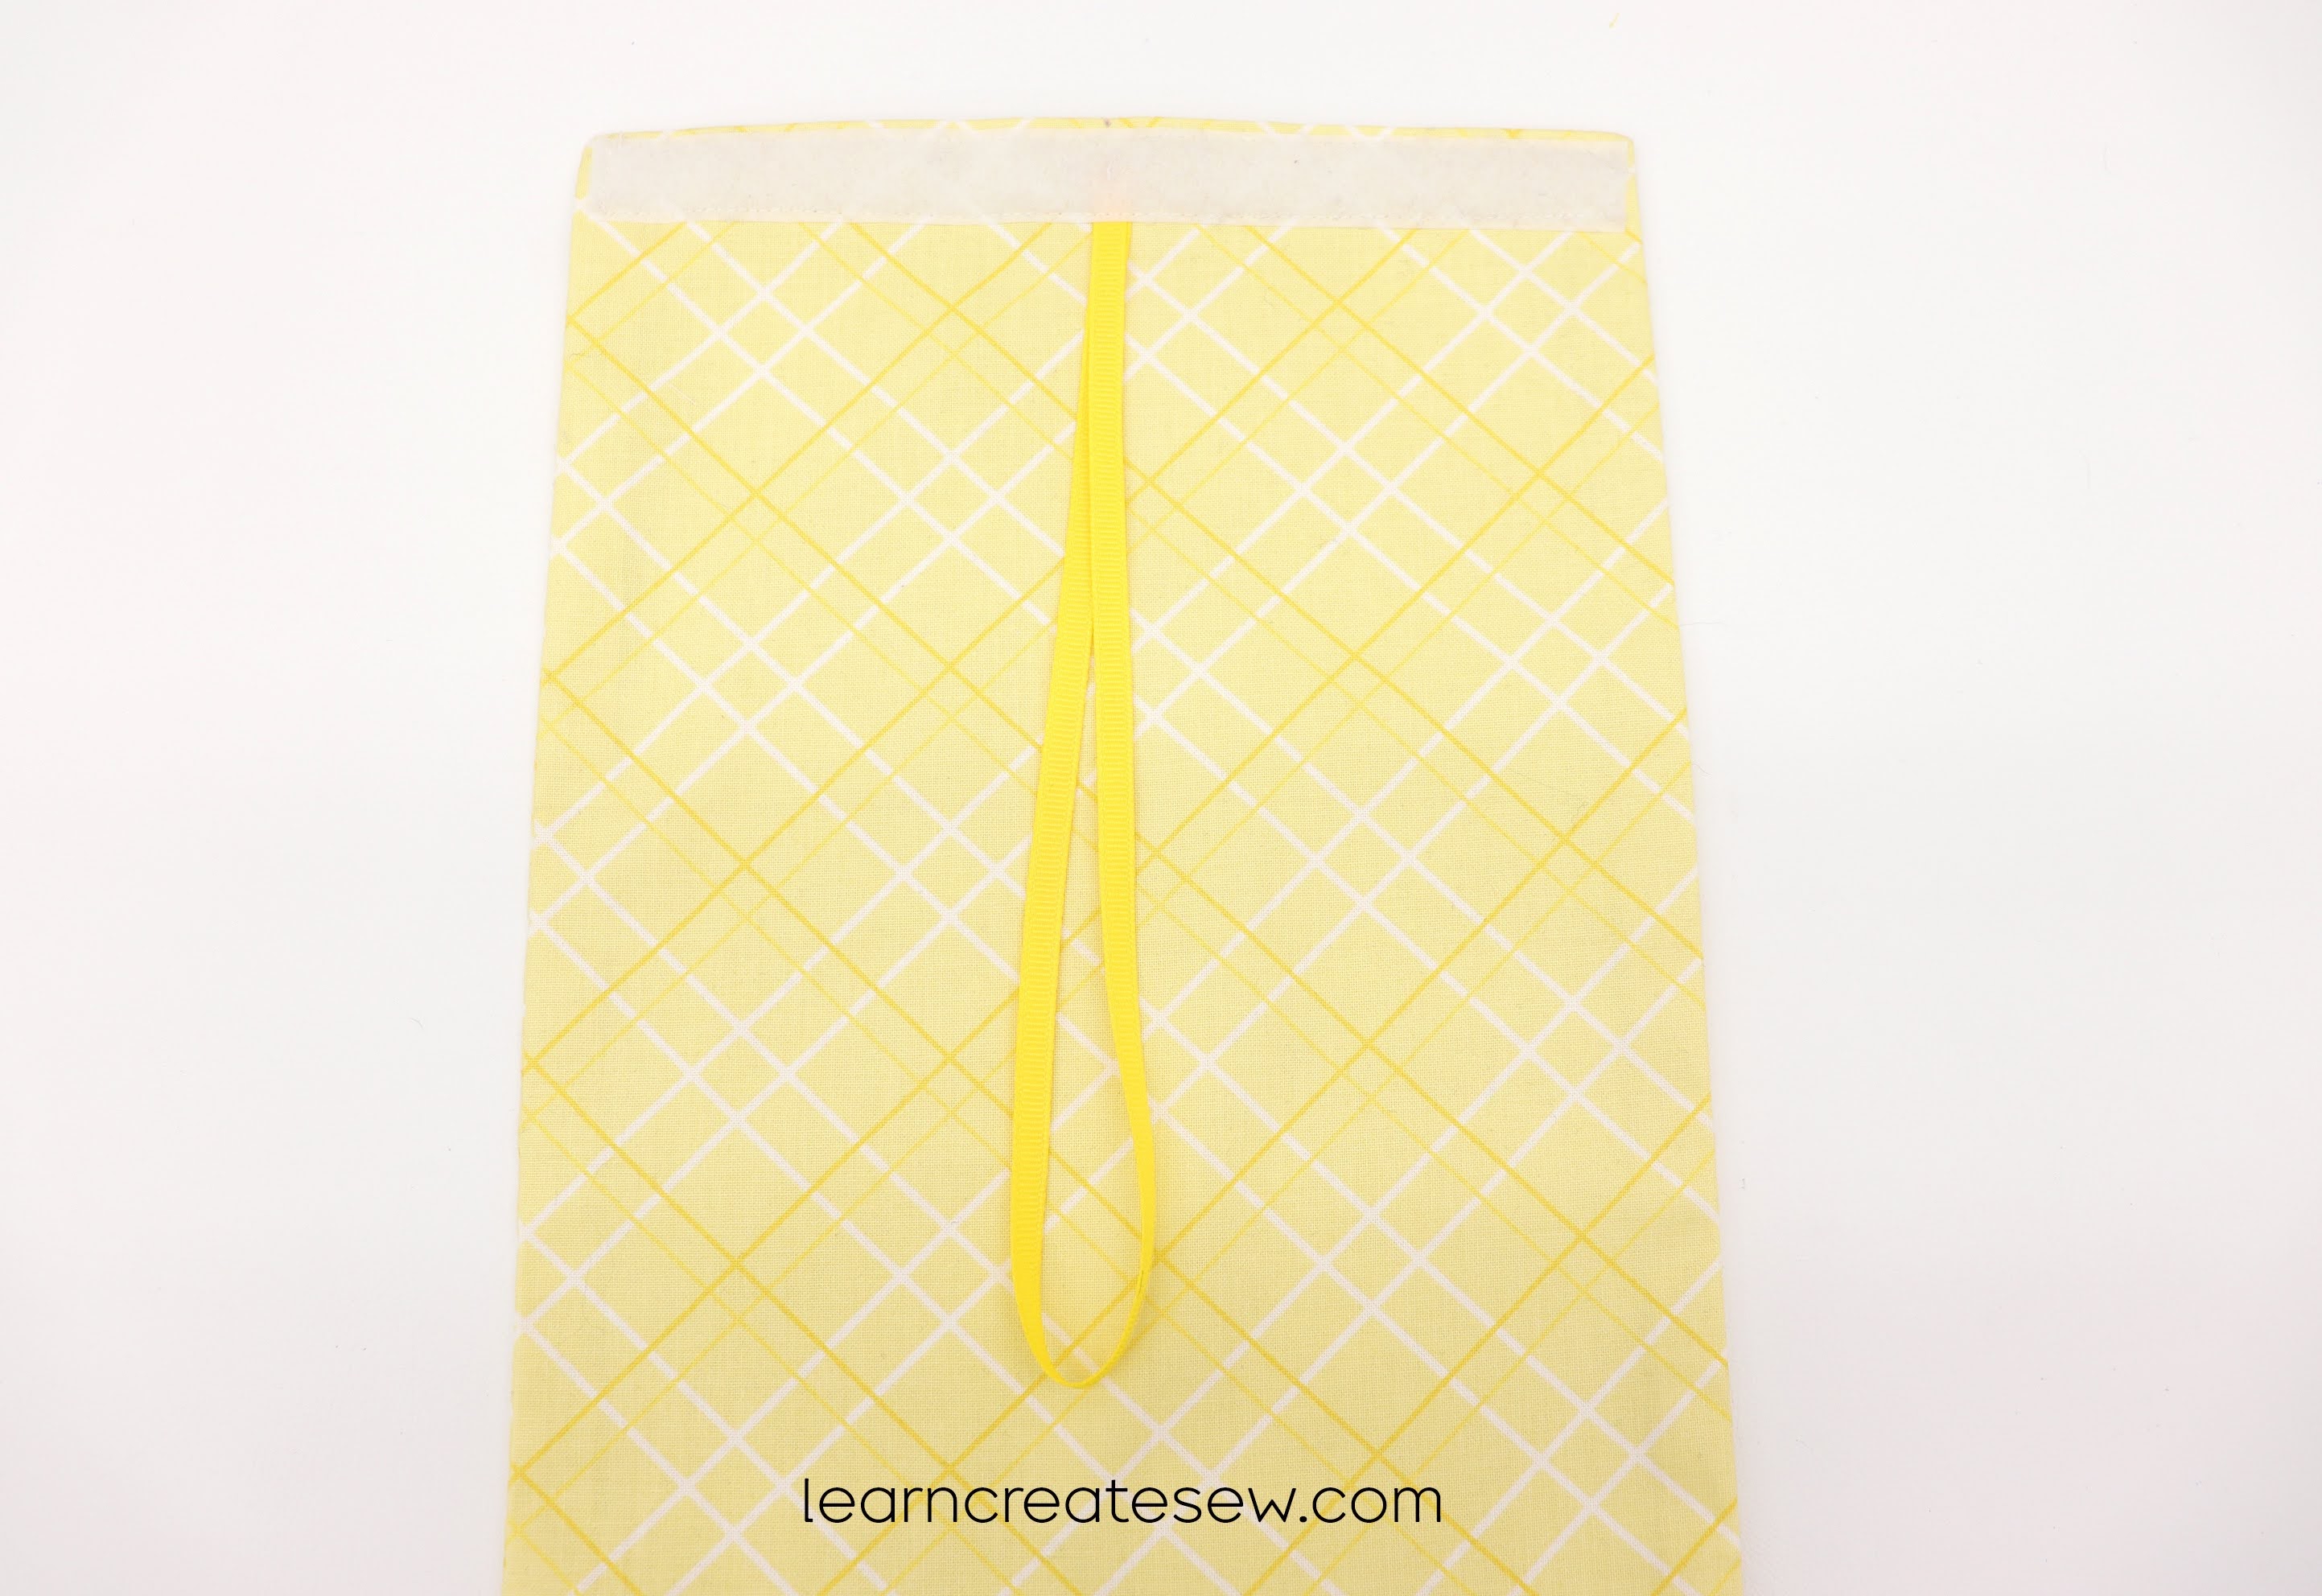
I am happy to share my latest project with you today! These are quick and easy drawstring gift bags.
I made mine quite small, but you can easily adjust the size. These are great for scrap fabric projects and are perfect for the holidays! They are also fun for beginning sewers.
There are two style options available, flat or standing. The standing bag has boxed corners.
Supplies:
1/3 yard (or more) fabric or scrap fabric – (The process is easier if you select a fabric that can be ironed)
It is so nice to have the time to post projects once again! This project is here for you today thanks to a viewer request. Thanks Joanne for your idea!
This is a quick little project that is a great addition to your rag doll.
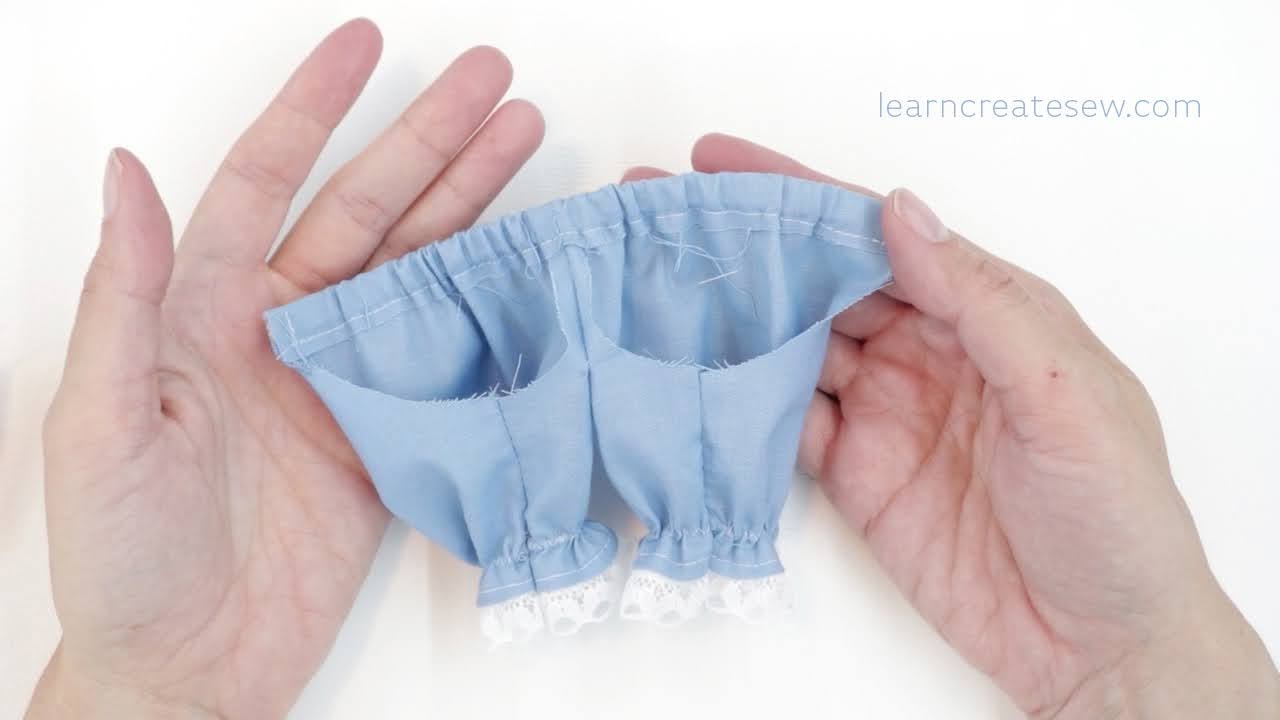
These beauties are available in 3 lengths, Short – Undies (Above) , Medium – Bloomers (Below), and Long – Extra Long Bloomers (Not Pictured).
This project is pretty quick, but their tiny size does make them a challenge. As a result, I tried to make as many of the steps as possible flat.
The hems in this project are finished with a single fold. If you want to avoid fraying, you can finish the top and bottom edges with a serger. You could also use double fold hems by add 1/4 inch to the top and bottom edge of the pattern and folding over 1/4 inch before following the other directions shown in the video. This may be recommended if you plan to remove the bloomers from the doll frequently.
There are two waistband styles demonstrated in the video. One is constructed flat and the ends of the elastic are visible in the seam allowance. The other is constructed in the round and the elastic is completely hidden.
You can also add lace to the bottom edge to add a bit of extra cuteness 🙂
To help reduce bulk, instead of adding an elastic casing using fabric or binding, I used a zig zag stitch over narrow elastic cord. This worked very well around the teeny tiny legs of the rag doll.
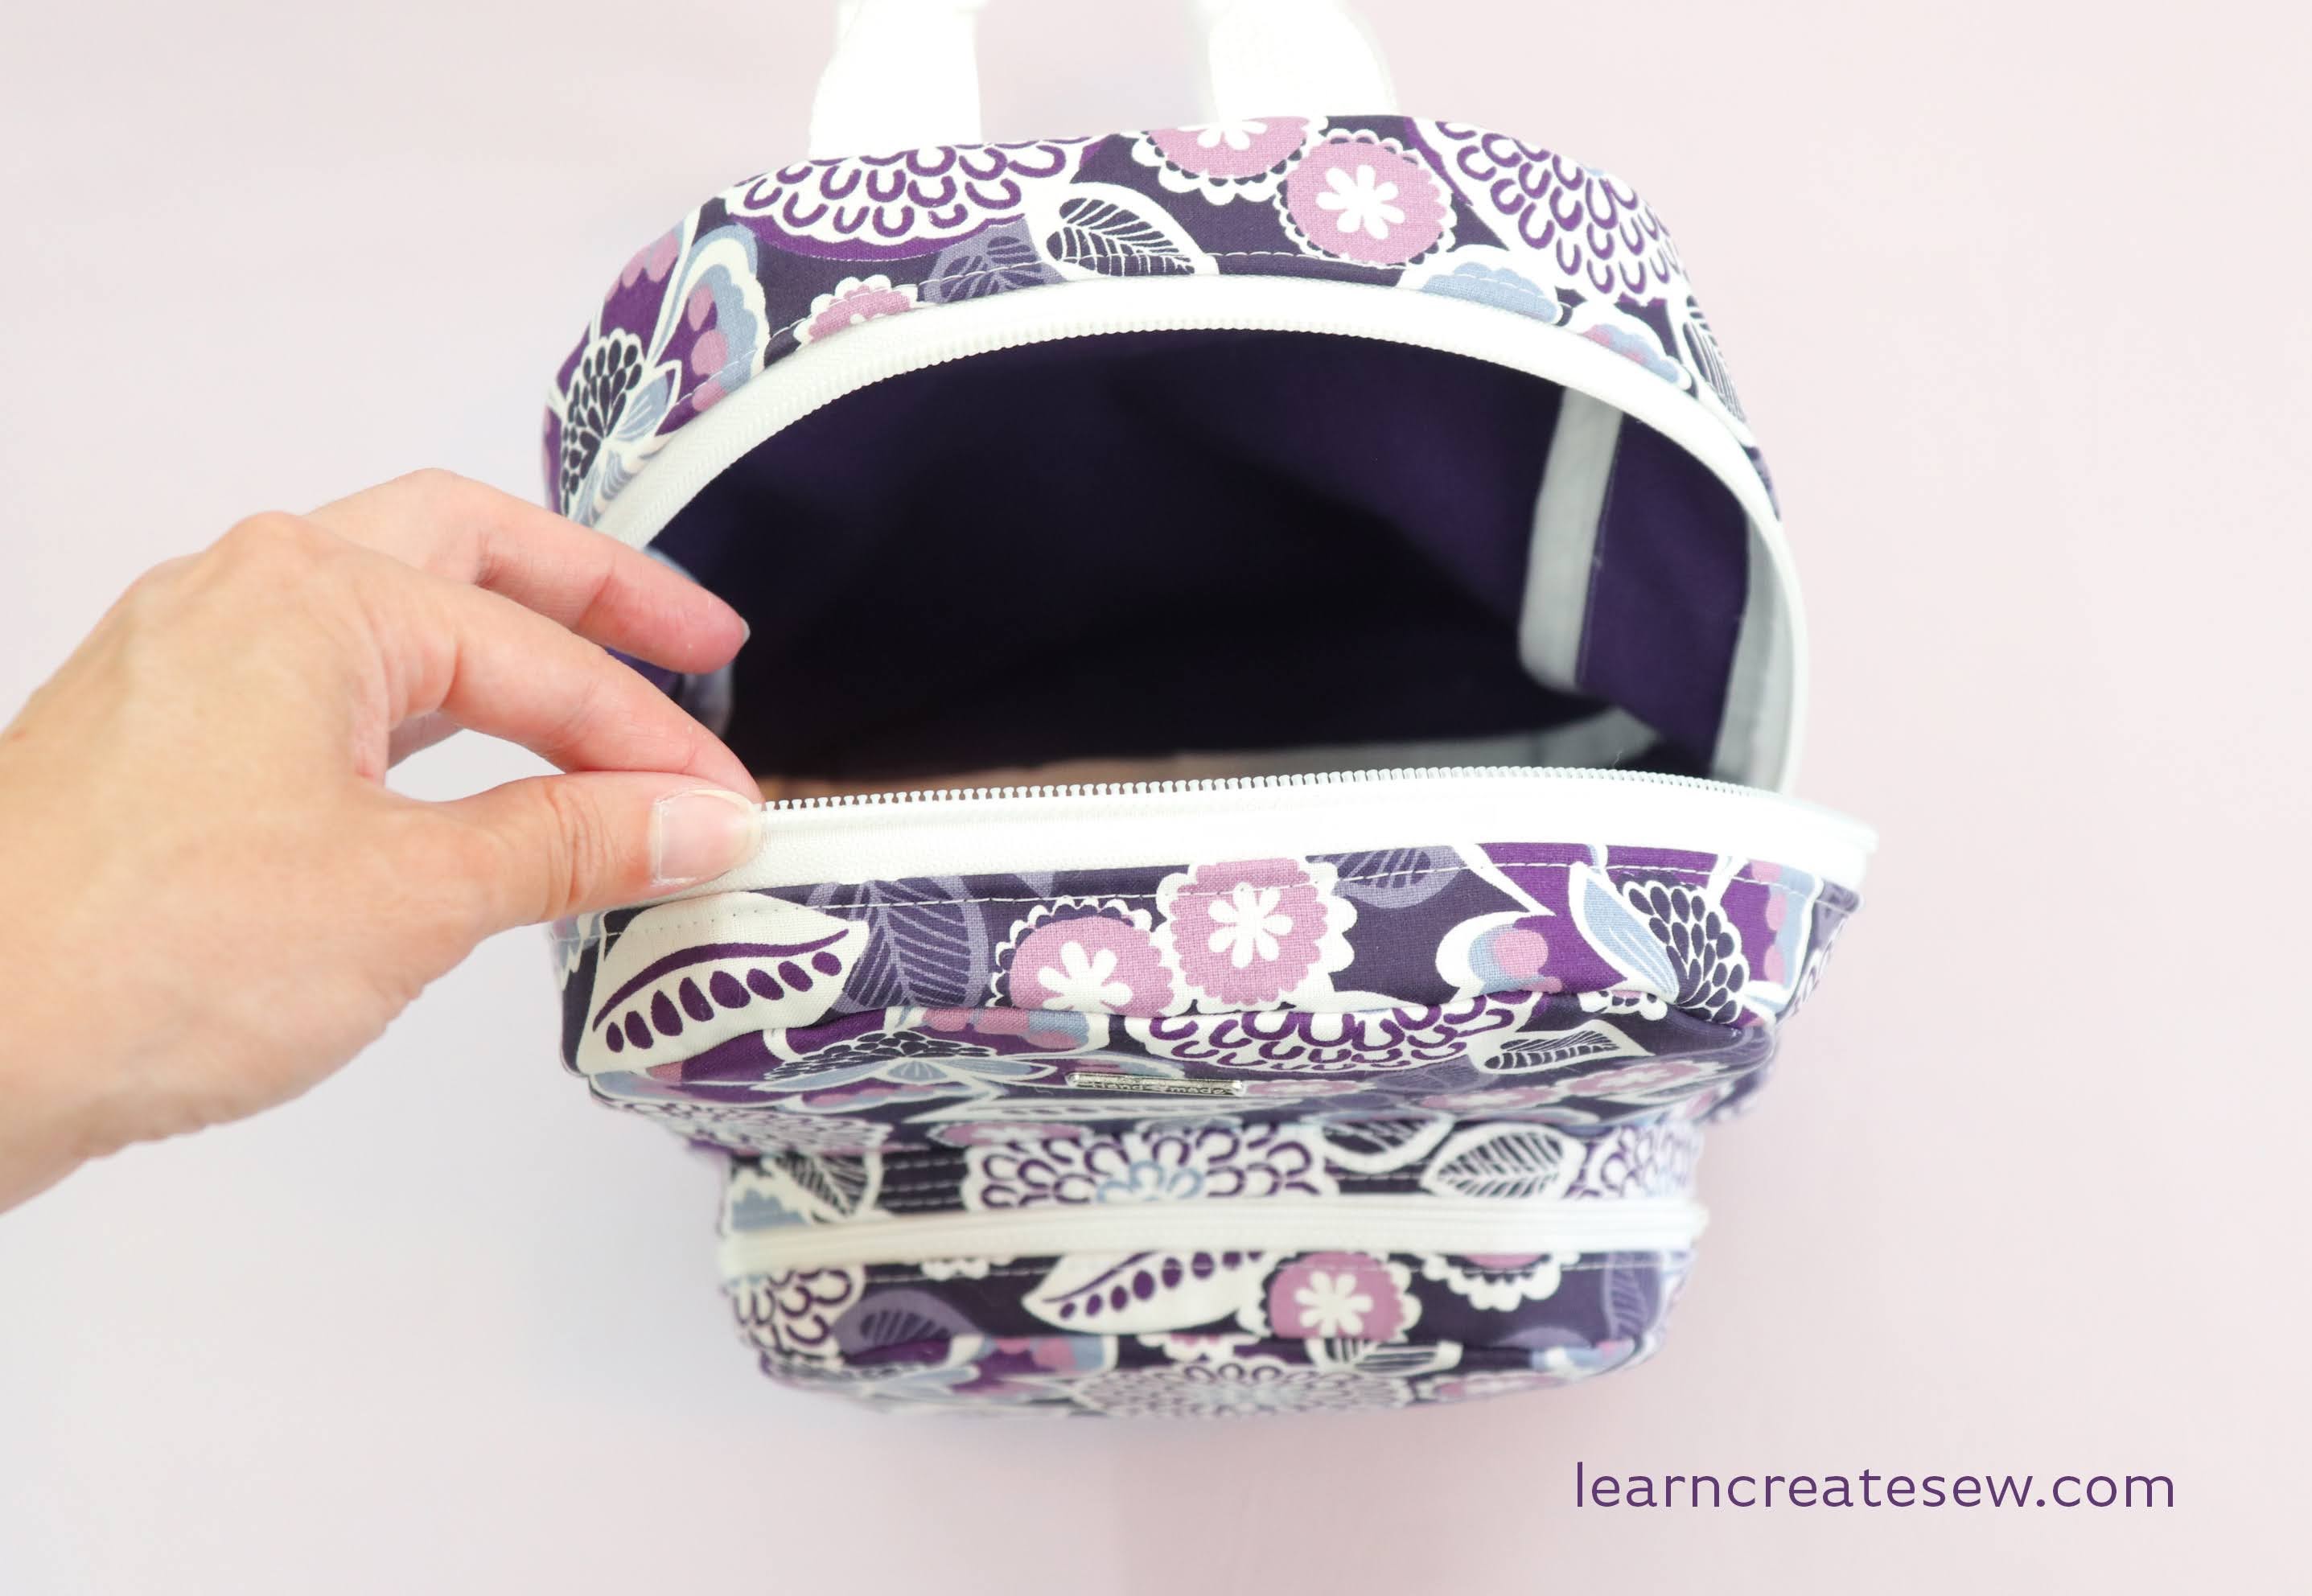
I have been making a lot of bags lately and one feature that I use almost all of the time is a zippered pocket.
These are super cute and convenient on both the inside and outside of the bag!
To create a zipper pocket you need one zipper, fabric for the pocket, and the fabric panel (either lining or exterior fabric) where you want the zipper to be placed. You begin by placing them fabric pieces right sides together. You then sketch a rectangle for the zipper window on the wrong side of the pocket fabric. I like to make the zipper window at least 1 inch below the top edge of the pocket fabric and at least 1 inch from each side. I also like to make the window 3/8 inch tall. (You may need a taller rectangle if you are using a zipper with larger zipper teeth.
You then stitch EXACTLY on the rectangle. This is super important! For years when I tried making a zipper pocket it always looked sloppy because I wasn’t careful about stitching the rectangle. To help myself be more precise I now use stitch length 2.0. I also slow down as I approach the corners and make sure I pivot with a 90 degree angle. Another trick that helps is to count the number of stitches you use to show the first short side and use the same number of stitches on the other short side. This will help make a nice even rectangle.
TIP: If you accidentally stitch too far, or mess up, I recommend taking the time to go back and fix it. It makes a big difference. Avoid simply backstitching to correct the error if you go too far. This actually makes the pocket harder to turn and it won’t lie flat in the end.
Next, you will clip the center of the window. Cut a line horizontally down the center of the box. About 1 cm from each end angle off to the corners. Clip very close to the stitches but be sure not to actually cut the thread!
Before I turn my fabric I really like to press. I find this helps the fabric to lay flatter and creates a better rectangle.
I fold the pocket fabric down along the top of the row of stitches of the rectangle and press. Then I do the same, lifting the pocket fabric up and pressing on along the bottom edge of the rectangle. And repeat for the left and right. It helps SO much!!!!
Then after pressing, I turn the pocket fabric through the opening, shaping the rectangle and press. I like to press from both the pocket side and the main fabric side.
TIP: Using a tailors clapper to help press is also really nice! It helps trap in the heat and set the folds.
Finally, you are ready to add the zipper! Simply lay the zipper right side up and place the window you created right side up on top of it. You can use pins, fabric glue, or double sided wash away tape to hold the zipper in place. Then stitch around the rectangle with a 1/16 – 1/8 inch seam allowance.
TIP: Before you start sewing make sure you know where the metal stoppers for your zipper are placed. You don’t want to accidentally stitch on one. It could cause damage to your tools and./or injury.
Once the zipper is attached it’s time to make the pocket! Simply fold the bottom of the pocket fabric up so that it touches the top of the pocket fabric, with right sides together. Pin around the edges (of just the pocket fabric) and sew with a 1/4 inch seam allowance. You will have to move the main fabric out of the way as you do this.
And the pocket is finished!
Below are video instructions for how to create the zipper pocket! There is both a Quick Overview and Detailed Instructions.
Pleats create fullness to your fabric and are a good alternative to gathering. Instead of scrunching up the fabric along the stitch line, you simply create folds.
Pleats can be a lot easier than gathering. They are quick and lie really flat. However, you do have to make sure they are consistently sized and placed, and that can be the tricky part. Often times patterns will have pleat placement guides which indicate the size and position of the pleats! This is really nice and takes out the guess work of pleating. So, as we practice how to make pleats we will use placement guides.
If you don’t want to make the pleats by hand you can use a Ruffler foot on your machine. They can be a bit tricky to use at first, but are a great option if you are planning to pleat anything that is really long such as the edging of a pillow, etc.
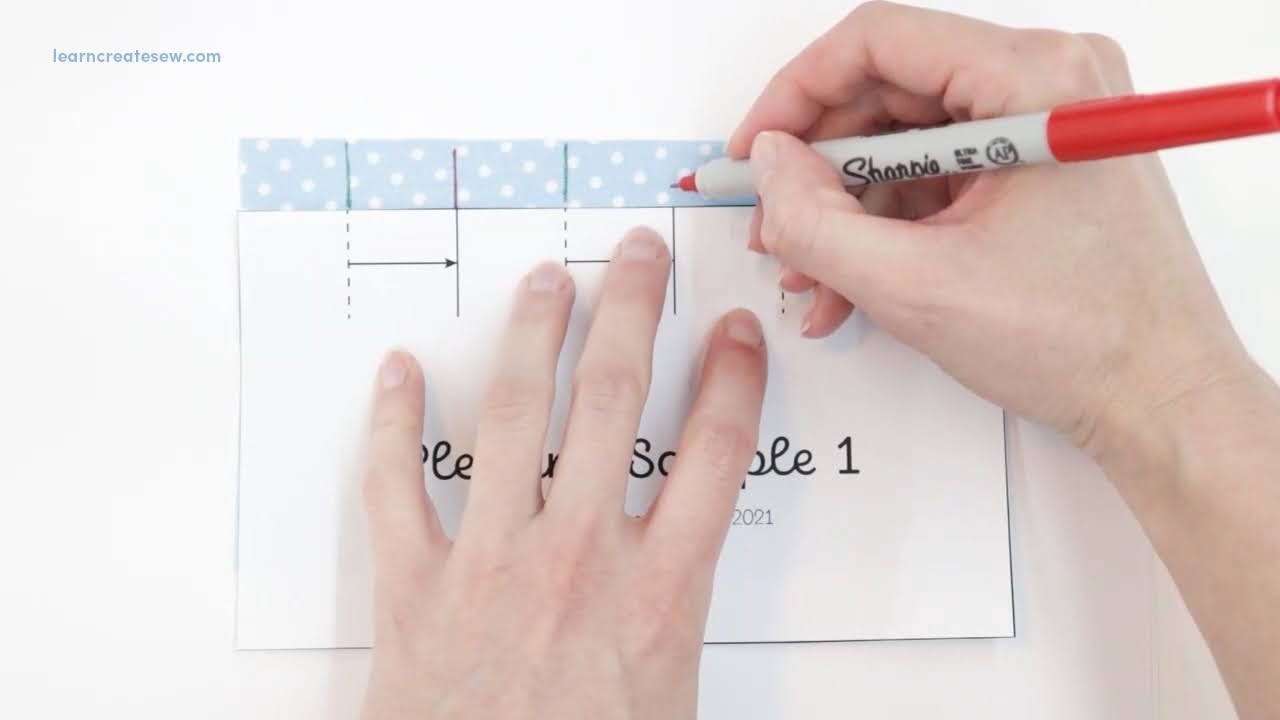
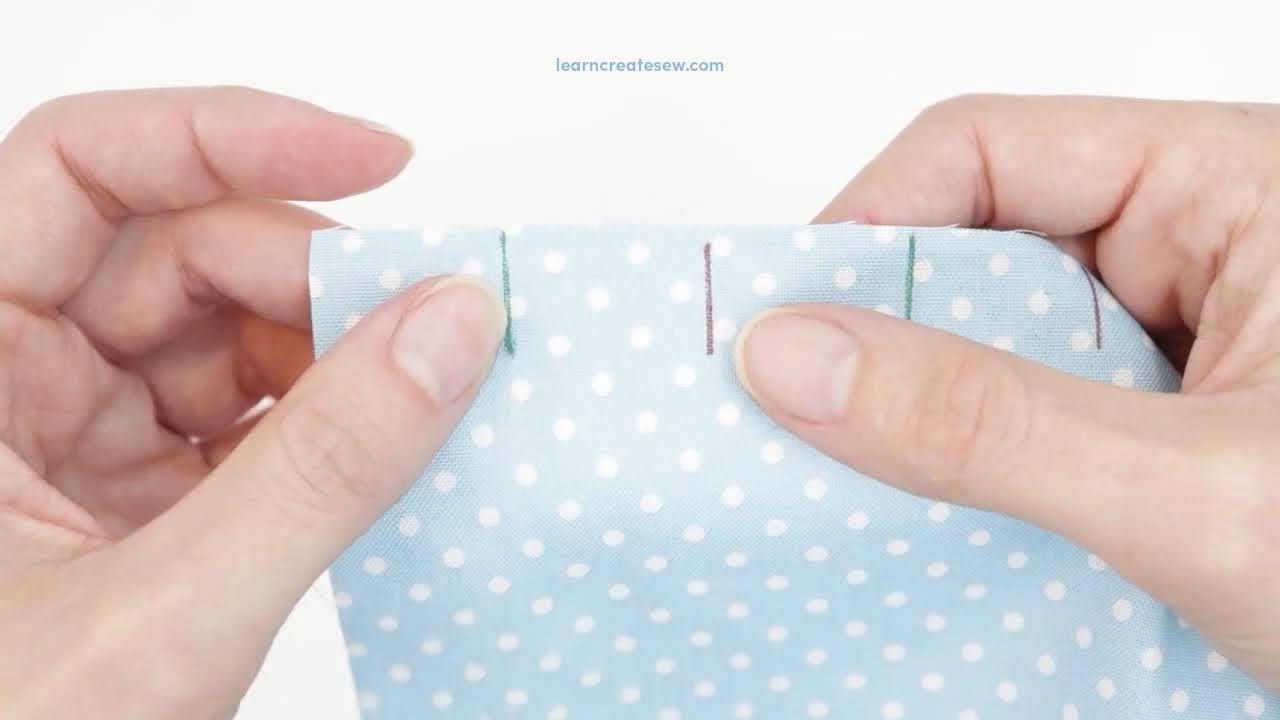
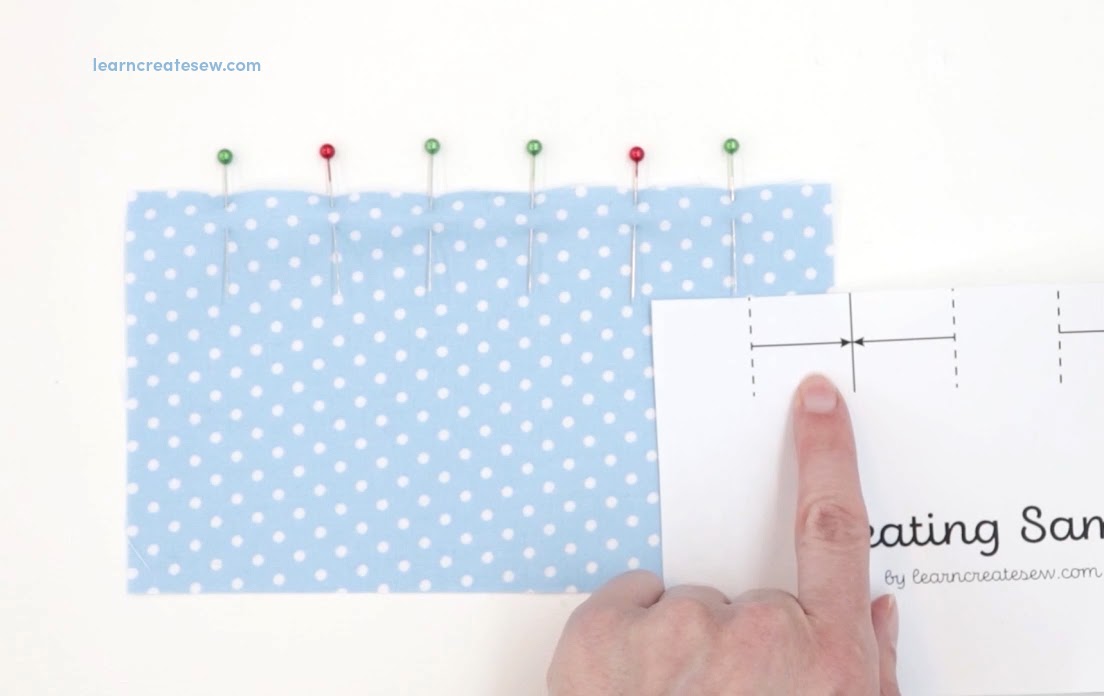
To create pleats you need two guide-marks, where the pleat starts and where it stops. In the first sample I marked this guidelines with sharpie to make them super obvious (NOT what I would do on an actual project!), but you could do something similar with fabric markers or chalk, something that will wash away.
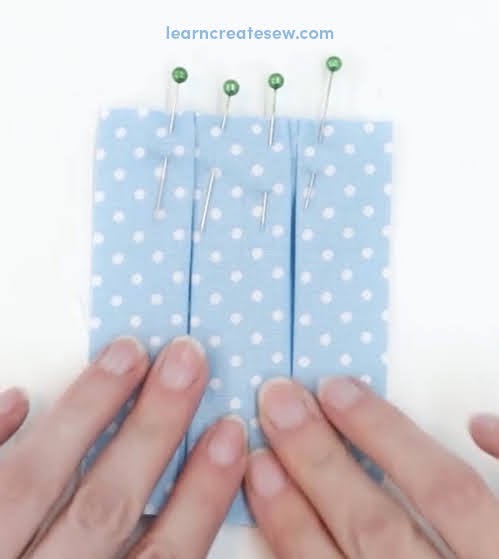
You can also use pins of different colors as guide-marks. In the second sample, I used green pins to represent the start of the pleat and red pins to indicate the stopping point.
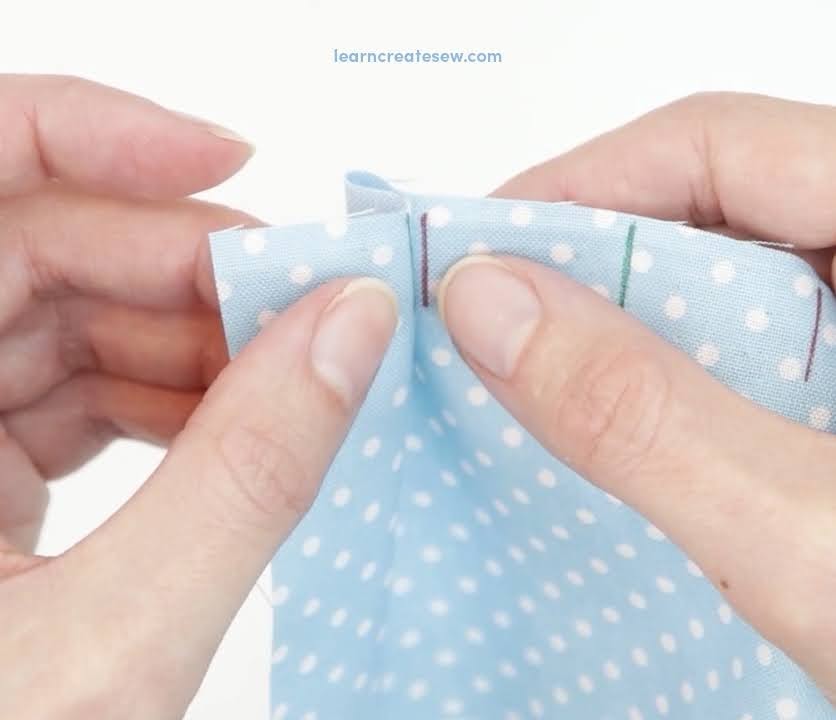
When you pleat, you fold the fabric at the starting point and bring it over to meet the stopping point mark, hiding the fabric between the two marks and following the direction of the arrow.
There are many many ways pleats can be arranged. Common placements include pleats all going the same direction, half going one way and half the other, or two pleats that meet at the same point going in opposite directions. Just be sure to look at your pattern or guide for the correct direction and placement.
Here’s what that process looks like with pins instead of marks.
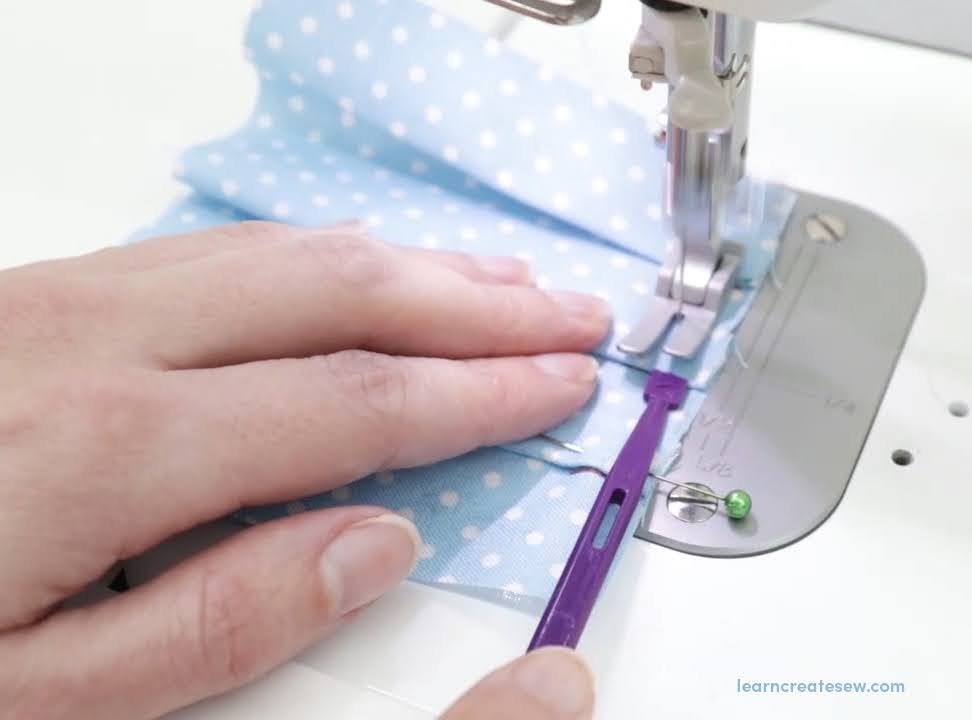
When sewing pleats in place it is important that they remain flat. As a result, I like to use a sewing tool to hold them in place while I sew. My favorite tool to use is That Purple Thang, but a sewing stiletto or the back edge of your seam ripper also works. Just remember to stay safe and keep your fingers clear of the needle, a sewing tool helps ensure that and protects your fingers.
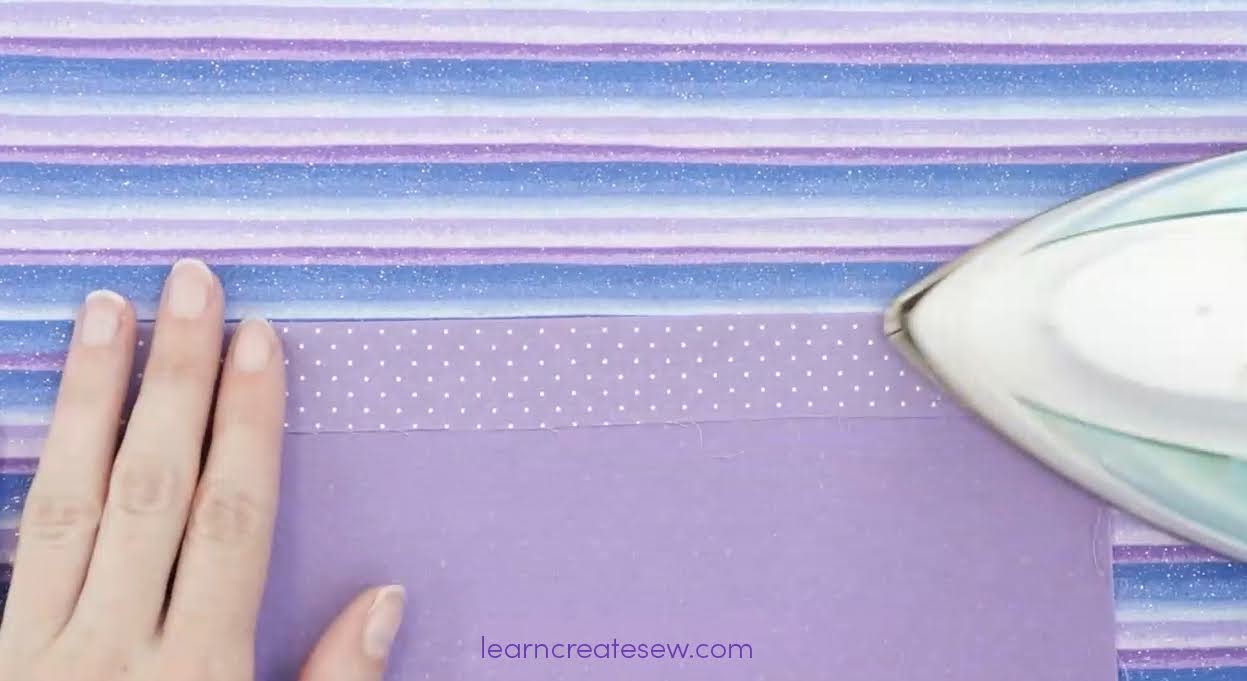
When you are done sewing, pressing is really helpful! You can press just in the seam allowance, all the way to the bottom of the fabric, or somewhere in the middle depending on your preference or the directions in your pattern. If your fabric is really thick, or composed of multiple layers, it may also be helpful to press before sewing. Just be careful not to press your pins 🙂
In the end, pleats are a quick fun way to add detail and decoration to a project!
Gathering can be found in many sewing projects and is used in everything from basic crafts to garment construction.
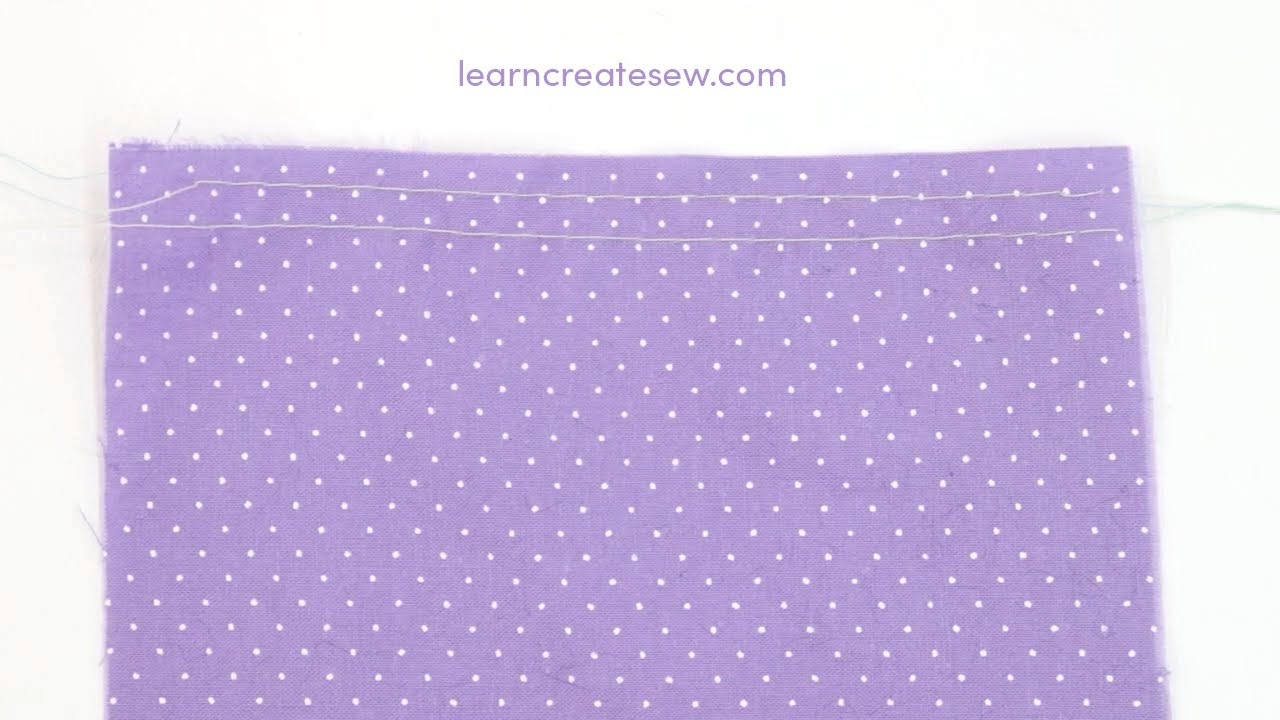
There are several different ways to gather, but my favorite way is using two rows of stitches.
TIP: USE TWO ROWS OF STITCHES
Creating your gathers with two rows of stitches provides a safety net, just in case the worst happens and a gathering thread breaks. It may save you from having to start all over again. The two rows also helps the fabric to lay flatter. This is a plus when you need to sew the gathered fabric to something else.
When sewing gathering stitches always use a long stitch length. The longest stitch length on your machine is usually best and can range anywhere from 4.0 – 7.0. I find 5.0 – 6.0 is usually my go to stitch length for gathering. The thicker your fabric, the longer the stitch length needed.
The two rows are stitched with a gap between them. I find it most successful when I use a 1/4 and 1/2 inch seam allowance for the gathering stitches. This leaves a wide 1/4 inch gap and provides a little bit of leeway for small errors in the seam allowances size. (If the rows of stitching get too close together it may stop the fabric from sliding along the threads.)
When you gather you do not backstitch (this would create a knot) and you leave the thread tails long.
TIP: SLIDE DON’T PULL
To create gathers we hold the two bobbin threads and slide the fabric. Our instinct when gathering is to pull the threads to create the gathers, and if that doesn’t work, we pull harder. Uh oh…then you hear it…snap! The thread breaks. This is a particularly dreadful noise when you are gathering, especially if it is something large. Having the two rows of stitching instead of one could save you, but not always.
So, instead don’t pull…slide. Simply hold the thread tails in place and slide the fabric along. See the video below for what to do when it won’t slide anymore! Pulling the threads isn’t the answer, as there is too much of a chance of that thread breaking. But if you remember….slide, slide, slide! It helps 🙂
TIP: USE TWO DIFFERENT COLORS OF THREAD
When you are just learning how to gather, identifying the correct threads to hold can be tricky. If you thread your bobbin and top thread with two different colors it makes it super easy to find the threads you are looking for! The bobbin threads become obvious and you won’t make the mistake of holding the wrong pair of threads. I used yellow thread for my main spool, and blue thread in the bobbin.
TIP: GATHER FROM BOTH SIDES
Sometimes when we are on a roll and gathering quickly we accidentally slide our fabric off of the threads entirely! At that point, there is nothing to do but begin again. To avoid this, gather half of the fabric from the left, and half from the right, so there is no danger of sliding the fabric too far.
See the video below for a detailed tutorial on basic gathers!
Hey Everyone! I just wanted to let you know that the Fun Sized Backpack Pattern has been updated!
There was an error on the Bottom Pocket Gusset piece. It should measure 12.75 inches in length. If you have downloaded the original pattern please make sure to take note of this change!
The pattern has now been updated and is linked below. I’m so sorry for the inconvenience! A special thanks to Shirley for pointing out the discrepancy in the pattern so it could be fixed! Thanks, Shirley!
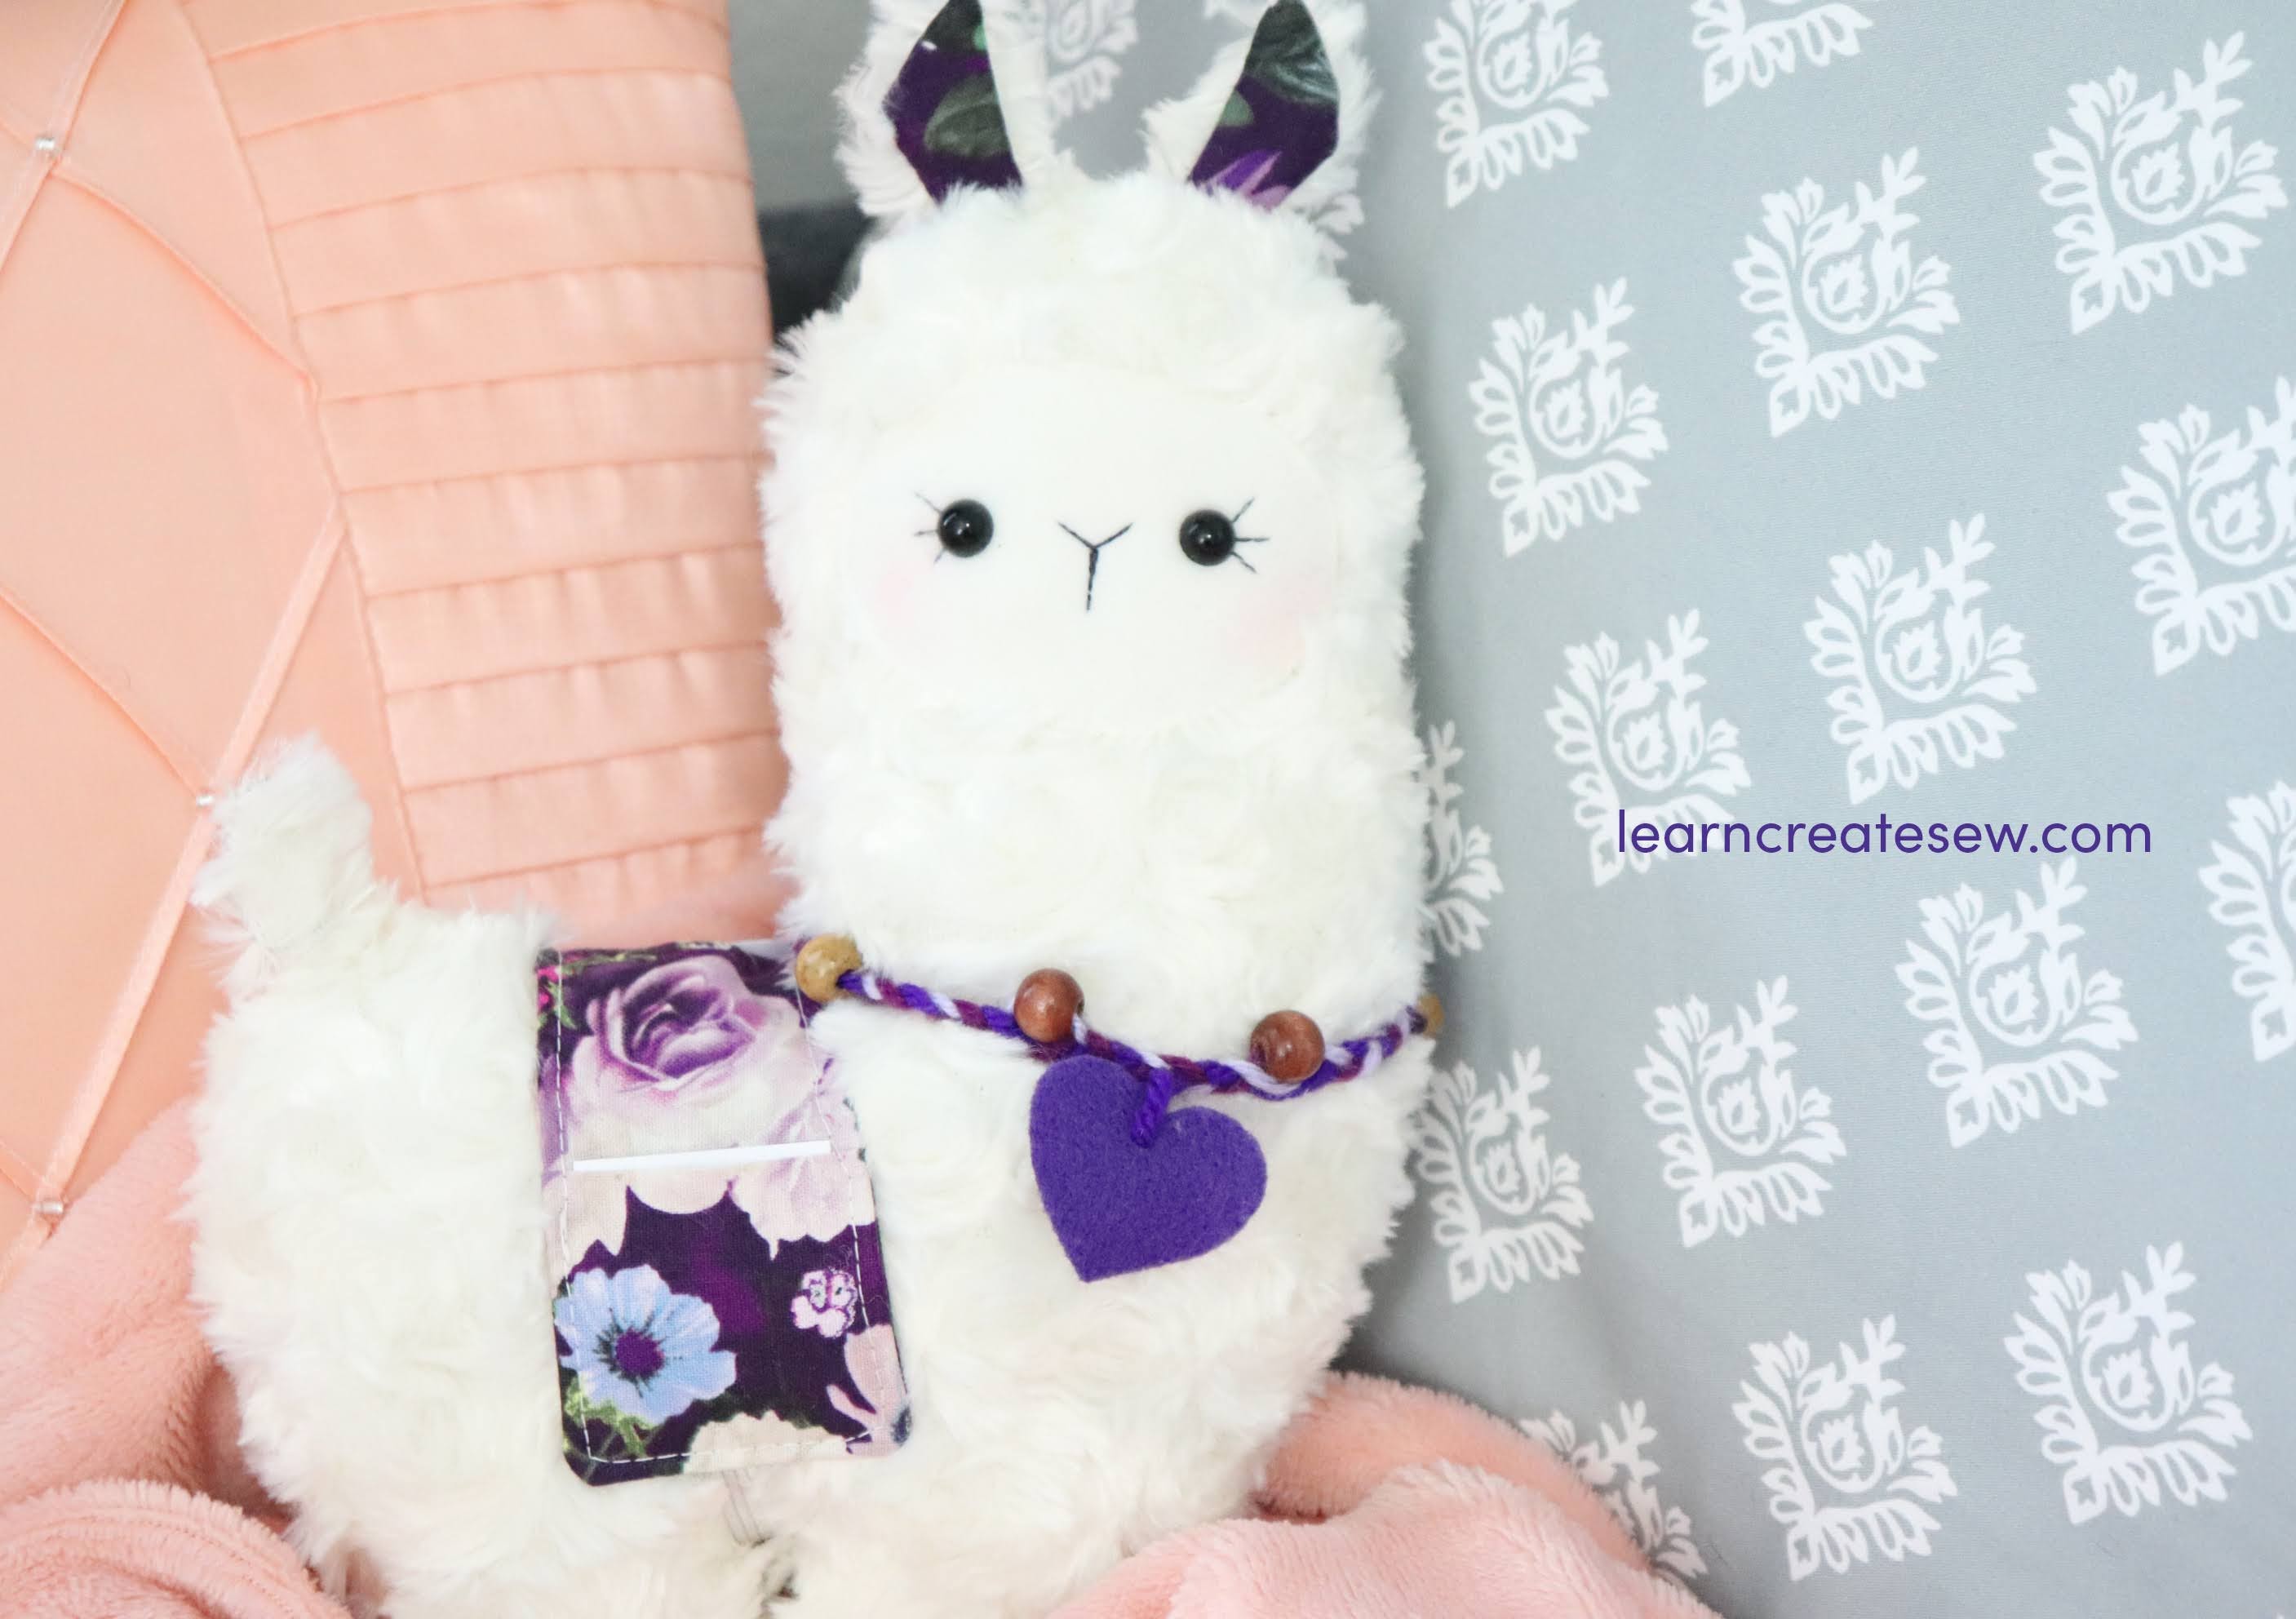
With Valentine’s Day coming up I was inspired by a cute new idea! A Lovely Little Llama Valentine!
This little llama has a blanket with two pockets that can deliver valentines for the big day 🙂
Not only would this llama be adorable for Valentine’s Day, but any holiday! Change the colors to green and red and you have Christmas. Dress it up for birthdays, Easter, or even Halloween. Changing the colors, accessories, and fabrics will completely change the feel of the project.
The pocket pouch is definitely my favorite part of the project, aside from the overall cuteness, of course! You can place notes, treats, and gifts in the little pockets.
The pattern is available in two sizes. The small size measures approximately 9 inches tall without the ears, and the large measures approximately 11.5 inches tall.
It is constructed with swirl fur which is great to work with and is super fluffy! It just calls out for cuddles 🙂
This project is fairly simple, but the fur does add a bit of difficulty. I would say it is about a 4/10 in terms of difficulty. You need to be comfortable using small seam allowances and sewing curves. Experience with fur or plush fabrics is also helpful.
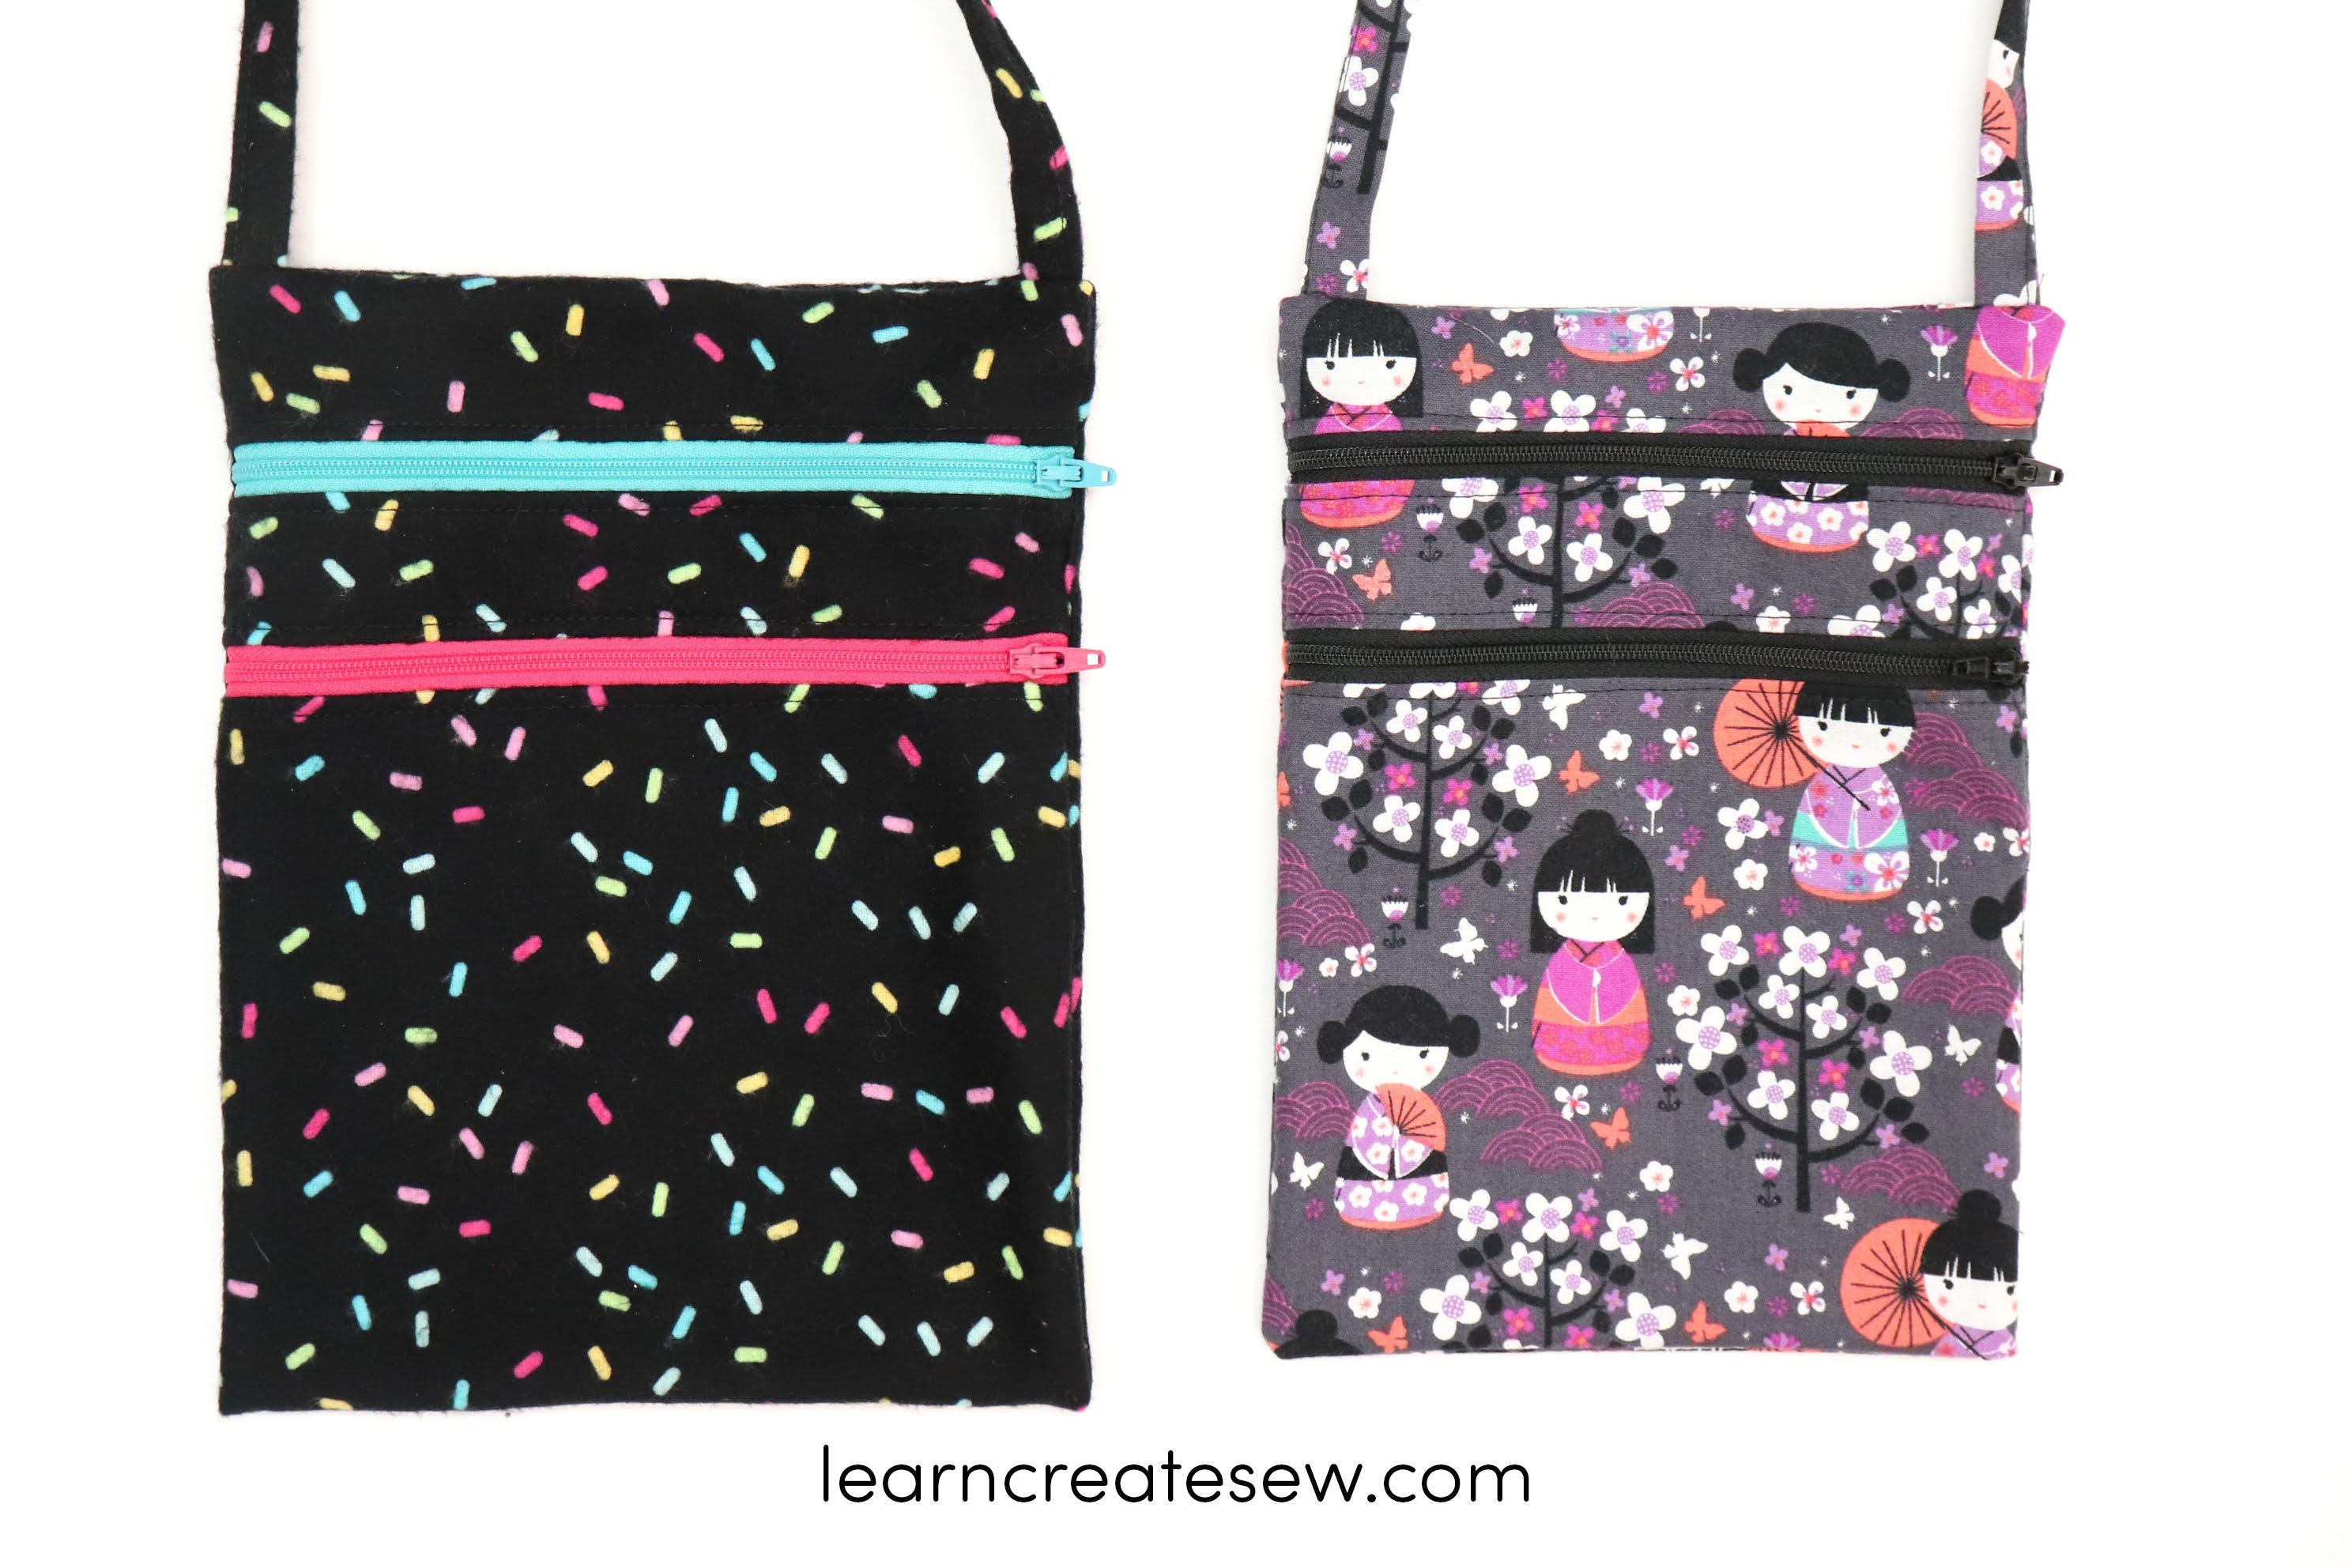
I absolutely love the project I am sharing with you today! I few years ago I was rushing to get ready for a vacation and my purse would NOT fit in my bag. I had one hour before I had to leave for the airport. What was I going to do? Well, being me, I decided to sew a new purse!
This is what I came up with! And since then I have used this purse absolutely all the time.
This purse is very lightweight and super handy to have around. I love to use this when I travel so I can fold it up in my luggage. I also really like to use it when I go for walks. It is the perfect size for a cell phone and smaller items.
This is a great first zipper project, so if you are just beginning with zippers this is a great place to start because you don’t have to worry about linings. Since the purse doesn’t have a lining it can be made quickly and simplifies the project. This is definitely a casual bag and I have enjoyed making this using both cotton and flannel fabrics.
Free Cut Layouts are available for two different styles, narrow and wide.
The black confetti purse is the wide version, and the cotton print is narrow.
Once you are comfortable with the process of how it is constructed it is super easy to adapt. By changing the length and width of your rectangles you can change the size of the bag. You can also use the same process to increase the number of zippers! I love the look with 3 zippers!
The wide bag measures approximately 7.375 x 9.5 inches and the narrow bag is approximately 6.375 x 9 inches.
SUPPLIES:
2/3 yard cotton or flannel fabric (Makes 2 if the fabric is at least 40 inches wide)
Two – Three 9 inch zippers (for each purse)
Coordinating thread
Fray Check (Optional)
Tools
Sewing Machine
Basic Sewing Tools (Pins, scissors, etc.)
Ruler and marking tool (to draw the rectangles from the cut layout)