
Here is my second fanny pack! This one is a flat version.
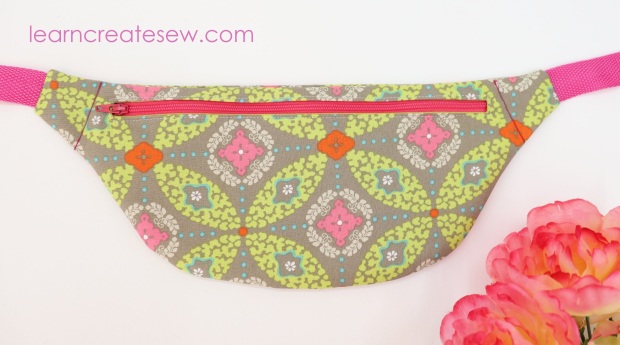
The construction of this fanny pack is quite a bit easier than my classic fanny pack.
It has a zipper window rather than a zipper on a curve. This is a great option if you are learning how to sew zippers. The difficulty level on this project is about a 3.5/10. You have to use a zipper foot. You will be working with lining, and your stitching has to be exact.

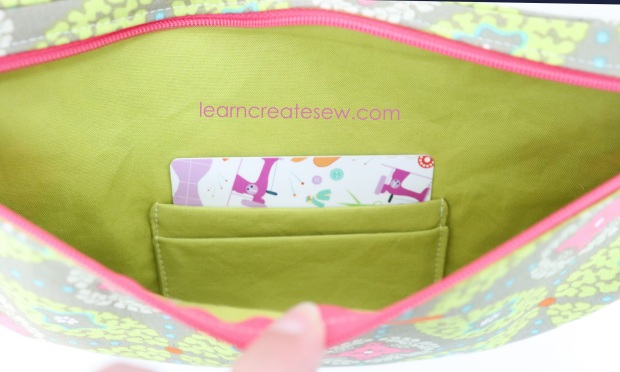
Since it is flat it can’t hold much, but it is perfect for your phone, lip gloss, or to act as a wallet. There is even an optional credit card pocket.
The pattern has two sizes, small and regular. The regular fanny pack is about 14.5 inches wide, 6 inches tall from tip to top, with a pocket about 5.25 inches deep. The small size is about 13 inches wide and has a pocket approximately 4.75 inches deep.
Here is the free pattern!
Flat Fanny Pack Pattern by learncreatesew
DETAILED INSTRUCTIONS:

Hello, what type of fabric did you use for your flat fanny pack lining and outer fabric? Thank you.
Jennifer
Hello! Thanks for asking. I used regular cotton fabric for both the lining and exterior of the flat fanny pack 🙂
Hi! Im in the middle of making this right now!! Just wanted to say thank you so much for the free pattern I’ve been looking for the perfect fanny pack to make for a while now and I love this one! 🙂
You are very welcome! I am so glad you liked it!
Hi, I’ve been making a fanny pack that is similar to yours but the instructions on yours are 100% more user-friendly. However, I have a lot of 7″ zippers as my fanny pack measures 11″ across the top – and 5.5″ top to bottom. I LOVE how you’ve inserted the zipper. Can you advise me how to adjust for the slightly smaller size and 7″ zipper.
Thank you, Janet
janet@roro.org
I am so glad the instructions are helpful! I’m happy to help 🙂 All you have to do to adjust for a smaller zipper is change the length of the rectangle you draw for the zipper window. (3:15 in the video.) Instead of a 9 or 10 inch window as shown in the pattern and video, make the rectangle 7 inches long (3.5 inches to the left and right of center). The rectangle will stay 3/8 inch tall. I would also keep the window 1 inch from the top edge as shown just to ensure it does not interfere with the top seam allowance. After drawing the rectangle I would also check to make sure it is not in the way of any other seam allowances. If it is, I would keep adjusting the length and placement until I like the position and it won’t interfere with any seams. I hope this helps! Happy Sewing 🙂
Thank you for the free fanny pack pattern I have used it over and over again I really enjoy it.
Thank you for sharing! I am so glad you enjoy the pattern!
do you have instructions one can print out step by step for the flat fanny pack or is it only on the YouTube video?
Thanks for asking! I currently only have the YouTube video.
Thank you! I will adjust as you suggest for 7″ zipper.
Great tutorial. Very simple and easy to follow. Thank you for the pattern😊
You are very welcome 🙂
One of the best how to videos that I’ve seen. I just can’t find the pattern!
Thank you! The link to the pattern can be found on the Flat Fanny Pack page just above the Detailed Instructions Video. It just looks like text, but should be a different color, pink I believe. It says “Flat Fanny Pack Pattern by learncreatesew.” If you click on that the pattern should pop up. Please let me know if you have any other questions!
Thanks for the free patterns of the flat fanny packs. I plan on making the classic ones as well as the flat ones. Could you please tell me where you got the machine embroidery design? Thank you!
You are very welcome! The embroidery pattern was actually one that came standard on my brother embroidery machine. I’m not sure if they sell it separately or not.
I am a chubby lady and the sizes given for the waist straps need to be adjusted. How do I determine the right length for my straps?
Hello! Thank you for your question. Here is a formula that may give you a place to start 🙂
This isn’t exact, but it’s a good estimate for what could work for you! First, determine the circumference you need and then you can select values for the long and short lengths until you find a range that works. I would select a fixed length for the short strap, this is the one that is not adjustable and will determine where the release clasp will be placed. Then you can solve for L or just plug in and check until you find a value that works for you.
Let L = Long strap length
Let S = Short strap length
Approximate Measurements:
Minimum Circumference = 13.5 + S +((L – 5)÷2)
Maximum Circumference = 13.5 + S + (L – 5)
Hope this is helpful!
Happy Sewing!
hello,
What kind of strapping did you use, and how wide are the clips? Thank you, great video!
So sorry for the delay! I use heavyweight polypropylene or polyester webbing. It is 1 inch wide. The clips are also 1 inch wide. Thanks for your question!
I’m printing the pdf for larger/regular pouch, but I only see “back” pattern piece, (C & D) no “front” pattern piece.
Is there a Front? Do I use C & D for front and back? Thank you.
Thank you for your question! Sorry for the confusion, you will use the same pattern piece for the front and the back.
Hi! & Thank you for creating this site and sharing your knowledge and time. I’m making the Flat Fanny pack for my niece. It’ll come in handy when she travels to Epcot/Disney!
I really like the presser foot that you’re using in the video. Can you tell me what machine or brand it is? Thanks!!
I am so glad you like the fanny pack! Thank you for sharing 🙂
The foot I normally use is the general-purpose or straight stitch foot that came standard with my Brother PQ1500SL. It is a straight stitch machine, so no zigzag or anything fancy. It is a simple machine, but I absolutely love it! Many of the attachments and feet are similar to what you would see on an industrial machine.
Thanks!! That looks like a great machine, straightforward and everything you need, nothing you don’t! The Flat Fanny Pack is coming along, I’ll make sure and share a photo, as well as look for another project from your site. Thanks again!!
From one teacher to another, Enjoy your Summer !!
love to make this one
Happy Sewing!
Is there a download for the larger size flat fanny pack?
So sorry for the delay. Unfortunately, I don’t have that pattern in any other sizes. However. while I have never done so, some have suggested that printing the pattern at a larger scale may work.
This is the best instructional video I have come across – thank you! Are there written instructions available?? It would really help with the way I learn new things! (flat fanny pack)
I am glad you enjoyed the video 🙂 Unfortunately, I don’t have written instructions available for this project at this time. So sorry.