
I have been wanting to make a fanny pack for years, and I finally did!
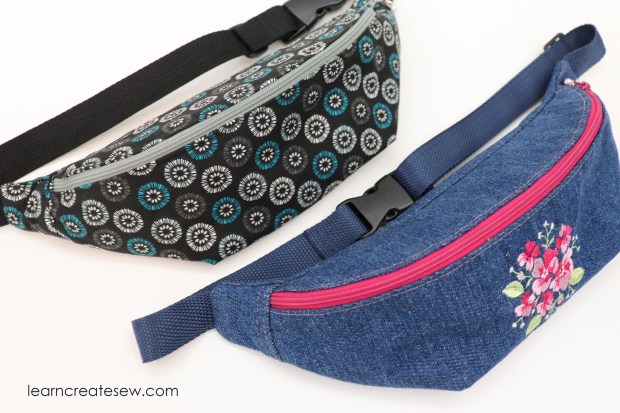
This is a classic fanny pack with a curved top flap. It’s what I always picture in my head when I think of a fanny pack. I made several different patterns before I settled on this one, and it was by far my favorite. It is fully lined, so no raw edges! But you could definitely make it with a single layer if you wanted to.

The waistband is also adjustable.

Since the zipper is on a curve, there is a bit of difficulty, probably a 5/10. If you aren’t as comfortable sewing zippers and think this might be a bit much for you, don’t worry! My next tutorial is a flat fanny pack and the zipper installation is much easier.

The dimensions of the fanny pack are approximately 13.5 inches side to side, 4 inches tall, and the top flap is about 2.5 inches deep. It tapers to a point at the bottom.
Here is the free pattern & my video instructions!
Enjoy!
Classic Fanny Pack Pattern by learncreatesew
Some viewers expressed that they had a hard time printing the top piece of the pattern. If that is the case for you, below is an alternate printable version.
Alternate Print Version of Top Pattern Piece
DETAILED INSTRUCTIONS:
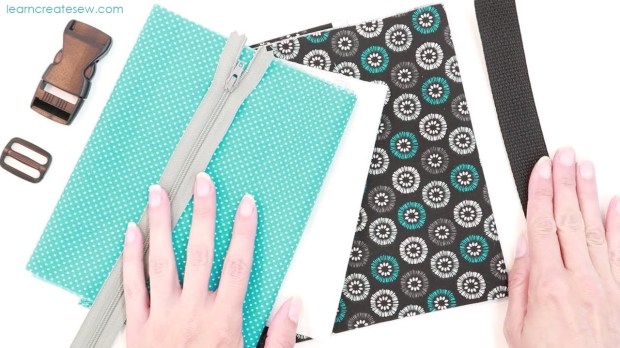
Supplies:
- 1/4 yard main exterior fabric
- 1/4 yard lining
- 1/2 yard of 20″ wide woven interfacing (optional)
- 14 inch zipper
- One side release clasp 1 inch wide
- One tri-glide slider 1 inch wide
- 3/4 yard or more of 1 inch wide strapping (adjustable approximately 28 – 34 inches)
- You will need more strapping for larger waistbands.
Adjusting the length of the straps:
-
- Need help adjusting the size of the strapping? Here is an formula that may help you get a rough estimate of the length needed.
- First, I like to choose the length of the short strap. This is the side that is not adjustable. I usually like this strap to reach to my center back. After selecting that length you can use the formula to find the length of the long strap.
- You can guess and check until you find a long length that works, or for those of you who love algebra like I do, choose a minimum or maximum circumference and then solve for L.
- Let L = Long strap length, Let S = Short strap length
Approximate Measurements:
Minimum Circumference = 13.5 + S +((L – 5)÷2)
Maximum Circumference = 13.5 + S + (L – 5)
The Fanny Pack:
You can use different fabrics for the fanny pack.
Canvas and denim are great for the exterior. You can even use regular cotton fabric, but I do recommend interfacing. I used SF101, but a fusible fleece would probably work good as well.

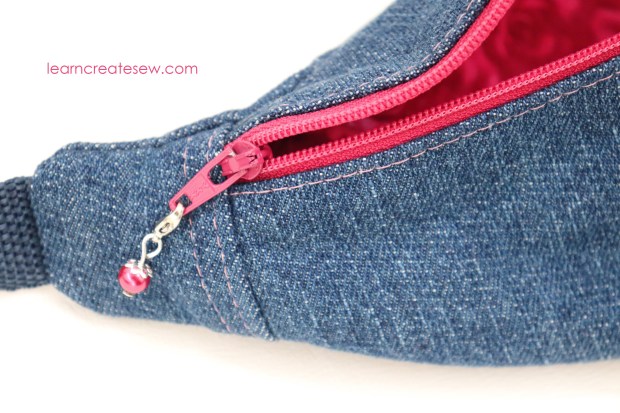
You can use top stitching as a decorative element and to add stability to the bag.

On my denim bag I used contrasting thread so the top stitching would stand out, and two rows on the sides to give it more of a “jeans” feel.
Keep an eye out for my next tutorial and I’ll show you how to make a different style of fanny pack!

I will attempt to sew the classic fanny pack. I watched your entire video tutorial and you are an excellent teacher. Very clear instructions, very pleasant voice and delivery. Thank you!
Thank you so much! I hope it was helpful 🙂
Hi I’m trying to print off your pattern. All pieces print correctly except the top panel. It is cropping off no matter how I print it 😦
Thank you so much for letting me know! I double-checked the patterns but was unable to find any errors. If I have time this weekend I will try to make a pattern with the piece more centered, that does not extend so far to the edge of the paper, which may make printing easier 🙂 Until then, it may be helpful to double-check to make sure the printer is not scaling the image. On my printers, I have to make sure that I select “Actual Size”, “Default”, or “Do Not Scale”. Thanks again! I will reply again when I have the alternate pattern available.
An alternate version of the pattern is now available! It is linked on the Classic Fanny Pack page.
would you have large size of this fanny pack? if not, how would you adjust the pattern bigger?
Hello! Thank you for your question. Unfortunately, I do not have the pattern in a larger size. You could try enlarging the scale of the pattern when you print (or making a copied enlargement of the original). I haven’t tried it before, so I can’t promise success, but I think it would work 🙂 If you do increase the scale you may have to increase the seam allowance size just a smidge as well. I wish you the best of luck!
This is the perfect pattern. Thank you so much for sharing and making yourself available to us. I already have the perfect fabric for this. I’m excited to sew this. I just found you about a week ago, as I was browsing YouTube and then I saw tonight that you had a fanny pack…..awesome. You are an excellent teacher and look forward to seeing more. Thank you again!
Thank you! You are very welcome! Happy Sewing 🙂
I have a question…I know the strapping goes by the size of an individual. I did cut my first piece to the size you mentioned in the flat fanny pack….is there a “rule of thumb” to use to get the correct size. …i.e. waist size divided by something….I hope this makes sense…. I’m almost done with it
Thank you for your question! I will look into it and see if I can write an equation to help calculate the strapping length.
I think I’ve got a rough estimate 🙂 This isn’t exact, but it may give you an idea of where to start.
Let L = Long strap length
Let S = Short strap length
Approximate Measurements:
Minimum Circumference = 13.5 + S +((L – 5)÷2)
Maximum Circumference = 13.5 + S + (L – 5)
Hope this is helpful!
Happy Sewing!
Hello. I made your flat fanny pack and was so happy with it! Thank you for sharing the free patterns. Now I would like to make the classic one and embroider the denim before I assemble it. I know you said that your embroidery design came with your Brother embroidery machine. Could you please measure it and tell me the height and width? I will look for a similar design and would like to place it the way you have yours so that it isn’t too large nor too small. Thank you very much!
Of course! The embroidery on the denim fanny pack measures 2 5/8 inches square. I hope you are able to find something that works for you!
Your pattern for the flat fanny pack doesn’t appear on line. I like your instructions, and would like to make some, thanks, Ginger
Thank you for your comment! I am so glad you enjoyed the instructions. The pattern is on the flat fanny pack page. You can access this by going to the following pages. Free Patterns – Bags & Pouches – Flat Fanny Pack. The pattern is a link, usually in pink, that is just above the detailed instruction video on the website. It says “Flat Fanny Pack Pattern by learncreatesew”. If you hover over that and then click on it the pattern should pop up. If you are still unable to locate it please let me know. Thank you!
Great video. My grandchildren, girls and boys are outdoor people. They want me to make them one so when they go on a little hike they can put a snack bar, money, etc. It’s going to be a challenge but with your video I’m sure I’ll be able to do the zipper. Thank you.
Thank you for sharing! I hope they work out great for you 🙂
What are the amount of fabrics needed for the Classic Fanny Pack, please?
Thanks for your question!
Supplies:
1/4 yard main exterior fabric
1/4 yard lining
1/2 yard of 20″ wide woven interfacing (optional)
14 inch zipper
One side release clasp 1 inch wide
One tri-glide slider 1 inch wide
3/4 yard or more of 1 inch wide strapping (adjustable approximately 28 – 34 inches)
You will need more strapping for larger waistbands.
I’m having trouble with the strap. Wondering how long the webbing needs to be? Also can I use a parachute buckle in place of the side release?
Thanks for your question! Yes, you can use a parachute buckle. The length of the strap can vary depending on how big you want the waistband of the fanny pack to be. For me, I cut the strapping into two pieces 8 and 18.5 inches long, creating a waistband that was adjustable to 28-34 inches. If you need the waistband to be larger or smaller than that you can adjust the lengths as needed. Another method that often works, you can cut the straps so they are larger than you need, clip them in place, and carefully try it on before sewing the straps in place, that way you can adjust them as needed. I hope this helps!
when I made the fanny pack it seemed smaller than you dimensions where smaller than yours. did I not print the pattern right? any thoughts on this?
Thanks for your question! It is a small fanny pack, but if the dimensions on yours were smaller it could be a couple things. The pattern could have been scaled when you printed it. Sometimes printers default to shrink the image to fit on the page or scale the image. On mine, I always have to change the settings to print actual size (or default). To check to see if that was the issue, when I print page 5 the top piece measures 10 and 7/16 inches across the straight top edge. If your pattern was printed the correct size, using a larger seam allowance can also reduce the overall size of the fanny pack. Wish I could be of more help!
enjoy your tutorial very much. great detail and easy to follow. I’m a new at sewing and appreciate all your help.
Thank you for sharing! You are very welcome 🙂
The sizes are so small!
Thank you for your comment! I will keep in mind that a larger variety of sizes would be helpful.
Are there written instructions for this as I do much better with written instructions? thank you
Thank you for your question. Unfortunately, I currently only have video instructions for this project. I will add written instructions to my list of requests. I will let you know if they become available in the future. Thank you!
Do you suggest a 14 inch #5 zipper? I am using metal zippers but would a nylon zipper be durable enough?
Hello! Thank you for your question. I used #3 nylon coil zippers for my fanny packs. I like to use the nylon coil because they are easy to work with and you can stitch over them. I have never had any trouble with them not being durable, but I am also not very hard on my bags. A metal zipper would be really cute! I think it would look very nice, but in this pattern, the 14-inch zipper actually extends a bit beyond the edges of the fabric, only about 12.75 inches of the zipper are actually visible on the outside of the bag, so if you choose to use a metal zipper you may have to shorten it a little. Also, the pattern and instructions were made for zippers with 1 inch wide zipper tape, if your zipper is wider than that it may require some sewing adjustments. A lot of #5 zippers are 1.25 inches wide, which would mean the edge of the zipper tape would hang off the edge of the fabric about 1/8 inch, or the pattern may need to be adjusted slightly. I hope this is helpful! Happy sewing!
How big is the finished product?
Thanks for your question! The dimensions of the fanny pack are approximately 13.5 inches side to side (measured from where the pouch connects to the straps), 4 inches tall, at its deepest point and the top flap is about 2.5 inches deep. It tapers to a point at the bottom. It is on the smaller side as far as fanny packs go.
Hello, thank you for this thorough, well paced instructional video. I made this fanny pack, adjusting the size a little bigger to be able to fit a water bottle. I love how it turned out! The lining was tricky but I’m happy with how it turned out. If I can figure out how to post a photo I will. I also added a zipper pull as you suggested plus a strap keeper for the loose end of the webbing
Thank you so much for sharing! I am so glad you enjoyed the project 🙂
To be clear, one needs to add seam allowances to the pattern pieces so that the finished product corresponds to the pattern pieces as printed. That is, the FINISHED fanny pack is 13.5 side to side. Correct?
Thank you for your question! The pattern includes seam allowance, it is not necessary to add it in. I just measured my finished fanny pack again and not including the strapping it is between 13.25 and 13.5 inches side to side.
Oh! Forgot to mention, just for printing clarification…piece A should be 7.25 inches side to side when printed. Thanks!
I just made this for my barrel chested husband as a crossbody bag and he loves it. Thank you. We could not find anything in the store that would fit him..
He was so impressed, he wondered if I could make more to sell. I didn’t see any disclaimer or disclosure saying I couldn’t but wanted to ask. I would never look to sell your pattern, just bags I made. Thank you
So sorry for the delay! Yes, you are very welcome to sell the bags you make 🙂 I am glad the pattern worked well for you!
Beautiful pattern. Is the pattern printed on standard 8½ x 11 paper, or A4 paper?
The pattern is for 8.5 x 11 paper. Thank you!
Hello and thank you for this pattern I’m getting back into sewing and want to make different size fanny packs and this one looks very interesting. Just wanted to find out is the pattern printed on standard 8½ x 11 paper or is it printed on A4 paper?
I had an issue with another bag coming out smaller than expected because the Creator stated the pattern was to be printed on A4 paper and I used 8½ by 11.
Hello! Thank you for your question. The pattern is intended to be printed actual size on 8.5 x 11 paper. Hope this helps 🙂
Love making this fanny pack. Just thinking about ways to make it larger for some of my heftier friends and family members. I’ll probably add an inch all the way around for each pattern piece.
Thank you so much for this wonderful pattern and it’s easy to follow.
which way do I lay the pattern on my fabric? Do I lay it parallel to the salvage edge or vertical? Thank you.
Hello! Sorry for the delay. The center line of the pattern pieces runs parallel to the selvage. If you refer to the cut layouts, the short side is going the same direction as the selvage. Thanks for asking!
thank you so much for this lovely pattern and your clear instructions. I have just finished making one. My only problem was that when I turned it to the right side at the end my webbing immediately unraveled. I couldn’t bear the thought of unpicking, so just box stitched it on the outside of the lining side pieces
You are very welcome! I am sorry to hear about the webbing. Often, when cutting synthetic webbing I will melt the end with a candle to prevent unraveling. I should have included that in the instructions. I will be sure to do so in the future. Thank you for the feedback!