Learn to Sew Lesson 2: Rice Bags

The second Learn to Sew lesson continues to focus on hand-sewing. Most of the time when we are hand sewing we are not working with felt or yarn. As a result, it is very helpful to practice your stitch size and placement, as well as working with regular all-purpose thread.

3img_1443

Recommended prep before this lesson:
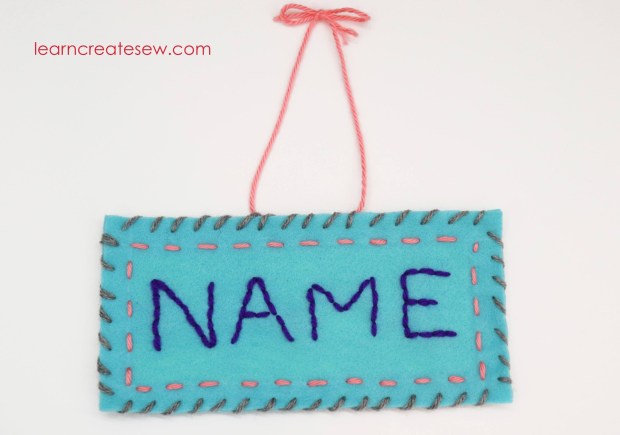
Lesson Category:

  • Hand Stitching

Lesson Topics:

  • Careful Cutting
  • Identifying the Right Side of the Fabric
  • Using a Seam Allowance
  • Double Threading a Needle
  • Tying a knot
  • Sewing a Back Stitch
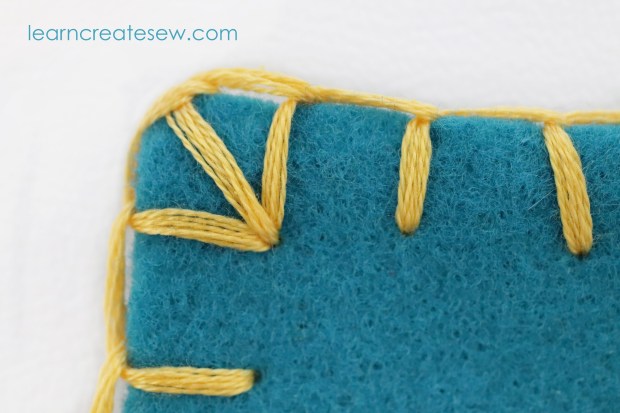
  • Blanket Stitch Applique
  • Stitch Size & Placement
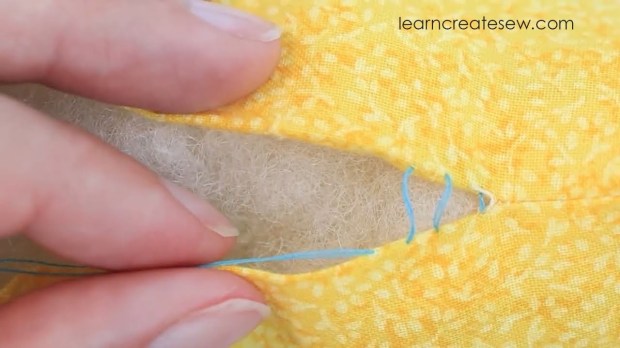
  • Slip Stitch

Whether you have been sewing for a while or are picking up a needle and thread for the first time, rice bags are always a fun project 🙂

1img_1469

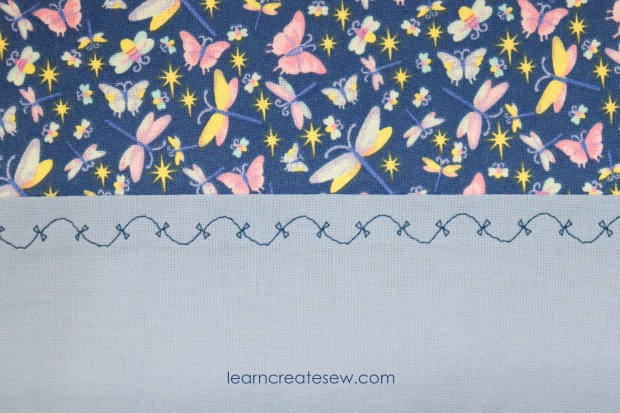
For this project, you get to add decoration of your choice to really personalize your project! Decorative stitching can add dimension to any project and is a great skill to have even when sewing complex projects. These also make great gifts when you are finished.

4img_1462

Supplies:

5.5 x 11 inches of Cotton Fabric

Scrap Felt

1 Cup of Rice

Coordinating All-Purpose Thread

Here is the free pattern:

Owl and Sloth Rice Bag Patterns by learncreatesew

LESSON:

Blanket Stitch vs Buttonhole Stitch

Yesterday I was working on a project that I had hoped to have ready for you today. The project involved a lot of blanket stitching, and as I was in the middle of sewing it I realized that without noticing I would randomly switch how I made the stitch.

It got me thinking…what stitch am I actually sewing? This led me to do some research. Come to find out, the blanket stitch is often confused with the buttonhole stitch. I practiced both for quite a while and as I did so I found a stitching method that worked great for me for both stitches, and allowed me to distinguish between the two.

1img_1647comp

I realized after doing this that I had actually been using the blanket stitch the whole time, I would just every once in a while switch to making the stitch backwards. This wouldn’t have been a big deal if I always did it that way, but going back and forth isn’t the best method. So, I made a consistent routine that helped me keep my stitches uniform. Since this helped me with my sewing project, I thought it may also be helpful to others, and decided to share it with you today.

The Blanket Stitch

The Blanket Stitch is often used for decorative edging, embroidery, and in felt crafts. You can sew the blanket stitch on the edge of fabric for decoration or to join to layers together.

1img_1660

It’s a little tricky at the corners, but not too bad once you know the process.

1img_1661

I most frequently use the blanket stitch for applique. This is when you sew one piece of fabric on top of another, usually for decoration.

1img_1619

The video will explain how to change your thread if you happen to run out or want a different color.

5img_1658

To help me remember the correct way to stitch a Blanket Stitch I think of this…

FRONT to BACK…UP and OVER.

21

The Buttonhole Stitch

The buttonhole stitch is stronger than the blanket stitch. While the blanket stitch hooks over the next stitch, the buttonhole stitch actually wraps around it.

3img_1654

This stitch is not as commonly used, but you do see it in embroidery, as well as actually constructing buttonholes. When making the buttonholes, you don’t leave space between the stitches. You stitch them side by side. This creates a really strong edge with all of the “knots” right next to each other.

To remember how to sew the Buttonhole Stitch I think of this…

BACK to FRONT…AROUND and DOWN.

12

I hope you find this information as helpful as I did! Happy Sewing!

DETAILED INSTRUCTIONS:

QUICK OVERVIEW: Blanket Stitch vs. Buttonhole Stitch

Lace Overlay Face Mask

I just had to give this project a try, I couldn’t help myself. I normally do a lot of costuming, and when I had the idea to branch away from cotton fabrics for the mask I couldn’t resist!

This was a lot of fun to make 🙂 I don’t think it would be my everyday mask, but for special occasions or when I feel the need to be a bit fancy, this mask would be great.

1img_1398

This mask uses my contoured face mask pattern with adjustable ties. I used 1/8 inch ribbon.

1IMG_1371

This mask also has a satin lining. It’s a little bit trickier working with specialty fabrics, but I was really pleased with how it turned out!

Supplies:

These dimensions will work for all sizes. Actual size needed may be smaller if you make a smaller size. Make sure the fabric can be washed and pressed.

About 8 x 15 inches Main Cotton Fabric ( I used satin)

About 8 x 15 inches Lining Fabric (I used satin)

About 8 x 15 inches of Lace

About 8 x 15 inches Interfacing (Optional – I used Pellon SF101.)

Elastic, Ribbon, Bias Tape, or Fabric for Ties

Here is the free pattern:

Contoured Face Mask Pattern by learncreatesew

DETAILED INSTRUCTIONS:

Thanks for Watching!


Sewing Skill Builder: Slip Stitch

I am happy to share with you today my first Sewing Skill Builder video. There are a lot of essential skills in sewing that if mastered, make your projects beautiful and professional looking. However, when those same skills remain a mystery sewing can become a challenge and at times frustrating. In this series I hope share with you essential skills that you can use and build upon as you make projects in the future!

The slip stitch is also often referred to as a ladder stitch or invisible stitch.

The slip stitch is used to close pillows, linings, stuffed animals, and more.

1slip-stitch-skill-builder-1

The slip stitch comes up again and again in sewing regardless if you are making bags, plush toys or garments. Being handy with a slip stitch is extremely useful.

When you slip stitch you are usually joining or closing two folds.

We make our stitches parallel to the folds, essentially hiding the thread inside.

1slip-stitch-skill-builder-2

Your stitches often begin to look like the rungs of a ladder, hence the name.

1slip-stitch-skill-builder-4

Once you pull the thread, the layers will join making the stitching invisible.

1slip-stitch-skill-builder-5

It helps when slip stitching if you use a thin sharp needle. I also like to double thread my needle so I don’t have to worry about it sliding off.

1slip-stitch-skill-builder-3

DETAILED INSTRUCTIONS:

Learn to Sew: Lesson 1: Name Tag Stitch Sampler

Welcome to our Learn to Sew series!

This lesson is the first in a series that will teach the basics of sewing. Through a series of projects and exercises we will learn a variety of skills and techniques that are essential to sewing. We will cover everything from hand-sewing to basic bags and crafts, how to use store bought patterns, and general garment construction.

I look forward to sharing with you all that I have learned! I hope you enjoy these lessons.

Lesson Category:

  • Hand Stitching

Lesson Topics:

  • Using a grid ruler
  • How to select your needle
  • Threading the needle
  • Tying a knot
  • Sewing a Backstitch
  • Sewing a Running Stitch
  • Sewing a Whip Stitch

Whether you have been sewing for years or are picking up a needle and thread for the first time, hand stitching is essential. To learn a few basic stitches we are going to make a Name Tag Stitch Sampler. It’s a great project to begin your sewing experience, and it’s fun to display in your room, or on a shelf or locker.

1img_0565

The backstitch is great for the name. It is a strong stitch and there are no spaces between the stitches.

1img_0555

The running stitch is your most basic sewing stitch, and one that is used in most hand sewing projects. The whip stitch also comes in handy in general sewing.

1img_0558

LESSON:

Dish Towel Apron

A special thank you to my Aunt for giving me the idea for today’s project! This is a cute little apron made from a dish towel. It’s pretty fast to make and doesn’t take a lot of fabric. It is a good way to practice sewing pleats and pockets.

1img_0479

It works best to have a dish towel with a general pattern design, rather than something that is directional, as the towel will be arranged horizontally along the waistband.

1img_0498

The width of the hand towel is adjusted using pleats to give the apron a skirt like feel.

1img_0493

It also has a good sized pocket that fits a cell phone and more.

1img_0512

This project was a lot of fun to make! It’s also pretty simple compared to many aprons. The only difficulty really lies in working with the terry cloth itself. I would rank this project a 3/10 for difficulty.

Supplies

1/3 yard cotton fabric (Fabric may shrink in the wash. I like to purchase a few extra inches just in case.)

1 dish towel

1/4 yard lace trim (optional)

1/2 – 1 yard fusible interfacing (optional)

Coordinating Thread

Here is the cut layout if you need it.

Dish Towel Apron Cut Layouts by learncreatesew

DETAILED INSTRUCTIONS:

QUICK OVERVIEW:

Flat Zipper Pouch

This is a classic zipper pouch! It is a great project to start sewing zippers if you want to learn. These make great pencil bags. They are also fun to fill and give as gifts.

1img_0415

This is also a fun project to use decorative stitching on. I love adding a cute stitch to the contrasting bottom panel.

2img_0355

This is a flat pouch, kind of like a pencil pouch. So, it does not stand up on its own.

1img_0386

That said, it still holds quite a bit!

1img_0387

You can easily adjust the size of the rectangles to make the bag as bid or small as you would like.

The bag I made has final dimensions of approximately 6 x 9 inches.

Supplies

Two 7 x 10 inch rectangles for the lining fabric

Two 7 x 10 inch rectangles of lightweight fusible interfacing (optional)

Two 4.5 x 10 inch rectangles for the outside TOP fabric

Two 3.5 x 10 inch rectangles for the outside BOTTOM fabric

One 11 inch Zipper

Here is the free pattern if you would like it.

Flat Zipper Pouch Pattern by learncreatesew

DETAILED INSTRUCTIONS:

QUICK OVERVIEW:

Needle Book

This is a cute fun little project. It is super fast to make, and handy to have around the sewing room, especially if you do a lot of hand sewing. These also make really cute gifts.

1img_0209

It doesn’t take much fabric, so it is a good way to use up your scrap fabric!

1img_0286

I love the little pockets. You can store thread, needle threaders, needle grips, and even tiny travel scissors.

This book measures approximately 3.5 x 2.625 inches when finished.

Supplies:

Scrap Cotton Fabric (or 1/4 yard)

Felt

12 – 14 inches of narrow ribbon (I used 1/4 inch wide)

Featherweight Fusible Interfacing (optional)

Cotton Batting (optional)

Here is the free pattern:

Needle Book Pattern by learncreatesew

DETAILED INSTRUCTIONS:

QUICK OVERVIEW:

Fun Size Backpack Tutorial Part 2 Now Available

I finished the instructions to the backpack!

1img_0140

I hope you enjoy making this project! I have added a quick overview as well if you just want a peak at the project.

DETAILED INSTRUCTIONS PART 2:

QUICK OVERVIEW:

Free Pattern:

Please note: This pattern has been updated. There was an error on the original pattern. The bottom pocket gusset should measure 12.75 inches in length. Sorry for the inconvenience!

Fun Size Backpack

I absolutely LOVE this backpack! This is my favorite size backpack to take to amusement parks. At 9 x 11 inches it is smaller than regular sized backpacks, but large enough to hold a lot. I’ve stuffed this thing with water bottle, snacks, extra sweatshirt, wallet, keys, notebook, first aid kit, and more. However, it’s not so big that it gets too heavy, as regular sized backpacks can.

It even fits in a lot of the ride compartments at Disneyland. That is it’s best feature in my book!

3img_0172

It is constructed with a layer of cotton overlaying duck canvas. I used bias tape to bind the seams.

1img_0090

I’ve made six or seven of these bags using a variety of fabrics and interfacing. I’ve used vinyl, suede, plain canvas, fusible fleece, and even satin. The cotton covered canvas, with woven interfacing is my favorite combination! It is nice to work with, strong without being bulky, and holds its shape very well.

3img_0056

I love the pocket in front. While it takes patience to construct it’s not too difficult once you know the method.

1img_0039

This bag also has adjustable straps depending on how you like to wear your backpack.

Supplies Needed:

1/2 yd 41” wide Main Cotton Fabric
42 inches 19” wide Interfacing (I used Pellon SF101)
3/8 yd 58” wide Canvas (I used duck canvas from JoAnn)
One 20 inch zipper
One 13 inch zipper

1 pkg Extra Wide Double Fold Bias Tape
75 inches 1” wide Strapping
Two 1” wide Rectangle Rings
Two 1” wide Tri-glide adjusters
One “Handmade” Metal Tag (Optional)

This project takes a bit of time and patience when working with multiple pieces, zippers, curves, and interfacings. Difficulty 7/10.

Approximate Finished Dimensions (inches):

Main Compartment 9 x 3.75 x 11, Pocket 7 x 1.5 x 5.75

DETAILED INSTRUCTIONS: PART 1: Fabric, Zippers, Pocket

DETAILED INSTRUCTIONS: Part 2: COMING SOON!

Free Pattern:

Please note, this pattern has been updated. There was an error in the first version of the pattern, the bottom pocket gusset piece should measure 12.75 inches in length. Sorry for the inconvenience!